
Welcome to Automate#
Overview#
Automate allows you to easily onboard customers and end users with collaboration services. The fulfillment procedures to achieve this objective may involve administrators at the provider, reseller, customer, and site levels of the hierarchy.
This guide provides information about provisioning Automate, including provisioning steps and interactions between Automate and the UC applications of vendors that Automate supports. This guide also describes user and subscriber management, including LDAP-related move and push operations.
This documentation includes several flowcharts to provide an overview of specific features and workflows for Automate. See the index (f) for a list of these flowcharts.
Related topics
Multi vendor support#
Automate supports provisioning and management of all unified communications (UC) applications, across multiple UC vendors (including Cisco, Microsoft, and Avaya), as single or multi vendor deployments:
Vendor |
Solution |
Microsoft |
See Introduction to Microsoft UC Integration in the Core Feature Guide. Provides a single, integrated, synchronized interface for managing the existing Microsoft Teams collaboration service, through the web portal, bulk-loading, or the REST API.
|
Cisco |
Provides for customized UC app management via the following capabilities:
|
Avaya |
Manage Avaya enterprise voice, extended into Microsoft Teams. |
Related topics
Accessibility#
Automate supports Web Content Accessibility Guidelines (WCAG) 2.1 Level AA. A full Voluntary Product Accessibility Template (VPAT) report is available from your account team.
To support accessibility, when using keyboard navigation, a black bar is enabled above the toolbar. When the cursor is in the URL box and the Tab key is pressed, this bar is displayed and has three menu items corresponding to three areas of the main user interface:
Home screen |
From any form on the interface, return to the main user interface. This is equivalent to the Home button on the main toolbar, and can, for example be accessed by means of a screen reader shortcut. |
Skip to content |
On the main user interface, move the focus to the dashboard menu items. Press <Tab> to move the focus to the first dashboard link. |
Skip to navigation |
On the main user interface, move the focus to the menu bar. The first menu item receives focus. |
The table provides examples of features in Automate that are assessed for accessibility to support users with disabilities, including those who require assistive technologies, such as users who are unable to use a mouse, or those who are visually impaired:
Setting |
Description |
|---|---|
Title display in the browser |
When choosing a menu option in the Admin Portal, the title displays in the browser to give screen reader users an overview of the page and to help them to move between open pages in their browser. |
Buttons and images have alternative text |
Buttons and images have accessible names and can be read by screen readers. For example, paginator buttons that allow a user to navigate to the first, next, previous, and last page on a form. The alternative text displays when the mouse pointer hovers over an image. Visually impaired users who are using screen readers can hear the alternative text read out. Users who have turned off images to speed up downloads or to save bandwidth can view the alternative text. |
Heading elements appear in a sequentially-descending order |
Headings are properly ordered and do not skip levels. This conveys the semantic structure of the page, making it easier to navigate and understand when using assistive technologies. For example, the Login page contains a level-one heading, and landmarks for the logo, input fields, and labels. |
Elements meet minimum color contrast ratio thresholds and can be changed |
Low-contrast text is difficult or impossible for many users to read. While some people need high contrast, for others, bright colors (high luminance) are not readable. A Chrome plugin can be installed (on the Chrome browser), which allows the user to change the default colors on a page. |
Zoom capability |
VOSS Automate supports zooming without losing any information or functionality. |
Keyboard access and alternative visual focus |
Many people cannot use a mouse and rely on the keyboard to interact with the Web. People who are blind and some sighted people with mobility impairments rely on the keyboard or on assistive technologies and strategies that rely on keyboard commands, such as voice input. In a browser that supports keyboard navigation with the Tab key (for example, Firefox, IE, Chrome, and Safari):
|
ARIA roles have allowable attributes |
|
Setting |
Description |
|---|---|
Dynamic forms |
|
Breadcrumb navigation elements |
Breadcrumbs have machine-readable labels to allow those using assistive technologies to understand the site structure, to facilitate navigation, and to provide context for their current location. |
Pop-up dialogs |
Form elements have accessible labels that properly identify the element, for example, a screen reader is able to announce a Close button as well as the header and content text on Confirmation dialogs and other messages, and on Search and Hierarchy pop-ups. Relationships between parent/child elements can be determined, for example, in the hierarchy tree. |
Compatibility#
Prior to install or upgrade, it is recommended that you review the latest Automate Compatibility Matrix for details on supported browsers and applications for your version.
Unicode limitations#
Automate supports unicode characters only in the following fields:
User Information
Description
Contact Information (Address, City, State, Postal Code, Country, Extended Name, External Customer ID, Account ID, and Deal IDs)
Phone Label
Conventions used in this guide#
Formatting conventions#
The table describes formatting conventions in the Automate documentation:
Component |
Formatting |
|---|---|
UI buttons and labels |
Uses the same capitalization as displayed in the user interface, formatted bold. |
Dashboard, menu, and page names |
Formatted bold |
Asterisk ‘*’ after field name, e.g. Userid * |
Indicates that the field is mandatory. |
Badges#
Automate Help topics typically display one or more badges (below the topic title) to indicate that the Help content is relevant only to a specific deployment type (Enterprise or Provider), admin level (for example, Customer admin, HCS admin, or Provider admin), or vendor (for example, Microsoft or Cisco, hybrid or multi-vendor).
Note
Badges are typically used only for exceptions, that is, where functionality is available only for a specific deployment type, vendor type or vendor configuration, or where you must log in with a specific admin role.
Deployment badges
- Only in the Provider deployment
Indicates that this functionality is only available in Provider deployments.
enterprise-only
Indicates that this functionality is only available in Enterprise deployments.
Vendor support badges
- Only for the Microsoft configuration.
Indicates that this functionality is relevant for Microsoft.
- Only for the Cisco configuration.
Indicates that this functionality is relevant for Cisco.
Vendor configuration badges
hybrid
Indicates that this functionality is relevant to hybrid vendor configuration.
multi-vendor
Indicates that this functionality is relevant to a multi vendor configuration.
Note
If no vendor configuration badge is used, assume single vendor, for example, Microsoft-only environment.
Admin role badges
Admin login roles are listed in order of highest access level to lowest access level. Provider and Enterprise admin are at the same level.
You can find more information about Automate roles and access levels in Introduction to role-based access control
sys-admin
Log in as sysadmin.
hcs-admin
Log in as HCS admin.
reseller-admin
Log in as Reseller admin.
provider-admin
Log in as Provider admin.
enterprise-admin
Log in as Enterprise admin.
customer-admin
Log in as Customer admin.
site-admin
Log in as Site admin
self-service-admin
Log in as Self-service admin
Context-sensitive Help files#
The Automate Admin Portal ships with context-sensitive help files, which are associated with the relevant menu via the model type (visible in the URL).
The example shows the Configuration Templates page, the model type in the URL (data/ConfigurationTemplate), and the Help file topic title, Configuration Templates.
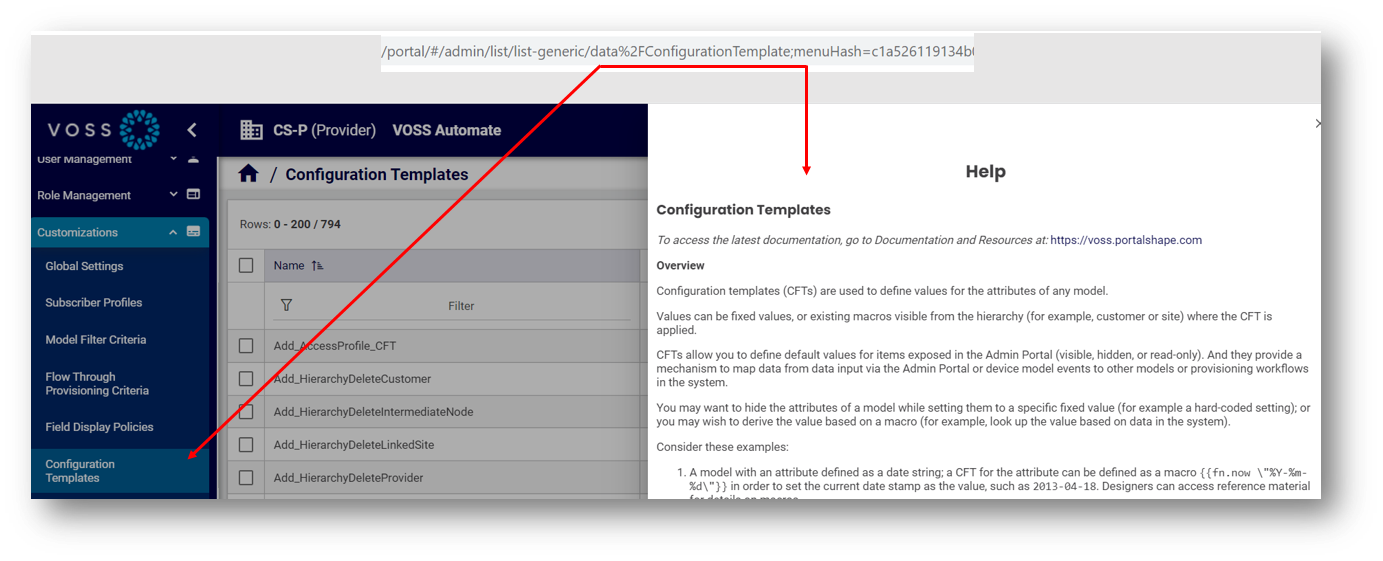
In addition to the help topic content, which may describe the feature, provide a task description, and additional details for the user interface, a default, auto-generated description is provided for the model. These model details may be further refined (filtered) via field display policies applied to the menu.

Where models are associated with two or more menus in the user interface, the help file may be a general topic for the model type, or the context of the help file that displays may relate only generally to the menu you’re working with. In this case, it is recommended that you view the latest documentation for the menu or feature via the Documentation website via a link at the top of the context-sensitive help or via the Documentation and Resources tab at: https://voss.portalshape.com
For example, the data/File model is associated with the following menus:
Audit Report Files
File Management
Manage Greeting Files
MS-Teams MP3 Files
MS-Teams WAV Files