
Cisco UCM users#
Overview#
This topic describes the user management functionality for Cisco Unified Communication Management (Cisco UCM) users.
From 21.4-PB5, Automate ships with two management page layout options for Cisco users in the Automate Admin Portal, each with their own look and feel, and with different levels of detail included on the forms. These layouts are accessible via two User menus in the Cisco User Management menu group:
The table describes the models associated with each of these layouts:
Model |
Menu |
Description |
|---|---|---|
|
Cisco Advanced User |
This page layout will be familiar to users of the Classic Admin GUI and who wish to retain the look and feel of a Cisco, single vendor view of the page when upgrading to Automate 24.1. |
|
Cisco UCM Users |
Provides a user-friendly panel layout, with features such as quick actions, and graphical icons for phones and services. |
Important
The two menu/layout option is available in the Automate Admin Portal. The Classic Admin GUI is deprecated from v24.1.
Customers upgrading to Automate 24.1 and who wish to retain the familiar look and feel of the Cisco User
layout of the Classic Admin GUI may want to use the relation/Subscriber model for their Cisco users.
See Cisco Advanced User menu.
You can view, add, update, or delete users via the list views and user management pages for either of these menus. It is recommended that you choose one or the other of these page layouts to use in your environment.
Related topics
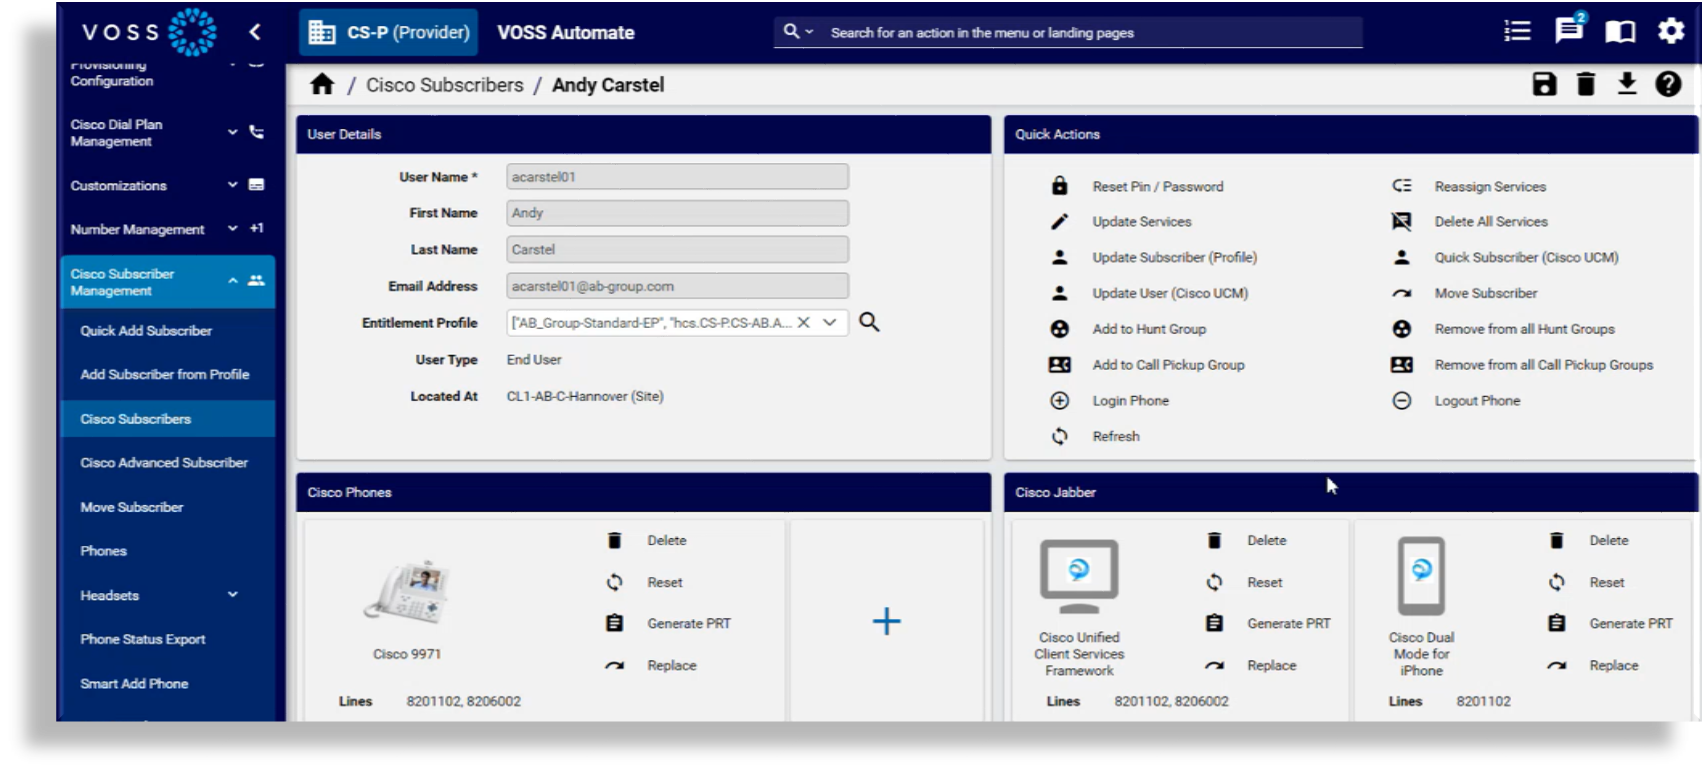
Cisco UCM Users menu#
The Cisco UCM Users menu uses the relation/Subscribers model in the Admin Portal, and uses a
multi vendor user field display policy. Viewing a user via this model
provides a user-friendly panel layout, and features such as quick actions, and graphical icons for
phones and services.
The image shows the look and feel of the management page layout of a user accessed via Cisco UCM Users in the Admin Portal:
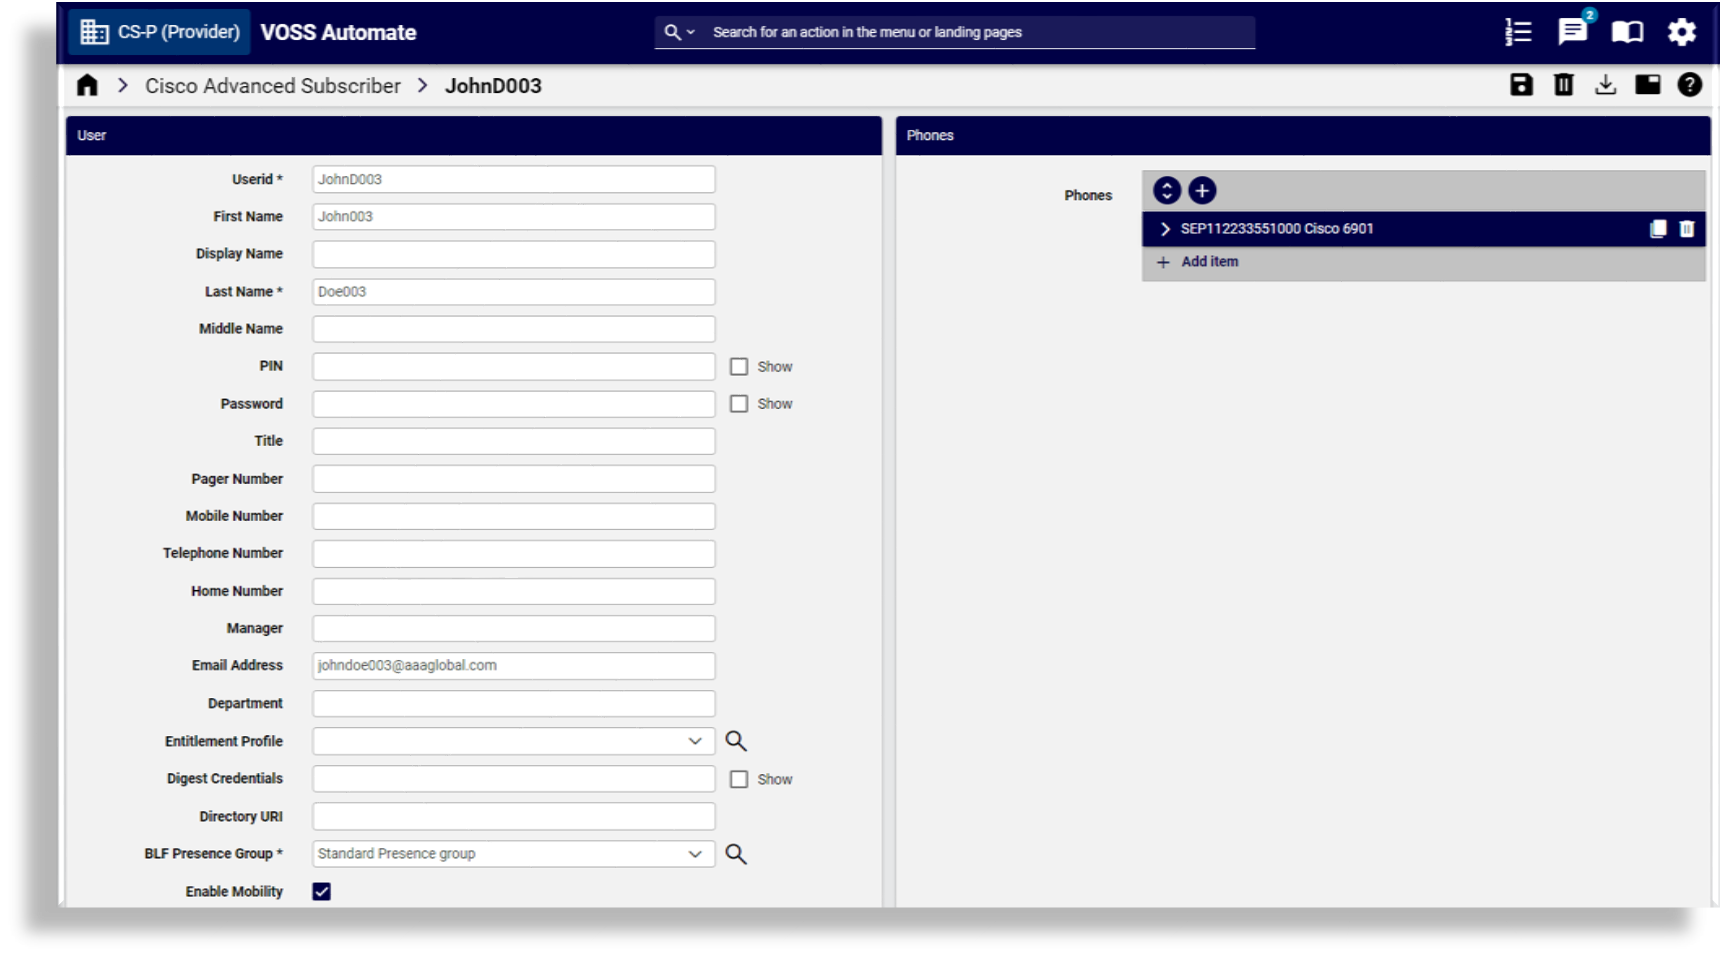
Cisco Advanced User menu#
The Cisco Advanced User menu is associated with the relation/CiscoSubscriber model in the Admin
Portal. Viewing a user via the list view for this menu provides a Cisco-centric user
management page layout that may be preferred by users familiar with the older,
Automate Classic Admin GUI in a Cisco-only (single vendor) environment.
You can view this page as a tab or panel layout (and switch between these layouts via the Switch to Panel/Tab Layout toolbar icon).
This menu and model must be set up using a custom menu path associated with relation/CiscoSubscriber.
Cisco Advanced User panel layout
The image shows the look and feel of the management page layout of a user accessed via the Cisco Advanced User menu in the Admin Portal, using a panel layout:
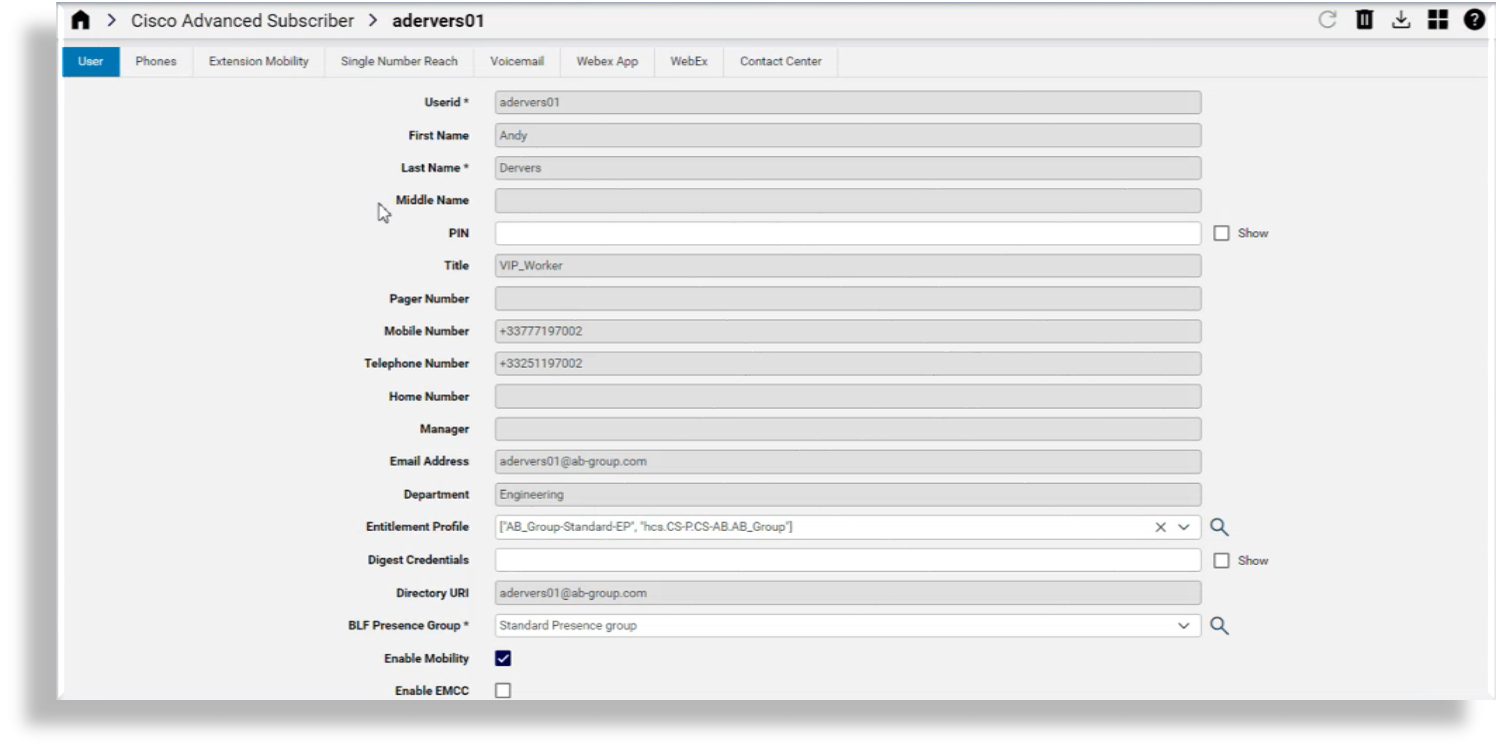
Cisco Advanced user tab layout
The image shows the look and feel of the management page layout of a user accessed via Cisco Advanced Users in the Admin Portal, using a tab layout:
View Cisco users#
In the Admin Portal, you can view a summary list of Cisco users (at the current hierarchy and down), which includes details of each user’s currently provisioned services, grouped by vendor.
To view the Cisco user list view in the Admin Portal, either of the following options, depending on your setup:
Environment |
Steps |
|---|---|
Single vendor environment (Cisco) |
Either of the following:
|
Multi vendor environment (which includes includes Cisco users) |
Go to Multi Vendor Users |
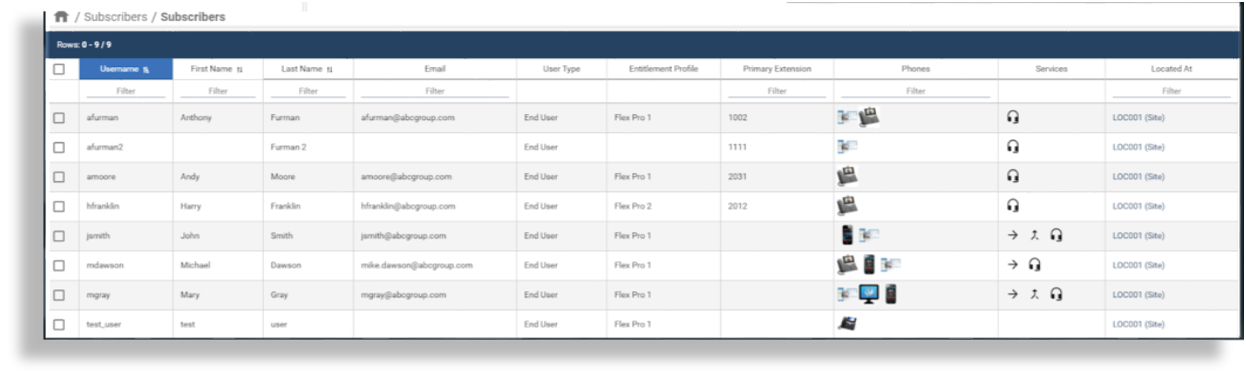
The table describes columns in the Users summary list - you can click on a user in the list view to open its management page:
Note
The list view is the same for both the Cisco Users menu and the Cisco Advanced Users menu.
Column |
Description |
|---|---|
Username |
The username associated with the user. |
First Name / Last Name |
First name and last name of the user. |
User’s email address. |
|
User Type |
The type of user, either Admin, End User, or End User + Admin (associated with their user role. |
Sync type |
How the user is synced in to Automate, for example, UCM, LDAP, Local (the source application of user data.
As for User [1] |
Entitlement Profile |
The name of the entitlement profile associated with the user. |
Primary Extension |
The user’s primary extension number, as selected from the Pattern drop-down list when adding the user. For Multi Vendor only, the line extension used as the primary line (a pre-allocated administrator line, and associated E164 number). |
Phones |
Displays all phones associated with the user at the current hierarchy and below. |
Services |
Displays all services associated with the user, one or more of the following:
|
Located At |
Displays an abbreviated version of the hierarchy showing the lowest point in the hierarchy. The hierarchy type is shown in brackets. When filtering on this column, only use text outside of brackets in the criteria. For example, “SiteName (Site)”, where (Site)= the hierarchy node type, only use the “SiteName” portion in the filter criteria. |
Note
Other user details that may be available in the list view or when adding or viewing a user’s:
Role - user role, typically a Self-service user role
Auth Method - as for User [2]
Collaboration - multi vendor users only; the user’s messaging services, for example, WebEx, MS Teams, Zoom
Webex App - whether the user is enabled for Webex App
Contact Center - if enabled, the contact center agent’s Team and extension, if the user is an agent
Device - IP address or hostname
Add a user#
This procedure adds a Cisco UCM user in Automate.
Note
If Enable CSS filtering is enabled at the customer dial plan, available calling search spaces includes only those marked as a Class of Service on the Class of Service page at the particular site. If another CSS is required, you can add custom CSSs in a CSS field if you know the exact syntax.
If Enable CSS filtering is disabled, the list of available calling search spaces includes all CSSs that are configured on Automate. [3]
Log in to the Admin Portal as Customer admin or Site admin.
Note
Only a subset of the fields described in this procedure are visible for Site admins.
Go to Cisco Users or Cisco Advanced Users.
If you’re logged in as Customer admin, choose the site where you want to add the user.
On the Users list view, click the Plus (+) icon.
Configure user details on the form:
User
Phones
Extension Mobility
Single Number Reach
Voicemail
Webex
Webex App
Pexip Conference
Contact Center
Click Save.
Repeat this procedure to add another user.
User settings#
The User tab/panel defines the user details of an Automate user you’re adding or updating.
Note the following:
Only alphanumeric characters are allowed.
For Cisco users, available entitlement profiles are imported from Cisco UCM.
When choosing an existing device (phone) to associate with a user and then saving the form, the Phones component is populated with the phone details.
When adding a LDAP user as a user, Password fields are hidden, and Enable Mobility is enabled by default, when any of the following is included or added:
A remote destination phone
Mobile identity for a phone
Remote destination profile (RDP)
If user self-provisioning is set up (allowing users to add their own smart devices, such as company or personal phones), and Enable Mobility is disabled (checkbox cleared), then the setting is enabled when users add a company or personal phone via the Self-service interface.
To enable Extend and Connect in Automate:
On the Users tab/panel, select Enable Mobility.
Add the following three groups of users:
Standard CCM End Users
Standard CTI Enabled
Standard CCM Admin User
For users entitled to Webex App, you can add a standalone Webex Apps user by completing the following minimum fields on the User component, then go directly to the Webex App component: Userid, Last Name, Email Address
To provide access to EMCC (only customers configured for EMCC), select Enable EMCC.
The group you choose in BLF Presence Group (configured in Cisco Unified Administration), specifies destinations the user can monitor.
Note
BLF Presence Group authorization works with BLF Presence Groups to allow or block presence requests between groups. The Busy Lamp Field default is set according to the selected number and specifies the Standard Presence Group that is configured with installation.
For Primary Extension, the pattern you choose specifies the lines available to the user. Your choice displays in the Primary Line column on the Users list view.
User Language and Role is set up in the Site Defaults of the user’s site hierarchy. If this is not specified, hierarchy defaults apply.
Phones settings#
On the Phones tab/panel you can add or update a user’s phone.
To add a phone:
On the Phones tab/panel, click Add.
Provide a device name, description, product type, device protocol, phone button template, and device security profile.
Note
Values for the following fields are dynamic, and change based on options selected in associated fields.
Product Type
Device Protocol
Phone Button Template
Device Security Profile
For example, when adding a device name with the product prefix and MAC address, a 79XX-type phone has device name ‘SEP’ prefixed, while ATA-type phones have ‘ATA’ prefixed to the MAC address. Field validation and tooltips provide guidance when you select the product type.
Note that the device names for hard phones have prefix SEP or BAP, depending on device type.
The phone type must support the protocol, or it defaults to the protocol option set up in the site defaults. Some phone types support multiple protocols (for example, Cisco 7960 with SCCP and SIP), and some phone types support only one protocol (for example, Cisco 9971 with only SIP). See Site defaults
Click Save.
Consider the following when adding a phone:
You can override the Phone Button Template value. Either choose another option, or type in a custom value. The value is applied on Unified CM if the Unified CM allows it for the phone type.
Modify phone-specific settings, such as DND Option, Do Not Disturb, and Hot Line Device.
Note
Available phone settings depend on the selected product type (phone type), the device protocol (for example, SIP or SCCP), and the Field Display Policy (FDP) applied by the administrator.
You can choose a Mobile User ID Name from the drop-down list when a Dual-Mode Phone for Android or iPhones is selected. This associates the selected user to the Mobile Identity feature on this phone and must match the Userid added on the User component.
Advanced settings fields are updated automatically for the phone based on the phone type. The phone is automatically associated to the user and is then displayed as an associated device for the user after you save.
When associating a phone that is also associated with another user, the Owner User ID defaults to the first user.
Line assignments are added in the Line section:
The Pattern field only shows lines with status Available or Used.
Pattern options in Route Partition Name are based on the selected partition selected. You can type in a custom pattern value.
Enduser - identifies the user for Presence; you can add a new User ID
Note
Automate adds the user first and then adds the User ID.
Speed dial information is added in the Speeddial section. Available options depend on the selected Phone Button Template.
Busy lamp field information is added to the Busy Lamp Field section. Options include:
Position
Label
Blf Destination
Add busy lamp field directed details in the Blf Directed Call Park section. Values depend on the values on a valid Directed Call Park on Unified CM.
Specify add on modules (if any) in Add On Module. The phone type must support the model you choose. Leave Load Name blank, unless you want to overwrite the default.
Add a valid IP phone service subscription to the phone, in the Services section:
Choose the IP phone service from the Service Name field.
Note
Subscribing a phone or a device profile to a service auto-populates the URL field in Services. To populate this field, when a service is added or updated the system retrieves the URL and a custom parameter (if any) from
device/cucm/IpPhoneService.To add the service to the device, add a number as the Uri button index to the Url Button Index field. If you don’t add a number, only the service is added.
In the Mobile Identity section, configure mobile identity details when selecting a Dual-Mode Phone.
These fields are auto-populated from the Device Name field: Name, and Dual-Mode Device.
Choose a mobility profile.
Mandatory. Specify a value for Destination Number. This option determines the destination number that is dialed when a call is made to the dual-mode phone.
In the Remote Destination section, to configure your remote destinations when a Dual Mode Phone or Cisco Spark Remote Device is selected as the Product.
Note
Remote destinations represent the mobile (or other) phones that are able to accept transfer from the desktop phone and can be used to initiate calls. Set the Pattern for the Line Association to the Route Partition name. If you enter more than one Pattern and the new Pattern is not on the system, enter the Route Partition Name manually. The Owner User Id and Dual Mode Device Name fields are auto populated.
When a CTI Remote Device is selected as the Product, a CTI Remote Destination section replaces Remote Destination. This allows you to configure your remote destinations specifically for a CTI Remote Device. The Owner User Id and CTI Remote Device fields are auto populated.
In the Vendor Config section, view and edit the configuration settings for each device. Available configuration settings depend on each product type chosen. Update the settings as required.
Note
The administrator password from the
AdminLoginDetailsin UCM is not stored in Automate. Data in Automate obtained from UCM.Automate cannot disable the
Override Enterprise/Common Phone Profile Settingssetting once this check box is enabled in the UCM GUI. This setting may be disabled on UCM (if required).
Related topics
Headset settings#
The headset can be connected to a device associated with a user, so that the Connected Device Name reflects this device. The available headset details are:
Headset Serial Number
Headset Model
Connected Device Name
Connected Device Model
Headset Connection Status: for example “Connected”.
Extension Mobility settings#
The Extension Mobility component configures a user’s extension mobility settings.
Consider the following:
Only one EM Profile can be added for extension mobility in Automate. If a user is associated with more than one EM profile on the Cisco UCM, and you sync with Automate, both will be displayed:
on the user’s EM component (this component)
on the Extension Mobility list view (see Add an extension mobility profile).
Values for the following fields are dynamic, based on selections in associated fields:
Product
Protocol
Phone Button Template
Note
For details of configuration options on this component, see the descriptions for the Phones component. The exception is remote destination information, which is not relevant for extension mobility.
Ensure that you associate the extension mobility profile and target phone for login with the extension mobility service.
If the Enable Extension Mobility Cross Cluster (EMCC) feature is enabled on the User settings, you must choose a CSS for this device from the Extension Mobility Cross Cluster CSS drop-down. The selected CSS is used as the device CSS that gets assigned to the phone when the user logs in to this remote phone. New CSS’s or existing CSS’s can be added or modified in Cisco UCM. Refer to the Cisco Unified Communications Manager Features and Services Guide for more details if required.
See also Add an extension mobility profile to add or edit an extension mobility profile, and associate it to one or more users.
Single Number Reach settings#
On the Single Number Reach settings, note that you cannot add more than one Remote Destination Profile for Single Number Reach. However, you can add more than one Remote Destination Rdp.
To enable Extend and Connect in Automate, first complete the following task:
Select the Enable Extend and Connect checkbox.
Select the CTI remote device that you created from the CTI Remote Device Name drop-down list.
Voicemail settings#
The Voicemail component configures the user’s voice mail service, provided a valid Cisco Unity Connection server is available.
When configuring voicemail:
PIN and Password can be left blank. In this case, the default credential policy on the Cisco Unity Connection is used.
If the user on Cisco Unity Connection is LDAP integrated, the Password field is visible but should be ignored.
The Voicemail Line drop-down list only shows lines with status ‘Available’ or ‘Used’ that are not already configured for Voicemail.
Note
The Cisco Unity Connection (CUC) server uses this line as a caller ID, so you should set it to the user’s default line.
When adding Voicemail for a user, all Call Forward To Voicemail checkboxes, except Call Forward All, are enabled on the chosen Line, and the Voicemail Profile setting will be set based on the Site Default Doc setting “Default UCM Line Voicemail Profile” (Line Defaults).
WebEx settings#
The WebEx component configures the user’s Webex details, if a valid server is available. The mandatory fields on this component are populated with the values entered on the User settings.
Note
Any updates on the User settings don’t update these values; values are populated only during the Add workflow.
Webex App settings#
The Webex App settings add a Webex App User and enables a user’s services and roles.
Consider the following:
Webex App is only available when:
A Webex App Service has been created at the required customer level (see Webex Application Access (Webex Organization))
Webex App is enabled in the Entitlement Profile associated with the user.
The following fields are read only and cannot be edited:
Login Enabled
Invite Pending
On-Prem UCM Calling Service (managed automatically by the Webex driver)
Assigned Licenses can be selected from the available licenses on the Webex App service.
Once you have successfully added the user as a Webex App user, the Webex App column displays status Enabled for this user.
The user’s e-mail address is required to enable Webex App for the user.
Pexip Conference settings#
The Pexip Conference component adds and configures the user’s Pexip services.
Consider the following:
The Pexip Conference component is only available if a Pexip Conference service has been configured at the required hierarchy (via the Quick Add Group).
Conferencing must be enabled in the entitlement profile associated with the user.
Once a user is successfully added as a conferencing user, you can view the service as an enabled service in the Conferencing column on the Users list.
Contact Center settings#
On the Contact Center settings, you can add, remove, or update CCX agent capabilities for a user.
See also: Contact Center
The Contact Center settings display only if these conditions are met:
CCX device has been added and is available to the hierarchy.
Contact Center Service is configured and available to the hierarchy.
Contact Center is enabled in the entitlement profile associated with the user.
For the agent:
Since CCX restricts the use of special characters, these are restricted in the Alias.
Team, Resource Group and Skill names need to be set up or synced from the CCX device before they can be assigned.
Automatic Available is enabled by default.
An IPCC extension is automatically managed for the Unified CM user associated with the Contact Center Agent.
You may change the agent’s Controlled Device to one that is already associated with the user.
Update a user#
This procedure modifies settings for one or more users.
Log in as a Customer or Site administrator.
Note
Only a subset of fields described in this procedure are visible to Site admins.
Choose the relevant site.
Go to Cisco Advanced User, or Multi Vendor User
Click on the relevant user to open their settings.
Make the changes you require. For details, see Add a user.
Note
You can add one or more phones.
If Extension Mobility is associated with more than one user, it will not be removed when removing it from one user.
Phone line settings can be edited directly on the Users page.
Expanding the Line section of a Phone or Extension Mobility Profile displays a link directly to the line editing form. Once you’ve saved your changes, the User edit page re-opens.
If your menu layout has more than one entry for
relation/LineRelationand associated Field Display Policy, the link for the line edit applies to the first one found (searching from top to bottom) in your menu layout (if available).
Save your changes.
Note
Filtering on the following columns on the Users list view is described in more detail below:
Located At
Displays an abbreviated version of the hierarchy showing the lowest point in the hierarchy. The hierarchy type is shown in brackets. When filtering on this column, do not use text included inside the brackets in the filtering criteria. For example: “SiteName (Site)”, where (Site) = the hierarchy node type, only search using the “SiteName” portion of the field.
Device
Allows you to filter on IP Address or Host Name.
Phone
When filtering on this column, results include all phones at the current hierarchy, and below, regardless of the Phone column in which they reside.
On saving a user, workflows will execute which will synchronize the user with its associated application: LDAP(top-down), Webex, UCCX, etc.
Deleting users#
Overview#
Users are deleted via Cisco User / Cisco Advanced User.
The system performs various actions when deleting a user via User Management. These actions depend on the user type and the user’s device associations.
User types
User types |
Description |
|---|---|
Non-LDAP synced users |
|
LDAP integrated at Automate users |
|
LDAP synchronized users |
|
User associations
Users can have no device associations, or they can be associated with devices such as the following:
Phones
Extension mobility
Single Number Reach (SNR)
Voice mail
Webex
Automate actions when deleting a user
The system performs these tasks when deleting a user via the Users page, depending on the user type and whether the user has associated devices:
User Type |
With Devices |
Without Devices |
|---|---|---|
Non-LDAP Synchronized Users LDAP Integrated at Cisco Unified CM Users |
Deletes all devices:
Deletes the Provisioning Status. |
Deletes the Provisioning Status. |
LDAP Synchronized Users |
Deletes all devices:
Deletes the user from Cisco Unified CM: device/cucm/User Removes the Cisco Unity Call Manager from the Provisioning Status. |
Deletes the user from Cisco Unified CM: device/cucm/User Removes the Cisco Unity Call Manager from the Provisioning Status. |
Important
You can configure Automate to retain desk phones (hard phones, prefixed SEP or BAP) associated with a user you’re deleting, and to update these phones via a configuration template (CFT) once the user is deleted. To do this, go to Global Settings, and on the Phones tab, set Retain Desk Phones when User is deleted to Yes, then select an option for applying a CFT to update the retained phone/s.
You can also configure that Webex accounts and Voicemail accounts associated with deleted UCM users will be retained (or removed) in the LDAP user sync that handles deleted UCM users. This is done via the Global Settings > Webex App tab or Voicemail tab, as applicable).
Related topics
Delete a user#
This procedure deletes and unprovisions a user.
Log in to the Admin Portal as a Customer admin or Site admin.
Note
Only a subset of fields described in this procedure are visible to Site admins.
Choose the relevant site.
Go to Cisco Users or Cisco Advanced User.
Select the checkbox for each user you want to remove; then click Delete.
Click Yes to confirm.
The deleted user is removed from the list. All elements associated with the user are removed, except lines.
Note
If you have the global setting for phones configured to retain the user’s hard phones, then only the soft phones are removed. See Global Settings in the Core Feature Guides (Phones tab).
For scenarios that include an LDAP-integrated Cisco UCM, users are deleted from the LDAP directory and not from the Automate system. Set up a data sync to synchronize the removal of the user.