
Manage number filters#
Overview#
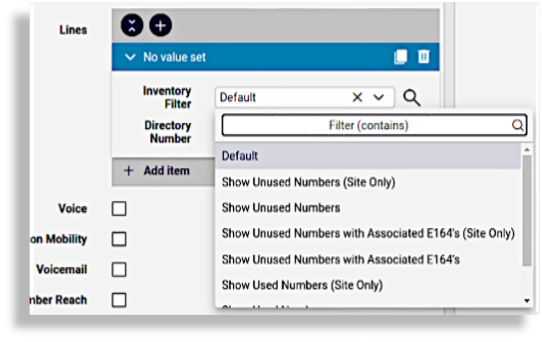
Automate ships with a collection of pre-defined, read-only filters for the number inventory (shipped filters), and allows an administrator to also create their own Custom inventory filters. When filtering is enabled at the hierarchy you’re working at, number inventory filters can be selected to filter numbers from the number inventory for specified criteria.
Note
Shipped number inventory filters are located at the system level (sys) and cannot be disabled, enabled, or renamed. If you wish to enable or disable a shipped filter, you will need to clone that filter to a lower level of the hierarchy. The cloned shipped filter then becomes a custom number inventory, but it cannot be renamed.
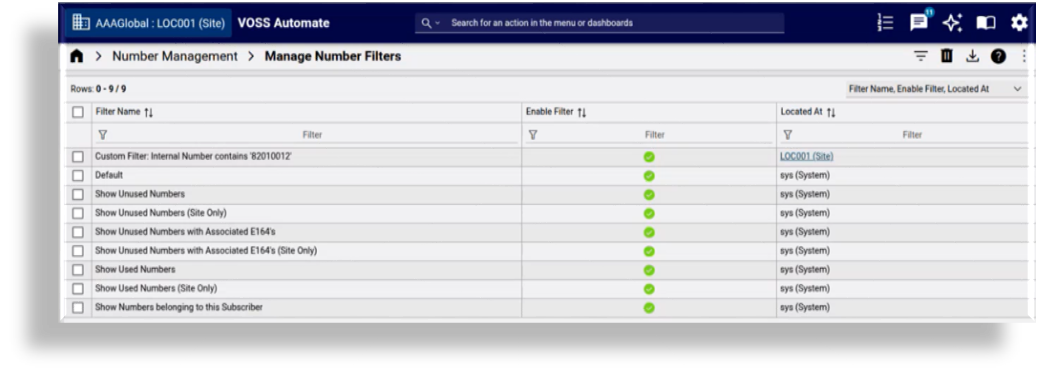
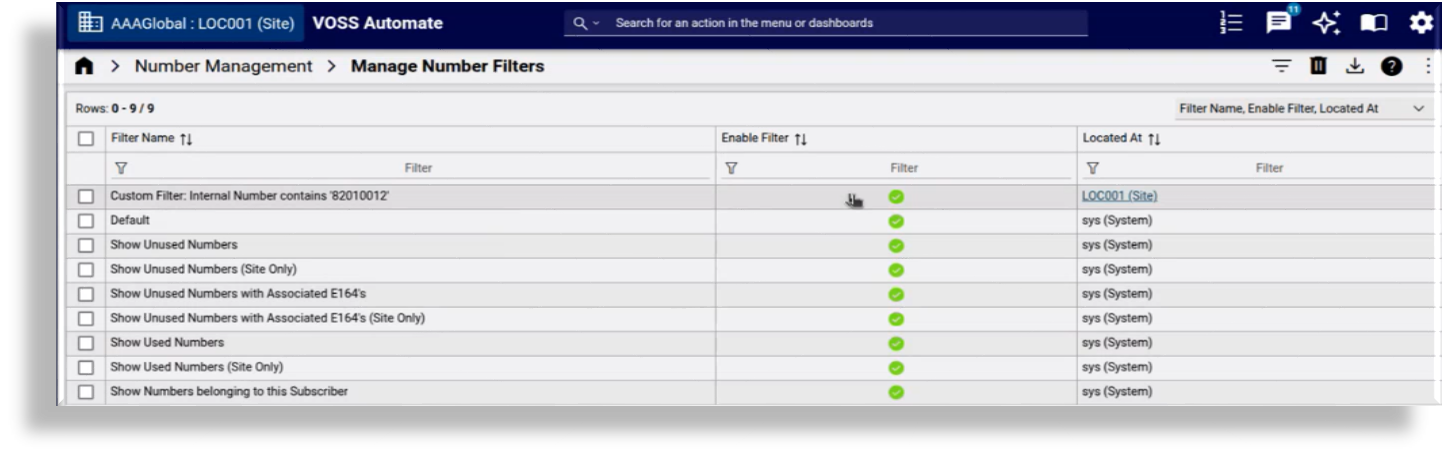
The image shows the Manage Number Filters page with a collection of custom and shipped inventory filters.
Applying a number inventory filter means that when assigning a number during onboarding or provisioning, you’ll be able to select from a smaller selection of relevant numbers. Additionally, when used with Use next available line, the system can use the next available line from a filtered selection of numbers.
Note
When using Use next available line functionality, the system prioritizes local numbers (numbers available at the current site) before checking for available numbers from higher levels in the hierarchy. If the user has reserved numbers, these are excluded and won’t be applied as the next available line.
Inventory filtering functionality in Automate can be summarized as follows:
Shipped filters cannot be enabled, disabled, or renamed. To enable or disable shipped inventory filters you’ll need to clone the shipped filter to a lower hierarchy, effectively creating a new custom filter, but you won’t be able to rename it.
Filtering is enabled by default, and only custom inventory filters can be disabled at specific hierarchies
Provided filtering is enabled at the hierarchy you’re working at, number inventory filters are available anywhere in the GUI where line filtering exists, for example, Quick Add User.
Only the read-only shipped filters are available until you create your own custom filters
You can only enable or disable custom filters at a hierarchy, for example, at a specific site
Filtering is integrated with Use next available line.
Related topics
Shipped inventory filters#
Shipped number inventory filters are available at install, located at the system level (sys), and are enabled by default. Shipped filters are pre-defined and read-only. To disable shipped filters at specific hierarchies you will need to clone the shipped filter down to a lower hierarchy and then disable the clone at that hierarchy. Shipped filters can’t be modified or renamed. Only the shipped inventory filters are available for your system until you create custom inventory filters.
Automate’s collection of shipped inventory filters are the following:
Show unused numbers
Show unused numbers (site only)
Show unused numbers with associated E164s
Show unused numbers with associated E164s (site only)
Show used numbers
Show used numbers (site only)
Show numbers belonging to this subscriber
As an example use case scenario for shipped inventory filters, let’s say you wish to see only numbers reserved for or belonging to a user you’re provisioning, in this case, you can select the shipped inventory filter, Show numbers belonging to this subscriber. For details around reserved for numbers, see Reserve numbers for a user.
Custom inventory filters#
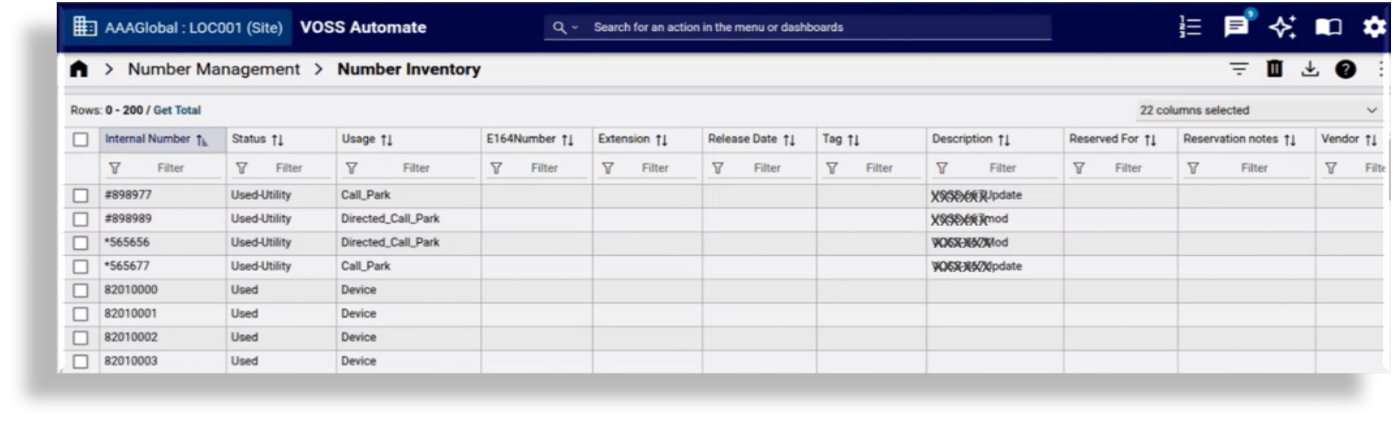
Automate allows administrators to create their own customized number inventory filters to define the numbers that will be available for selection in drop-downs where lines are provisioned, such as Quick Add User. For example, you may want to make available only Microsoft numbers at a particular site, or to display only a selection of numbers greater than or equal to a specified value, for example, to display only numbers greater than or equal to 820100001.
Whereas shipped inventory filters are located at the system level (sys) and available at all hierarchies, custom inventory filters are created at the hierarchy you’re at and are only available at that hierarchy. For example, when a Provider admin creates a custom inventory filter at a particular site, that custom inventory filter is located at that site and can only be used at that site. A system administrator can however create custom inventory filters at sys level.
The image shows the Manage Number Filters page with a collection of custom and shipped inventory filters. The custom inventory filters Located At value indicates the hierarchy where the inventory filter was created, site in this case. Green checkmarks indicate enabled inventory filters. You can click on a custom inventory filter in the list to enable or disable it, or to rename the custom inventory filter.
Note
A custom inventory filter cannot be given the same name as a shipped inventory filter as the settings of the shipped inventory filter will then override any settings you configured for the custom inventory filter. In this case, you will need to rename your custom inventory filter. However, if the custom inventory filter is a clone of a shipped filter, this filter cannot be renamed as it is still owned at sys level.
The name of a custom inventory filter must be unique at the hierarchy where it’s located.
Custom inventory filters and saved search
Custom inventory filters are created at the hierarchy you’re at when creating the filter, and can be used by any user at that hierarchy, provided the custom inventory filter is enabled at that hierarchy, at a specific site for example. Saved searches however, are personal filters created at the user’s hierarchy and are only available at that hierarchy, for example, if a provider admin creates a saved search, that saved search is only available at the provider hierarchy.
Related topics
Enable or disable filtering and inventory filters#
Filtering is enabled/disabled via Global settings (Number Inventory settings). By default, inventory filtering is enabled in Automate but can be disabled (custom inventory filters only) at selected hierarchies or at system level.
You’ll need to ensure that filtering is enabled at the hierarchy you’re working at to use the custom inventory filters in the drop-downs where lines are provisioned at that hierarchy, such as Quick Add User.
When enabling number inventory filtering, you can choose to make all enabled inventory filters available (custom and cloned shipped inventory filters), or only shipped inventory filters. Specific custom or cloned shipped inventory filters at a hierarchy can also be disabled. For example, you may want to make some cloned shipped inventory filters available at a particular site and not at others.
Note
All inventory filters are enabled at a hierarchy until you disable them. Only the read-only shipped inventory filters are available until you add custom inventory filters.
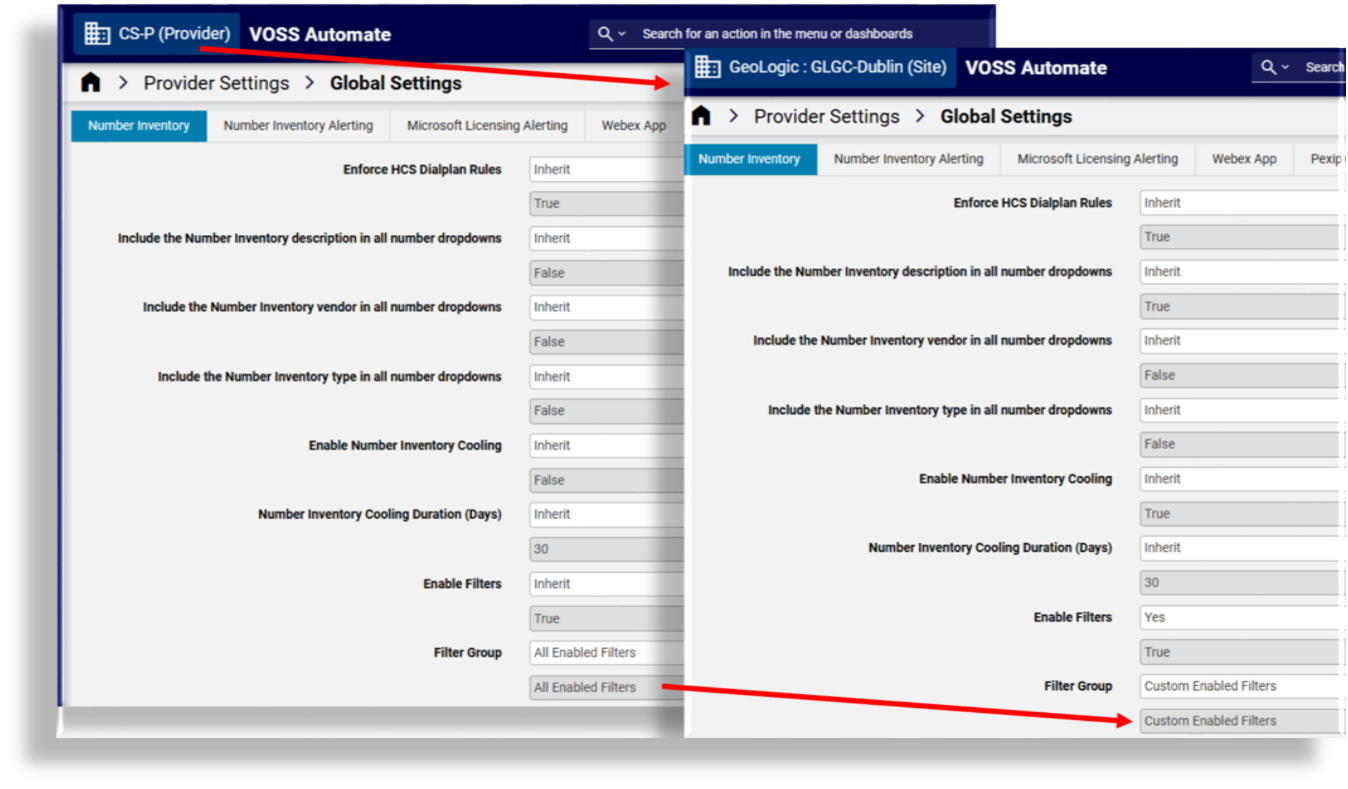
The image displays inventory filters enabled at Provider level with the filter group set to All Enabled Filters, while at a specific site, only Custom Enabled Filters will be available in the drop-downs.
In Manage Number Filters, an administrator can enable or disable one or more cloned shipped filters or custom filters. In this case, even if the selected filter group is All Enabled Filters, you may want to disable specific cloned shipped or custom inventory filters at certain hierarchies.
Enable/disable filtering#
This procedure enables or disables inventory filter functionality via the Global Settings in Automate.
Note
Custom and shipped inventory filters available at a hierarchy can be viewed and managed (enabled/disabled) via Manage number filters, at that hierarchy.
In the Admin Portal, set the hierarchy to the level where you want to enable or disable inventory filters.
Go to Global settings.
On the Number Inventory tab/panel, at Enable Filters, choose an option:
Option
Description
Inherit
Sets the current hierarchy to use the setting from higher up in the hierarchy. The value for Filter Group then displays the value that will be used.
Yes
Default. Enables inventory filtering at the current hierarchy and exposes the Filter Group drop-down, where you can select the type of inventory filtering.
No
Disables inventory filtering (custom filters only) at the current hierarchy.
At Filter Group, select the type of inventory filters you wish to use at the current hierarchy. Options are:
Inherit
Custom Enabled Filters
Shipped Enabled Filters
All Enabled Filters (default)
Note
The filter group value is populated based on the inherited setting if you’ve selected Inherit. See Global settings. Only shipped inventory filters display until you’ve created custom inventory filters at this hierarchy.
At Include the Number Inventory description in all number drop-downs, define whether to include a description for numbers displaying in the drop-downs.
At Include the Number Inventory vendor in all number drop-downs, define whether to include the vendor along with the number in the drop-downs.
At Include the Number Inventory type in all number drop-downs, define whether to include the type of the number in the drop-downs.
Save your changes.
Once the transaction completes and you’ve set Enable Filters to True, users will have the option to choose from the selected collection of inventory filters when assigning a line.
Related topics
Inventory filters and “Use next available line”#
Custom and shipped inventory filters can be used with next available line functionality. When enabling Use next available line for provisioning, you can select a custom or shipped inventory filter to allow the system to choose the first available line from the collection of filtered numbers in the number inventory.
Note
By default, Use next available line is disabled (checkbox is clear) and inventory filtering is enabled.
When using Use next available line functionality, the system prioritizes local numbers (numbers available at the current site) before checking for available numbers from higher levels in the hierarchy. If the user has reserved numbers, these are excluded and won’t be applied as the next available line.
The table describes how Use next available line is integrated with inventory filtering:
Note
When using Use next available line functionality, the system prioritizes local numbers (numbers available at the current site) before checking for available numbers from higher levels in the hierarchy. If the user has reserved numbers, these are excluded and won’t be applied as the next available line.
Setting |
Description |
|---|---|
“Use next available line” - ENABLED / Filtering - ENABLED |
|
“Use next available line” ENABLED / Filtering DISABLED |
The system automatically selects the next available line from the number inventory. |
“Use next available line” DISABLED / Filtering DISABLED |
Select a line from an unfiltered list of available numbers in the Directory Number drop-down. |
“Use next available line” DISABLED / Filtering ENABLED |
|
View shipped and custom inventory filters#
You can view and manage all number inventory filters via the Manage Number Filters list view.
Shipped inventory filters are located at the system level (sys) and are by default available to all hierarchies. Only cloned shipped inventory filters can be enabled or disabled via Manage Number Filters but the inventory filter name is read-only and can’t be changed.
Custom inventory filters are created at and then located for and at a particular hierarchy level, for example, a custom inventory filter created at a site is only available at that site (if enabled). Custom inventory filters can be deleted and updated via Manage Number Filters, where the name can be changed and the inventory filter can be enabled or disabled.
Create a custom inventory filter#
This procedure creates a custom inventory filter at a specified hierarchy level.
In the Admin Portal, set the hierarchy to the path where you want to create the inventory filter.
Note
The custom inventory filter will only be available at the hierarchy where it’s created.
Go to the Number Inventory list view.
There are two ways to create custom inventory filter criteria:
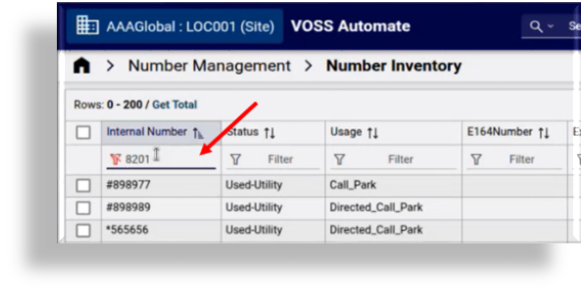
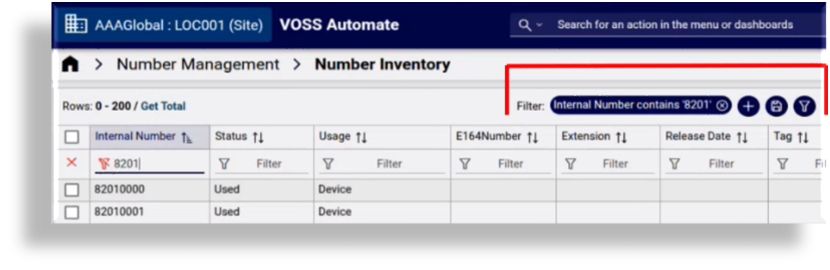
Fill out inventory filter criteria at the top of the Internal Number column. Go to step 4.
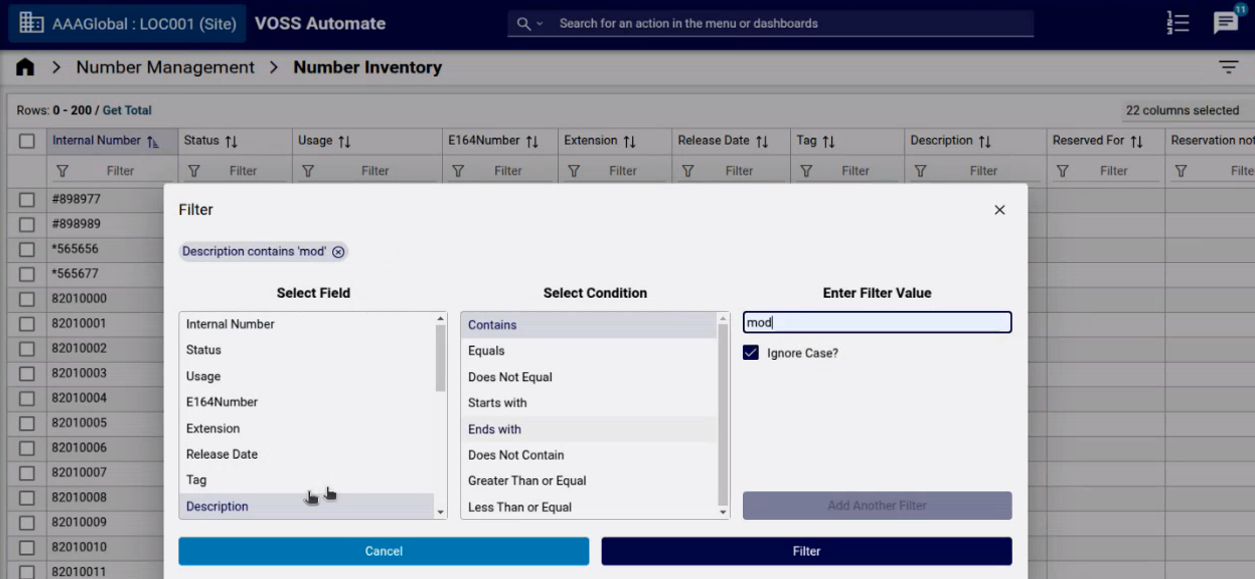
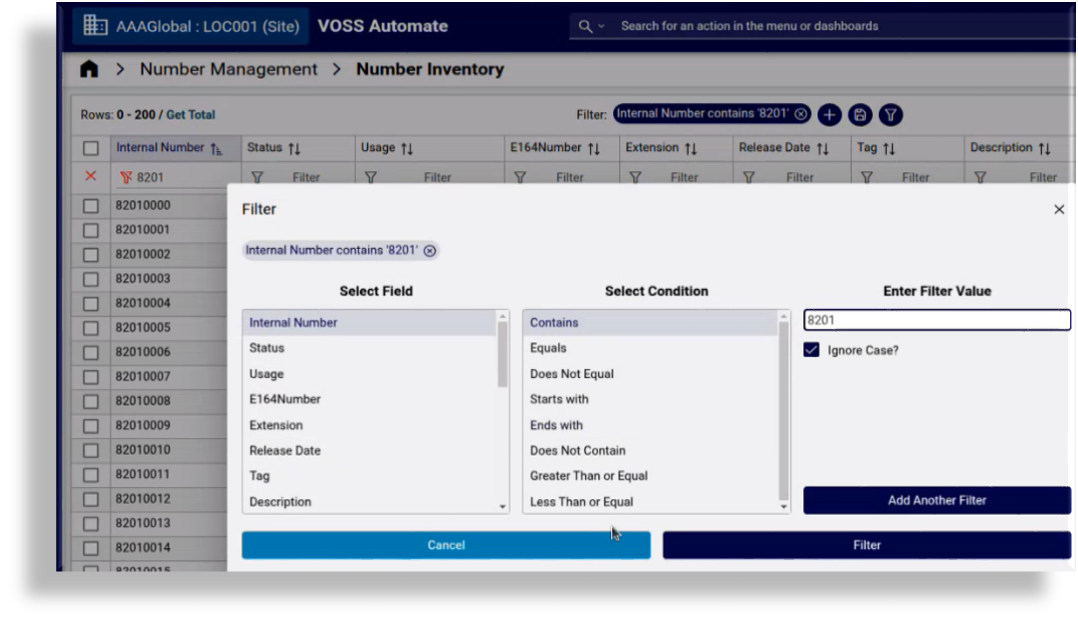
Click the toolbar Filter icon (funnel) to open the Filter dialog. Set up conditions for the inventory filter, then click Filter. Go to step 4.
View the inventory filter and additional save and filter icons that now display at the top of the list view.
Optionally, to modify the custom inventory filter before you save it, click on the inventory filter name to launch the Filter dialog, where you can add or update inventory filter conditions, for example, to add a condition for only including numbers greater than or equal to, or less than or equal to the criteria you specified, or to add any other of the available conditions for filters. Click Filter to update the custom inventory filter.
Note
By default, the custom inventory filter name is the column name and the filter criteria. You can click on the custom inventory filter to change its name. Special characters, such as the wildcard character (*) are supported.
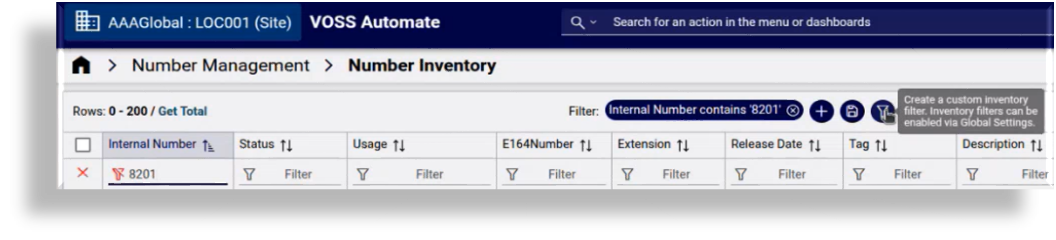
Click the toolbar Filter icon to launch a dialog where you can confirm or update the inventory filter name before saving the new custom inventory filter.
Important
A cloned shipped filter cannot be renamed. All shipped inventory filters exist at sys level in the Automate hierarchy and are read-only. Admin users with sysadmin privileges can also create custom inventory filters at sys level, but these custom inventory filters cannot have the same name as any shipped inventory filter since the settings from the shipped inventory filter with the same name will override any other settings you define for an inventory filter with the same name at sys level.
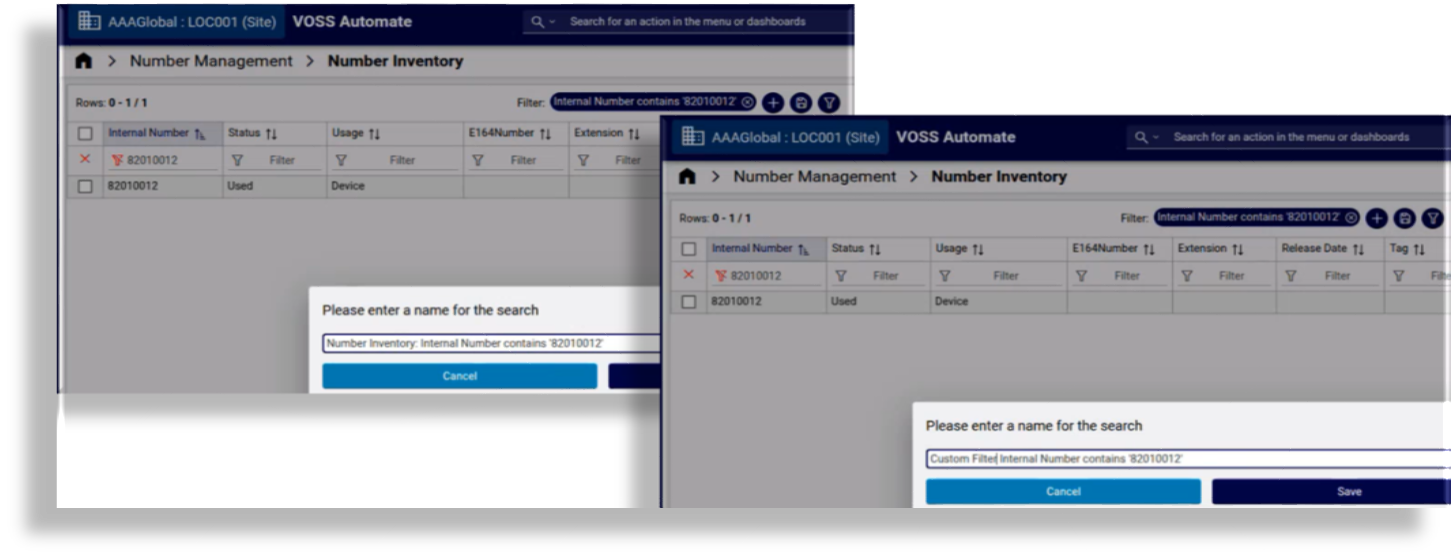
Click Save to confirm the custom inventory filter name and save the filter.
Once the transaction completes the custom inventory filter is enabled by default and is available in any number inventory filter drop-downs where you’re provisioning lines, at the hierarchy where the custom inventory filter was created.
Go to Manage Filters at the hierarchy where you created the custom inventory filter to confirm that the new inventory filter now displays in the list of filters for the hierarchy.
The custom number inventory filter you added can now be used in Automate wherever line filters are available, for example, Quick Add Subscriber and Subscriber from Profile.
Enable, disable, or rename custom inventory filters#
This procedure displays the collection of shipped and custom inventory filters at the current hierarchy, enables or disables custom or cloned shipped inventory filters, and renames custom inventory filters.
In the Admin Portal, go to Manage Number Filters.
Choose the hierarchy.
View all custom and shipped inventory filters at the hierarchy you’re at. The list view contains the following details:
Column
Description
Filter Name
The name of the inventory filter, read-only for shipped inventory filters.
Enable Filter
Defines whether the custom inventory filter is enabled at the current hierarchy.
Located At
The location of the inventory filter in the system. Shipped inventory filters are at system level (sys), whereas custom inventory filters are created and located at the current hierarchy.
Do you want to …
Enable or disable a cloned shipped inventory filter or custom inventory filter?
Click the inventory filter in the list view to open its settings.
If the inventory filter is enabled and you want to disable it at the current hierarchy, clear the Enable Filter checkbox
If the inventory filter is disabled and you want to enable it at the current hierarchy, select Enable Filter.
Save your changes.
Drop-down lists that allow you to choose an inventory filter will now exclude any inventory filters you disabled.
Rename a custom inventory filter?
Note
Only custom inventory filters can be renamed. Shipped inventory filters and cloned shipped inventory filters cannot be renamed.
Click a custom inventory filter in the list view to open its settings.
Click in the Filter Name field, update the inventory filter name, then save your changes.