
Cisco Webex App users#
Overview#
You can view, update, and add Webex users into Automate via:
Webex User Services > System User Details (add record) (
relation/User)Webex User Services > Onboard User (at site) (
view/AddSubscriberFromProfile)Webex User Services > Webex User Details (at site) (
relation/SparkUser)Webex User Services > Webex Quick User (at site) (
view/WebexTeamsSubscriberQas)
Note
Automate also allows for the periodic logging and inspection of changes made to data directly in the
Webex Control Hub. Contact VOSS if this functionality is to be exposed.
The view/WebexAuditEvent and data/WebexAuditEvents models are used for this purpose.
Related topics
Webex User Details#
This procedure displays, updates, or adds a Webex user via the Webex User details page
(relation/SparkUser).
Note
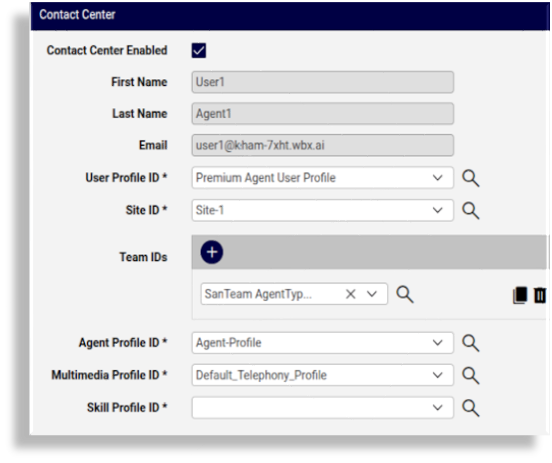
Webex Contact Center agents can be added if a user is assigned a Contact Center Premium Agent or Contact Center Standard Agent license. Refer to the Assigned Licenses entry below, particularly the Contact Center panel form that allows for Contact Center agent management.
You can choose phone numbers and assigned licenses. For phone number type, a Webex Calling license is required, and the Webex API (used for syncing with the Webex Control Hub) only supports add or update for phone number type Work.
By default, No administrator privileges is enabled.
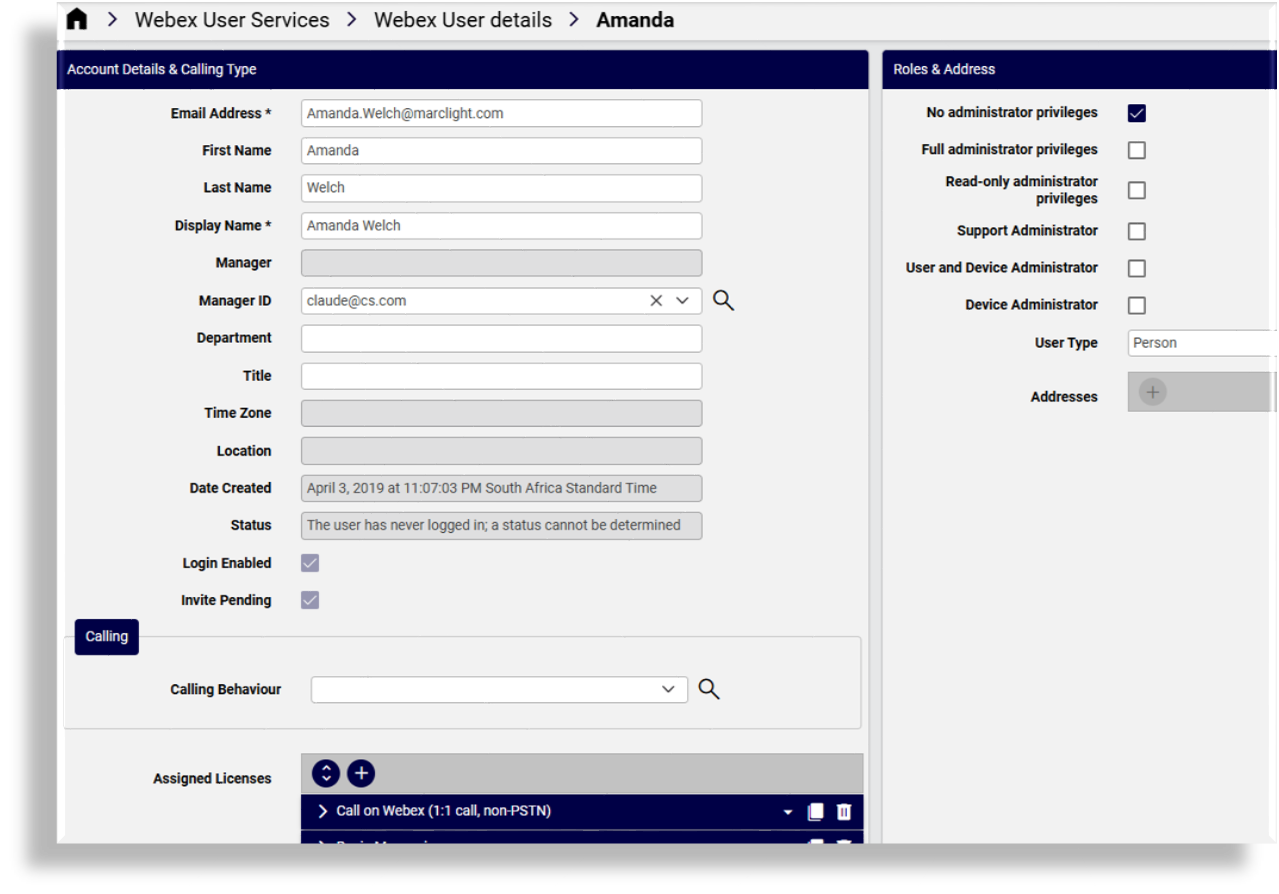
On the Webex User Details page (relation/SparkUser) you can view a list of Webex users in Automate,
and click on a user to view or configure the following settings:
Account Details & Calling Type
Roles & Address
Wholesale Package
Calling Settings
Contact Center
View, add, or update the Webex user
Log in to the Admin Portal as a Provider, Reseller, Customer, or Site administrator.
Go to the Webex User Details list view.
Select a user to view or manage their account, or click the Plus icon (+) to add a new record, then choose the relevant site.
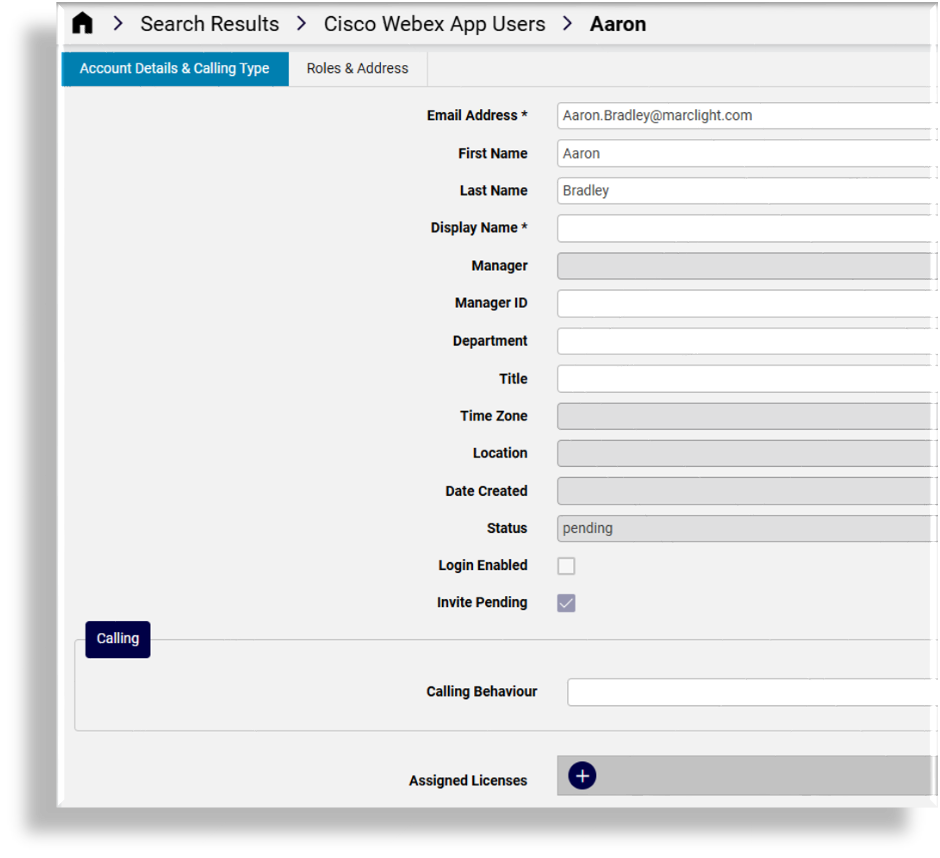
Configure account details and calling type on the Account Details & Calling Settings tab/panel:
Note
Location is read-only, synced from Control Hub.
(Mandatory). Select an email address. This value is used to match users when they’re moved during an overbuild.
Fill out a first name and last name.
(Mandatory) At Display Name, fill out a display name for this user, typically, name and surname.
At Manager ID, select the manager’s email address.
At Calling Behavior, choose an option to auto-populate settings:
Note
The default calling behavior is Calling in Webex App.
Calling in Webex App
Calling in Webex App (Unified CM)
Cisco Jabber app
Third Party app
Note
For Calling in Webex App (Unified CM), fields for device creation (Iphone, Android, CSF, Tablet) are displayed and checked by default.
Phone Numbers: The fields: Type (e.g. “Work”) and Number are available for each entry.
Extension: Webex Calling extension is available if a user has a Webex Calling license.
Assigned Licenses: selected from licenses available on the Cisco Webex service as synced in from the Webex Control Hub.
Depending on a user’s license, services such as Collaboration, Conferencing and Contact Center are available.
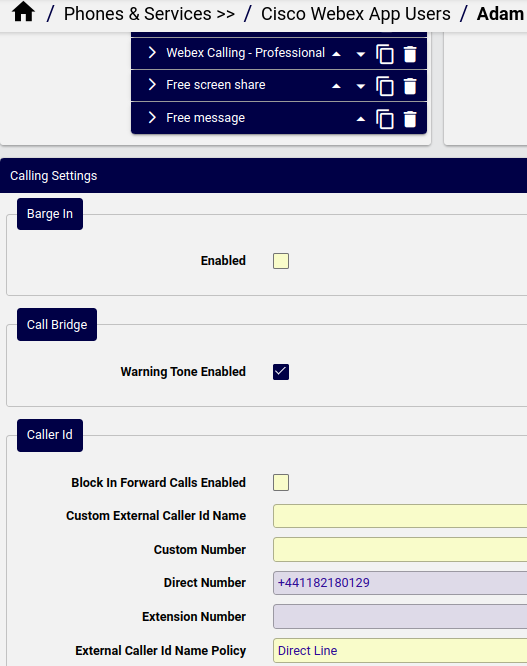
If Webex calling is enabled and a user is assigned a Webex Calling - Professional license, a Calling Settings panel on the form allows for the user management of Calling Settings (such as Barge In, Caller ID, Call Forward, Call Recording, Call Waiting, Intercept).
Note
If a user has Calling Settings available, these need to be removed and to be re-provisioned if it is necessary to move the user to another site. For details, see Move users.
Configure Contact Center settings - displays only if the user is assigned a Contact Center Premium Agent license. Settings include:
User profile ID, Site ID, Team IDs, Skill Profile ID. See Introduction to Webex Contact Center in the Core Feature Guide.
Agent Profile ID, Multimedia Profile ID.
See Webex Contact Center Desktop ExperienceNote
At Agent Profile ID, all global and only desktop profiles assigned to the same contact center site as the user are available.
On the Roles & Addresses tab/panel, select relevant roles:
No administrator privileges
Default
Full administrator privileges
Assigns access to all portal features, including:
Assign roles
Company policy and templates
Device management
Licenses and upgrades
Read-only administrator privileges
Assigns read-only access to content available to a full privilege admin
Support administrator privileges
Assigns access to user information and support logs
User and Device Administrator
.
Device Administrator
.
If available, on the Wholesale Package tab/panel, manage settings for packages in the Webex for Wholesale service, and their status, for example, provisioned.
This tab/panel displays only when the Webex for Wholesale service is available. See Webex Application Access (Webex Organization) in the Core Feature Guide.
Depending on the package selected, the user’s assigned licenses, as available on the Webex for Wholesale service, are then also updated when the user is provisioned.
Note
When modifying a Webex user and UCM Calling Licensing is deleted and the work phone number is also set to empty, the number is removed from the user. Work phone number remains assigned to the user if it’s not set to empty.
Save your changes.
The Webex user is added. The summary list view provides details:
On-Prem UCM Calling Service (True/False) - Defines whether calling services are on-premise or cloud. The On-Prem UCM Calling license is removed if the Cisco Webex Calling (with UCM) is removed from the user.
Calling Behavior (determines license use) - options are:
Calling in Webex App - Allows calling via the Webex app using native Webex calling
Calling in Webex App (Unified CM) - Allows calling via the Webex app using a registration to UCM
Cisco Jabber App - Allows calling using a Cisco Jabber client registered to UCM
Third Party App - Allows calling using a third party app registered to UCM
Use Organization’s Domain (True/False) - When enabled, the Cisco Webex organization domain is used for calling in Cisco Webex (Unified CM)
UC Manager Profile - May be used to identify the required UCM cluster when a calling behavior using UCM is selected. If the default UCM domain is selected, this is not required.
User Type - “Person”, “Bot” or “App User (Guest User)”.
Status - the current Cisco Webex App user status: for example: active/inactive, in a call/meeting/presenting, and so on. If unknown, then displayed as: “The user status could not be determined”.
Webex Quick User#
To add a Webex user via Webex Quick User (view/WebexTeamsSubscriberQas), go to
Webex Quick User.
In this case, it is recommended you add Webex App users on a Webex Control Hub with the wholesale customer service. See Webex Application Access (Webex Organization) and Quick Add Groups in the Core Feature Guide.
In Webex Quick User, choose a Webex Teams User Template from the drop-down, or use the default user template (which is referenced in the Quick Add Groups associated with the user).
If you want customized values, clone the Webex Teams User Template via the Configuration Templates page, and edit as required.
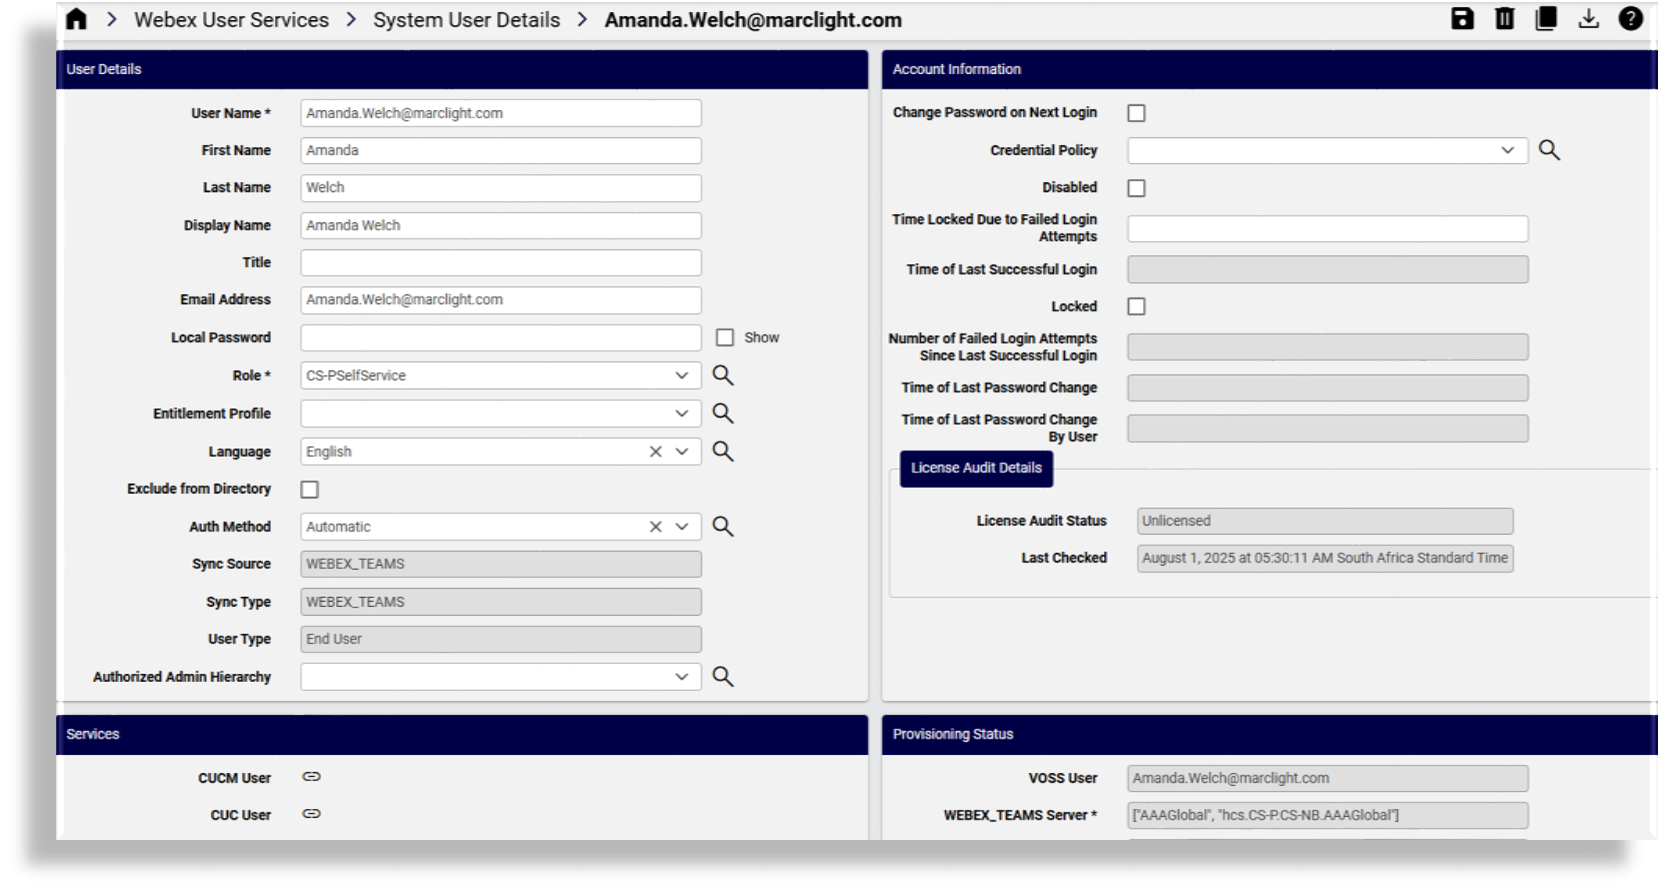
System User Details#
On the System User Details page (relation/User) you can select a Webex user to view and manage their user details
(including their authorized admin hierarchy and sync source), their account information,
license audit details, their provisioning and hybrid status, their contact details, and their services.
Related topics
Manage Users#
On the Webex User Services > Manage Users page (relation/MultiVendorSubscriber) you can
select a user to view and manage their user details, licenses, calling settings, phones, or services. You
can also access quick actions available for the user, and enable or disable their login.
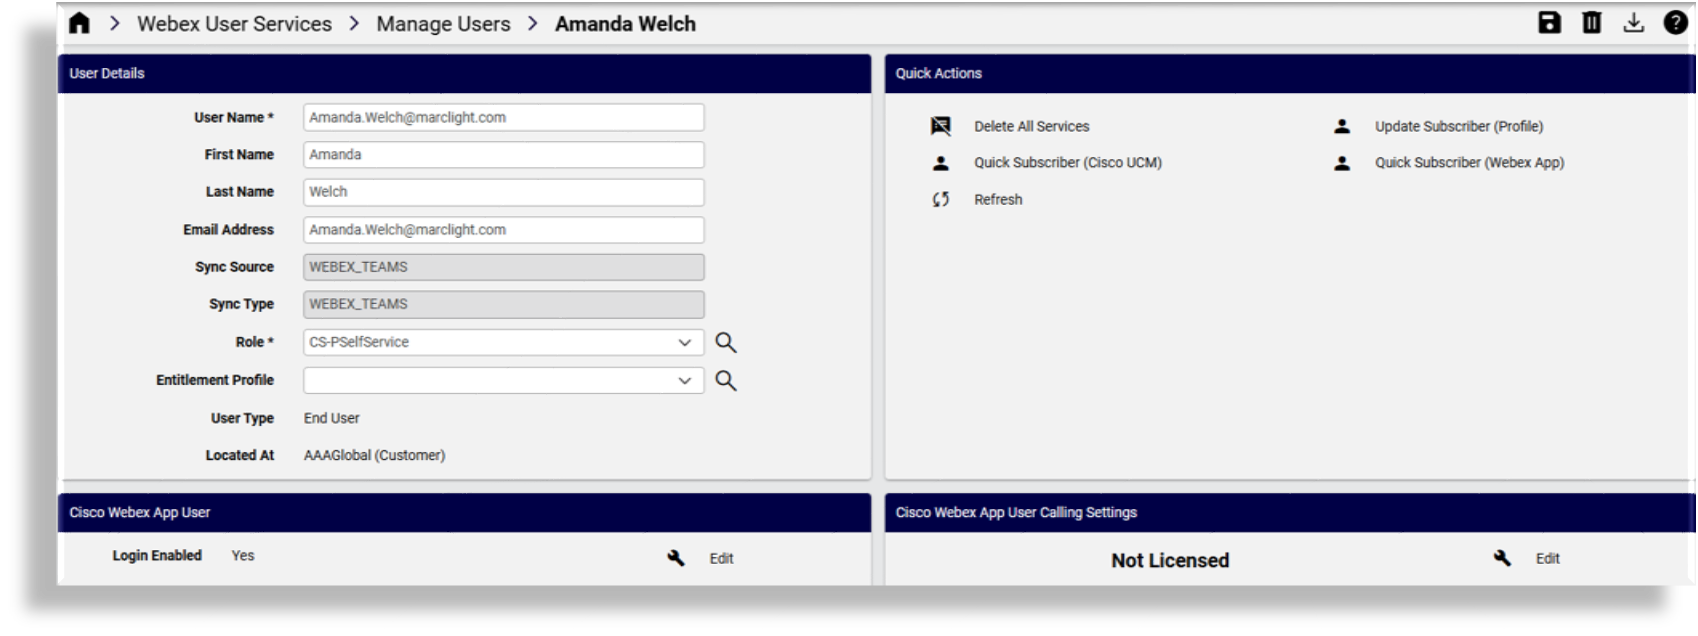
Note
If the user is associated with a phone (device) you can click the link adjacent to the
device to go to relation/WebexDevice to view and manage the device settings.
Multiple Jabber devices can be added to a Webex user as long as the user does not have an existing device of the same device type.
Related topics
Sync Webex user with flow through provisioning#
Sync with flow through for Webex users requires pre-configuring several settings in Automate (including flow through provisioning criteria) before the initial sync from the Webex Control Hub. See: Flow through provisioning (FTP).
Enable flow through provisioning in the Global Settings for a hierarchy (see: Global settings)
Configure Webex settings matching the user’s location in the Site Defaults (see: Site defaults) so that the move filter criteria are
webexUserModelFilterCriteria. These criteria are used as a part of a user profile.The
AddSubscriberFromProfileworkflow at site uses the following configuration template:Webex_FlowThroughProvisioning_SubscriberFromProfile
This set up allows Automate to apply the correct configuration, licenses, and services to imported users, and to move users to sites. Once you run the sync, users are imported, provisioned, licensed, and moved to the correct synced in sites, as users - in accordance with configured Webex App user model filter criteria and user profile.
Important
For Webex Control Hub users with Webex Calling Professional licenses and a location assigned, this location won’t be overwritten by any site setting configured in the Automate user move component (model filter criteria) of flow through provisioning.
The flowchart sets out the sync with flow through of Cisco Webex users and services.
Related topics
Delete a Webex user#
This procedure deletes an existing Cisco Webex App user (a synced in user, or one added via Automate).
Log in to the Admin Portal as a Provider, Reseller, Customer, or Site administrator.
Set the hierarchy to the Customer or Site level.
Go to Webex User Services. Choose an option to open a list view of users. See View Webex user.
From the list view, select users to delete, one or more; then, click the Delete icon.
Click Yes to confirm.
Note
When deleting a user with Cisco Webex App, the internal number inventory (INI) is updated as the number status is changed to Available, and the description, if any, is removed.
Provisioning users with Cisco Webex#
This section describes how to provision Cisco Webex for a user, either via the Users list view, or via Webex Quick User.
Related topics
Provision Cisco Webex via Cisco User list view#
This procedure provisions a user with Cisco Webex, via the Cisco User list view.
Prerequisite:
The users entitlement profile must have Cisco Webex enabled (Webex App checkbox must be selected).
Unless Cisco Webex service assigned is Message only, new users must have an input line specified, and existing users must have either a primary extension, or an input line must be specified.
To provision a user with Webex:
In the Admin Portal, go to Cisco Users.
From the Users list, click on a user you wish to provision with Cisco Webex.
On the Webex App tab/panel, at Webex App User, expand and then fill out settings:
Note
The Invite Pending checkbox is read-only, and defines whether the user’s Webex account is active (checkbox is flagged). When the checkbox is clear, the Webex account is not active.
Options in the Manager ID field and Location field depend on the Cisco Webex server to which the Cisco Webex Service is synced.
At Calling Behavior, choose an option, either of the following:
Calling in Webex App
Calling in Webex App (Unified CM)
Cisco Jabber app
Third-Party app
At Assigned Licenses, select a license. Options depend on the Cisco Webex server to which the Cisco Webex Service is synced.
At Roles, select relevant roles.
No administrator privileges
.
Full administrator privileges
Access to all of Portal features, including:
Assign roles
Company policy and templates
Device management licenses and upgrades
Read-only administrator privileges
View only access to privileges available to a full administrator.
Support Administrator
Access to user information and support logs.
User and Device Administrator
.
Device Administrator
.
Save your changes.
The user is provisioned with Cisco Webex. To verify, ensure the value in the Webex App column in the Cisco Users list view is set to Enabled.
Provision Webex user via Webex Quick User#
This procedure enables Cisco Webex for a user via Cisco Quick Add User.
Prerequisite:
The user’s entitlement profile must have Cisco Webex enabled (Webex App checkbox must be selected).
Unless Cisco Webex service assigned is Message only, new users must have an input line specified, and existing users must have either a primary extension, or an input line must be specified.
See Webex User Details and Add Webex App service using Quick Add User
In the Admin portal, select the relevant site.
Go to Webex Quick User (
view/WebexTeamsSubscriberQas).At Username, select the user to be provisioned with Cisco Webex.
Select the Webex App checkbox to enable Cisco Webex for the user.
From the Webex Teams User Template drop-down list, choose the template you want to assign to the user.
Click Save. Cisco Webex is provisioned for the user.
To verify that Cisco Webex is enabled for the user, ensure the Webex App column in the Users list view displays the text, Enabled.
Note
When Cisco Webex Calling (with UCM) is removed from a Webex User, the ‘On-Prem UCM Calling’ license is removed from the Webex User.