
Microsoft tenant setup#
Overview#
Microsoft provider-only
When Microsoft services and users are deployed in your system, a Microsoft tenant must be set up for each Microsoft customer in the system. The Microsoft tenant workflows create default schedules, data syncs, and test connections, based on the solution capabilities enabled for the tenant.
Solutions and the Microsoft tenant#
Solutions are licensed system components delivering specific functionality and features. As at release 25.3, for new and upgrading customers, the following solutions are available in the system and enabled by default in the Global Settings:
UC Automation
Email
Deployment of the following solution capabilities is reserved for future development:
UC Monitoring
UC Analytics
Security
License Management
Meetings Rooms
Inquire with your VOSS service representative for further details about the deployment and use of the reserved for development solutions.
Permissions required in the app registration for the Microsoft tenant, by solution:
UC Automation: Certificate
Email: Certificate
UC Monitoring: Secret
UC Analytics: Secret
Security: Certificate
License Management: Certificate
Meetings Rooms: Certificate
Add a Microsoft tenant#
This procedure adds and configures a Microsoft tenant at the customer level with one or more solution capabilities, including configuration of a single, customer configurable app registration containing all permissions associated with the selected solutions.
These steps also configure connections:
Between Automate and the PowerShell Proxy
Between the PowerShell Proxy and the Microsoft tenant
The Graph API connection between Automate and the Microsoft tenant
Note
References in this section to “PowerShell Proxy” refer to the MS Windows host running PowerShell commands. References to just “Proxy” refer to the HTTP proxy server that the the Windows PowerShell host uses to access the tenant in the cloud.
Prerequisites:
Solution capabilities required on the customer tenant must be enabled in the Global Settings.
The FQDN or IP address of a single-node PowerShell Proxy, or the FQDN corresponding to your load balancer’s virtual IP address.
See Run PowerShell proxy server setup scriptCredentials for the local service account you created on the PowerShell Proxy
Proxy authentication credentials (if the outbound Internet Proxy requires authentication). Note that Authenticated proxy is not supported.
The client ID and tenant ID
Either the client secret or certificate. See Solutions and the Microsoft tenant. A secret or certificate created when registering Automate as an application object with Microsoft Entra ID. For greater security, certificate is preferred.
If an Arbitrator is configured on Automate, secret is required.
See Arbitrators
To add and configure the Microsoft Tenant
Log in to the Admin Portal as a Provider administrator.
Note
By default, the Provider administrator role is the only role that has the ability to create Tenant connections.
Go to the Tenant Setup page.
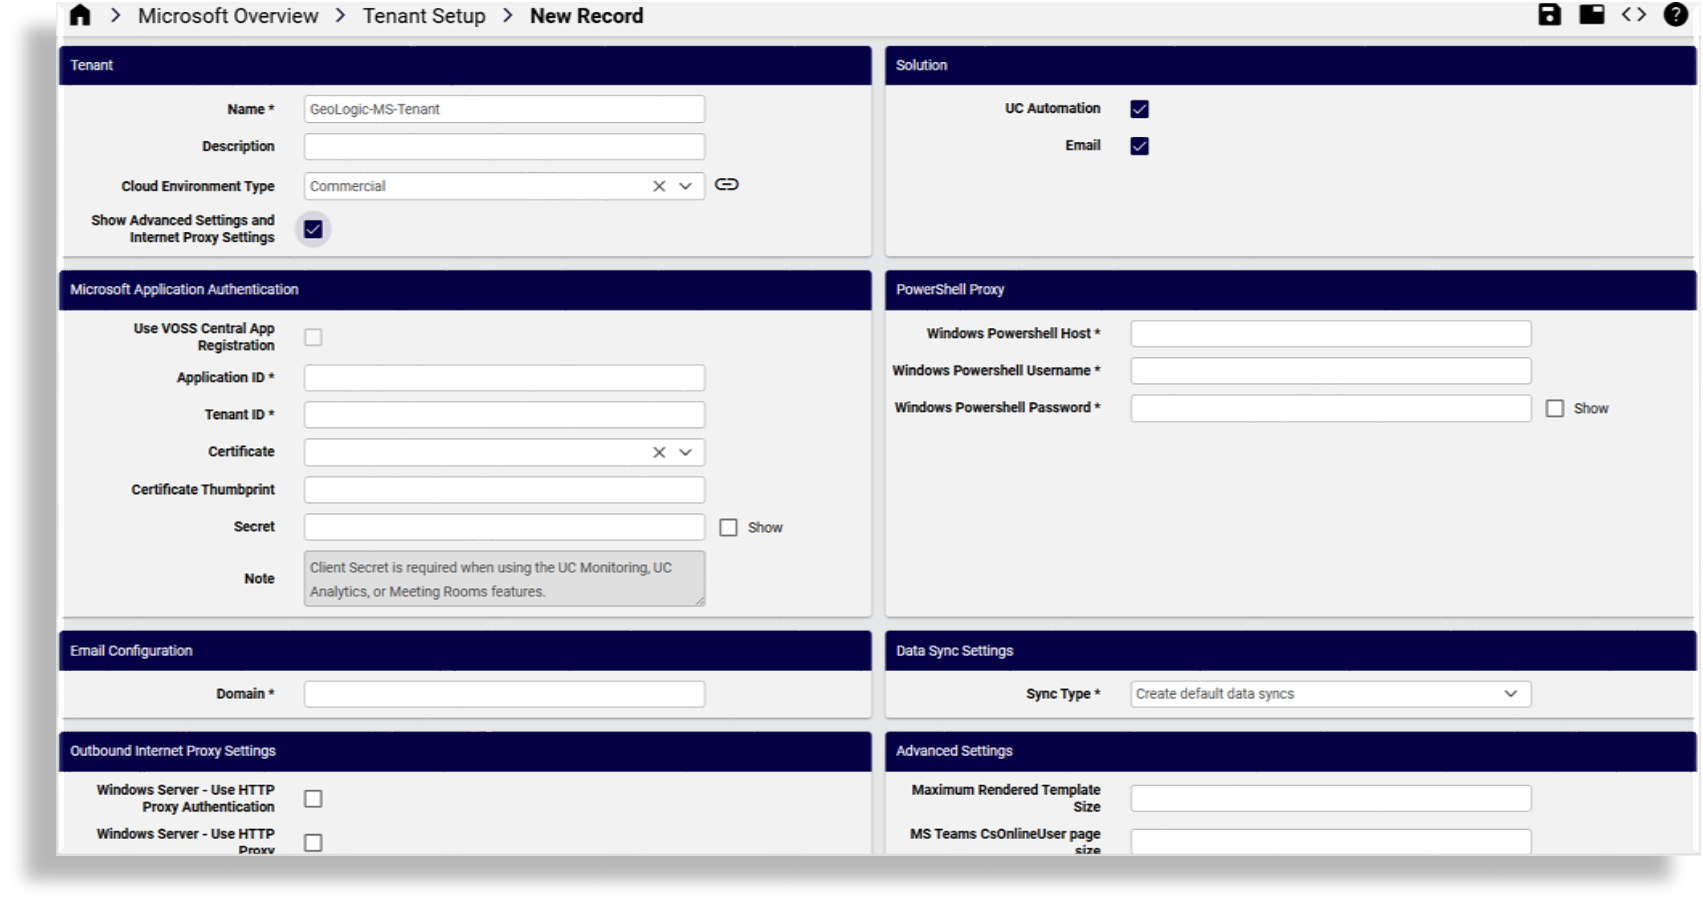
Click the Plus icon (+), then choose the hierarchy, typically, Customer.
Optionally, add a description. The tenant name auto-populates the Name field. You can update it if required.
At Cloud Environment Type, select the cloud environment type to authenticate to. For details, see Microsoft tenant cloud environment type.
At Solution, select solution capabilities to enable for this tenant.
Note
As at 25.3, the following solutions are available: UC Automation, Email
Solutions must be enabled for your system in the Global Settings. See Solutions and the Microsoft tenant. Displayed fields on the form are filtered by selected solutions. For example:
UC Automation enabled? Displays PowerShell Proxy settings.
Email enabled? Displays PowerShell Proxy and Email Configuration settings.
UC Automation and Email enabled? Displays PowerShell Proxy and Email Configuration settings. Use VOSS Central App Registration cannot be used (Relevant only when only a single solution is enabled).
It is NOT possible to disable/remove a solution on the tenant once you’ve saved the tenant.
Configure settings based on enabled solutions:
Settings
Instructions
Microsoft Application Authentication
If you have only one solution enabled and want to use VOSS Central App Registration, select the checkbox, Then fill out the Tenant ID. The workflow applies the Application ID based on the selected solution.
If you have more than one solution enabled you’ll need to create your own app registration:
Application ID is auto-populated.
Fill out Tenant ID
UC Automation and Email solutions require a certificate. Select your certificate. The certificate is pushed to Windows during the Test Connection step after saving the tenant.
Certificate Thumbprint is auto-populated once you select the certificate.
Secret is required if you have an Arbitrator configured on Automate.
PowerShell Proxy
UC Automation and Email solutions
Configure PowerShell server authentication details:
Windows PowerShell Host: Fill out the FQDN or IP address of a single-node PowerShell proxy, or the FQDN corresponding to your load balancer’s virtual IP address.
Windows PowerShell Username and Windows PowerShell Password: Fill out the credentials for the local service account you created on the PowerShell Proxy.
Data Sync Settings
UC Automation and Email solutions
Choose the sync to perform. Three options:
Create default data syncs: Creates default data syncs that ship with the product (these syncs are common to all solutions):
SyncMS365
SyncMS365Users
PurgeMS365
Create default data syncs with custom MS365 MIF: Creates a new model instance filter (MIF) for a specific model. Choose a filter or create a custom filter to run the default syncs with filtered data.
Use Datasync Builder: Uses the custom data sync template to create the data syncs based on selected solutions. You can either use a data sync profile or choose one or more templates to use with the Datasync Builder. Choosing individual templates will allow you to set the first execution date and time for any data sync template that requires schedules. Scheduling defined on the tenant in this way applies only to the tenant and is not added to a template or profile.
Email Configuration
Email solution
Domain: Provide the Microsoft Exchange admin domain used to authenticate.
Note
In Shared Central App Registration, VOSS builds and maintains the app registration in their Microsoft Entra ID tenant and performs organizational and application validation with Microsoft.
Tenant ID and Application ID are recorded in the app registration and identify the tenant in the Microsoft cloud.
For the certificate:
You can generate a certificate in Automate and upload it to MS Entra ID, or;
If you already have a signed certificate from another source in your organization and it’s already uploaded to MS Entra ID, you can upload that certificate into Automate and have Automate manage it on itself and on the PowerShell proxy.
Optionally, select Show Advanced Settings and Internet Proxy Settings to configure additional settings on the tenant, where relevant:
Outbound Internet Proxy Settings:
Do you have an outbound internet proxy deployed between the PowerShell proxy and the public internet?
Yes. Select Windows Server - Use HTTP Proxy.
If the outbound Internet proxy requires authentication, select Windows Server - Use HTTP Proxy Authentication, and fill out a username and password.
You will have already provisioned the outbound internet proxy’s IP address (or FQDN) and port number when you set up the PowerShell proxy. See Run PowerShell proxy server setup script, and note the caveat regarding proxy authentication described at:
PowerShell proxy deployment topologiesIf you wish to disable the use of a currently configured outbound internet proxy:
Uncheck Window Server - Use HTTP Proxy and save the Microsoft tenant configuration.
Re-run the PowerShell proxy server setup script and respond
yto the outbound internet proxy question, followed by enteringnoneas the value for the proxy as in the example below:Do you want to configure the outbound internet proxy? (y/n) y Input: y Configuring outbound internet proxy... Enter the outbound internet proxy address and port. Use the format <proxy_address>:<proxy_port>. Enter "none" to remove the proxy. Press Enter to use "10.121.2.231:3128". none Input: none Proxy settings removed and proxy disabled for user Administrator. Current WinHTTP proxy settings: Direct access (no proxy server). System-wide WinHTTP proxy settings removed.
No. Clear the following fields: Windows Server - Use HTTP Proxy, Windows Server - Use HTTP Proxy Authentication, Windows Server - Proxy Server Username, Windows Server - Proxy Server Password
Authenticated proxy is supported.
At MS 365 HTTP proxy / MS 365 HTTPS proxy, set the outbound internet proxy server if required for traffic outbound to the public internet.
The proxy setup defines the route for the MS Graph API communications that the system uses for communication with the MS 365 Cloud tenant.
For HTTP proxy traffic, fill out a MS 365 HTTP proxy value with the following format:
http(s)://[user:password]@host:port/.Special characters in either the user or password must be URL encoded. Verify the required format with the proxy administrator.
For HTTPS proxy traffic, fill out a MS 365 HTTPS proxy value with the following format:
http(s)://[user:password]@host:port/Special characters in either the user or password must be URL encoded. Verify the required format with the proxy administrator.
Note
MS 365 HTTP proxy and MS 365 HTTPS proxy values will almost certainly be identical unless your proxy administrator has clearly told you that HTTP and HTTPS traffic are being proxied through different servers. It is not required that the MS 365 HTTP proxy address begin with
http://or that the MS 365 HTTPS proxy address begin withhttps://.It is perfectly acceptable to proxy HTTP traffic to anhttps://address or HTTPS traffic to anhttp://address.In both cases the host can be a FQDN if resolvable via DNS or the IP address of the internet proxy.
Advanced Settings
The table describes fields in the Advanced Settings pane:
Field
Description
Maximum Rendered Template Size
The maximum allowed size of any rendered template for all models for all managed drivers. Size in bytes, so 900000000 is 900MB. Only set this value if the amount of data returned when using the default value is causing an error. Default is 900MB.
MS Teams CsOnlineUser page size
Defines page size for the
msteamsonline/CsOnlineUserdevice model. Only set this value if the amount of data returned when using the default value is causing an error.MS Teams Number page size
Defines the maximum number of records to retrieve at a time from APIs related to the
msteamsonline/Numberdevice model. Starting January 2025, Microsoft has set the page size limit for phone number retrieval to a maximum of 1000 numbers per query. Requests exceeding this limit will result in an error.See the Automate 24.2-PB1 release notes for the upgrade notes for EKB-22837, for details.
MS 365 MsolUser page size
Defines the maximum number of records to retrieve at a time from the API related to
device/msgraph/MSOLUser.For optimal performance, leave this field blank to use the default value, 999.
MS 365 Group page size
Defines the maximum number of records to retrieve at a time from APIs related to
device/msgraph/Group.For optimal performance, leave this field blank to use the default value, 999.
Auto filter Teams users
Defines whether to add a default, automatic filter to all CsOnlineUser syncs to only return records matching MsolUsers in the cache. Default is False.
When enabled (True), no other sync filters can be used for CsOnlineUser syncs. Using additional filters will trigger a system error in this case.
Important
Automate issues a warning when it detects an
incondition forUserPrincipalNameused alongside otherCsOnlineUserfilters during sync and filtering. In Microsoft tenants with auto-filter enabled, the expected records may not be returned if your MsolUser cache is not up to date.Note
For details on the auto filter for Teams users, see Microsoft syncsSave the tenant configuration.
Note
Saving the tenant with the certificate deploys the certificate to the PowerShell proxy and installs it. You can then import the certificate on the tenant App registration in Microsoft Entra for authentication of all apps (MS Exchange, Teams, and Graph).
Next steps
High level administrators with access to the
data/MultivendorUsernameMappingMacrosmodel instances should verify that no changes are needed in user name mapping macros prior to sync.Important
For release 21.5-PB5, Multivendor environments using the
data/MultivendorUsernameMappingMacrosmodel at a hierarchy belowsyslevel require an additional update. High level administrators with access to this model should ensure instances include:"username_macro_ms_365": [ "{{ input.UserPrincipalName }}", "(( fn.is_none_or_empty input.username == fn.true ))<NOT_FOUND>(( data.User.username | username:input.username != '' ))<{{ data.User.username | username:input.username }}><NOT_FOUND>", "(( fn.is_none_or_empty input.username == fn.true ))<NOT_FOUND>(( data.User.username | username_ms_365:input.username != '' ))<{{ data.User.username | username_ms_365:input.username }}><NOT_FOUND>", "(( fn.is_none_or_empty input.UserPrincipalName == fn.true ))<NOT_FOUND>(( data.User.username | email:input.UserPrincipalName != '' ))<{{ data.User.username | email:input.UserPrincipalName}}><NOT_FOUND>", "(( fn.is_none_or_empty input.UserPrincipalName == fn.true ))<NOT_FOUND>(( data.User.username | username_ms_365:input.UserPrincipalName != '' ))<{{ data.User.username | username_ms_365:input.UserPrincipalName }}><NOT_FOUND>", "(( fn.is_none_or_empty previous.UserPrincipalName == fn.true ))<NOT_FOUND>(( data.User.username | username_ms_365:previous.UserPrincipalName != '' ))<{{ data.User.username | username_ms_365:previous.UserPrincipalName }}><NOT_FOUND>", "(( fn.is_none_or_empty input.UserPrincipalName == fn.true ))<NOT_FOUND>(( data.User.username | username_ms_teams:input.UserPrincipalName != '' ))<{{ data.User.username | username_ms_teams:input.UserPrincipalName }}><NOT_FOUND>", "(( fn.is_none_or_empty previous.UserPrincipalName == fn.true ))<NOT_FOUND>(( data.User.username | username_ms_teams:previous.UserPrincipalName != '' ))<{{ data.User.username | username_ms_teams:previous.UserPrincipalName }}><NOT_FOUND>", "(( fn.is_none_or_empty input.UserPrincipalName == fn.true ))<NOT_FOUND>(( device.cucm.User.userid | userIdentity:input.UserPrincipalName != '' ))<{{ device.cucm.User.userid | userIdentity:input.UserPrincipalName }}><NOT_FOUND>", "(( fn.is_none_or_empty input.UserPrincipalName == fn.true ))<NOT_FOUND>(( device.cucm.User.userid | mailid:input.UserPrincipalName != '' ))<{{ device.cucm.User.userid | mailid:input.UserPrincipalName }}><NOT_FOUND>" ],Perform a sync from the Microsoft tenant:
Syncs import Microsoft users, tenant dial plan, licenses, and policies to the customer level.
For Microsoft Exchange, ensure that instances for all four device models (User mailboxes, Shared Mailboxes, Room Mailboxes, and Distribution Mailboxes) are synced in at the level were the tenant exists.
If Security is enabled (Enable Defender for Endpoint set to True in Global Settings), a data collection and schedule is added.
A Defender for Endpoint Data Collection <hierarchy name> schedule is created. This schedule can sync data according to this created collection and that allows for a batch sync of the device data. The collected data is then also available when Overbuild for Microsoft is run.
Configure the customer-wide site defaults doc (SDD),
CUSTOMER_TEMPLATE. See Site Defaults Doc templates.Add network device lists (NDLs) with Microsoft 365 and Microsoft Teams tenant details. NDLs are required when adding sites.
Create sites.
- Run the Overbuild for Microsoft
- Configure Automate for Microsoft services
Related topics
- Arbitrators
- Shared central application registration
- Generate a certificate for application registration
- Upload a certificate to use for app registration
- Run PowerShell proxy server setup script
- Global Settings
- Datasync Builder
- Microsoft Defender setup, sync and overbuild
- Overbuild for Microsoft
- Network Device Lists (NDLs)
Test the tenant connection#
You can test your Microsoft tenant connection parameters when adding or updating the tenant. In this step you’re verifying that Automate can connect to the Microsoft tenant using the Teams and Exchange Powershell modules on the Windows server as well as using the Graph API on the Automate platform.
To run a test connection on the tenant:
Add or update the Microsoft tenant.
Open the saved tenant via the Tenant Setup list view.
From the overflow actions menu, select Test Connection.
The workflow tests all configured elements and adds relevant connection parameters for solutions enabled on the tenant (provided these solutions are also enabled in the Global Settings). If a certificate exists it is pushed to Windows. Steps for disabled solutions are skipped.
When running a test connection on an updated tenant, the workflow reviews existing connection parameters and updates these if needed. ted. We pushed the certificate to Windows because that’s what Security requires. And we added all the Graph security connection parameters.
Update a Microsoft tenant#
Modifying a Microsoft tenant will only overwrite those driver parameters in the underlying connections (MSTeamsOnline, MSExchangeOnline, MSGraph) that are managed by the tenant workflows. Other driver parameters will be left as is.
It is NOT possible to disable/remove a solution on the tenant once you’ve saved the tenant.
Also refer to the Advanced Settings above to modify the page size options for the Microsoft Tenant in order to adjust the synchronization performance.
Related topics
Microsoft tenant cloud environment type#
When setting up the Microsoft tenant you can optionally choose a cloud environment type to authenticate to. Automate’s default cloud environment for a Microsoft tenant is “Commercial”.
On upgrade or install, the cloud environment type is set to this default value.
Automate also supports authentication to high security cloud environment types, allowing an admin to identify their Microsoft customer tenant as one that is operating in a high security cloud environment, either DoD (United States Department of Defense) or GCCH (Microsoft 365 Government Community Cloud High).
When the tenant cloud environment type is set to either DoD or GCCH, Automate sets the appropriate environment names for the Microsoft Teams and Microsoft Exchange PowerShell modules, and appropriate URLs are used for the Microsoft Graph API.