
Overbuild for Microsoft#
Automate provides an overbuild tool for each of:
Automate with Microsoft enabled (not Microsoft Defender)#
Overview#
The Overbuild feature enables Provider and Reseller administrators to integrate existing, deployed Microsoft tenants into Automate without re-provisioning, unless required.
Important
It is recommended that Automate training and/or VOSS Services are engaged during the initial use of the feature to help ensure optimized processes and guidance.
In Automate, a Microsoft tenant shows the combined and specific details of a MS Office 365 and MS Teams tenant.
Overbuild provides tools to help the administrator manage Microsoft Tenant data synced from existing configurations.
While a Microsoft Tenant does not contain such Automate components as a hierarchy or a user, the relationship with Microsoft tenant components makes it possible to, for example, create an Automate user at a site hierarchy during the Overbuild process. The necessary filters can be set up and workflows, macros, and brownfield move processes are available for this purpose.
After overbuild is run for the first time, a schedule is created in Automate that can be set up to run at a selected interval.
Overbuild logic for handling users:
Microsoft Users
The synced in Microsoft tenant user is moved to the site, based on the MS 365 model filter criteria selected for the site in the site overbuild defaults. To allow this, ensure you select Include Site for Overbuild and Microsoft Users (on the Overbuild Defaults tab in the site defaults).
To view the number of Microsoft users at the hierarchy level (MS 365 users, MS Teams users, and MS Exchange users), go to Overbuild > Overview Tool. A Microsoft tenant user can be set up with services using Quick User.
Note
Microsoft Guest users (Msol users external to the tenant) are synced in, but their group details (information about which groups they’re associated with) won’t be included in the sync.
Related topics
Configure overbuild site defaults for Microsoft Users#
Pre-requisite:
Note
Ensure the NDLs are configured for the overbuild by adding tenant details, including MS Exchange details if you wish to move mailboxes to the site in the overbuild.
All Microsoft elements must be moved to customer level in a sync before running the overbuild, which moves these elements to the sites.
To configure a site for overbuild:
In the Automate Admin Portal, go to Site Defaults.
Note
Alternatively, go to Defaults and select the Overbuild Defaults tab. You can also fill out the search term, Site Defaults, in the Automate Admin Portal Search field to locate Site Defaults.
In the Site Defaults list view, click on a site to open its site default settings.
On the Overbuild Defaults tab, configure the following:
Enable Include Site for Overbuild
At Overbuild Device Control, choose Limit Moved Devices.
Select Microsoft Users to enable Microsoft users.
For Microsoft Users, on the Move Filter Criteria tab, configure the following:
At MS 365 User Model Filter Criteria, select the relevant filter.
Note
For more information about filters, see Model filter criteria.
If required, select Move by Number.
Note
User data is moved to a site using Move by Number only if the synced in Microsoft Teams user’s LineURI matches a pre-loaded internal number at that site.
If you’ve selected a filter for MS 365 Model Filter Criteria and you’ve enabled Move by Number, the overbuild first processes MS 365 Model Filter Criteria, and then processes Move by Number.
For more information about options on the Move Filter Criteria tab, see Site defaults in the Core Feature Guide.
Related topics
Run overbuild#
In the Automate Admin Portal, go to Run Overbuild.
Choose the site.
In a Microsoft-only environment without MS Defender, select only Microsoft Users to include in the overbuild.
Note
This allows Microsoft users to move to the site. Automate looks at the MS user, and checks whether it has MS Teams and MS Exchange, and moves these elements to the sites along with the user.
Save your changes to run the overbuild.
Note
For Microsoft Users*, the overbuild moves assigned numbers to the number inventory, flagged with the user’s name, location (customer or site), number status (Used when assigned, else, Available), and the relevant vendor (Microsoft, in this case).
The number management step occurs on sync, overbuild, as well as in a number audit. You can run a number audit anytime to verify that numbers are correctly flagged as used or available (via Number Management > Audit Number Inventory) - see Number inventory audit.
Related topics
Overbuild with Microsoft Defender - by Model Filter Criteria#
Overview#
The Overbuild by Model Filter Criteria feature makes it possible to move resources across hierarchies in accordance with defined Model Filter Criteria (MFC) instances where the MFC Usage is set to Overbuild. See: Model filter criteria.
Microsoft Defender overbuild options:
Microsoft Defender for Endpoint
This will move Microsoft Defender for Endpoint device data and alerts down to lower hierarchy levels using Model Filter using Model Filter Criteria.
Microsoft Defender for Office
This will move Microsoft Defender for Office attachments, links and quarantine policies for Office down to lower hierarchy levels using Model Filter Criteria.
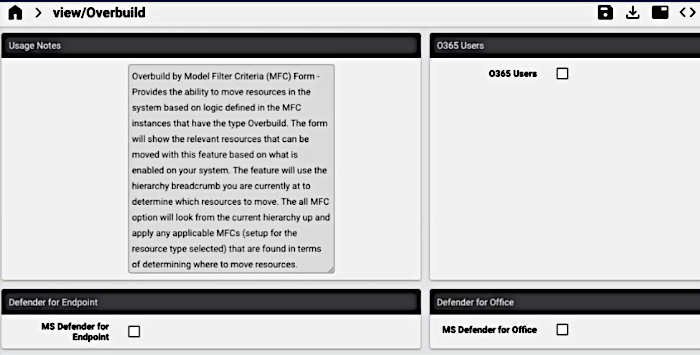
The feature presents a form showing available overbuild options based on the global settings enabled on your system - see: Global settings.
For example, in the image below, Enable Defender for Office and Enable Defender for Endpoint are available, since these are enabled.
Note
If on Global settings, the Enabled Solutions setting Enable Voice Automation Solution is enabled,
Overbuild by Model Filter Criteria will skip the move of device/msgraph/MsolUser and that this data will be
moved by standard settings - as implied by the setting.
Option selection#
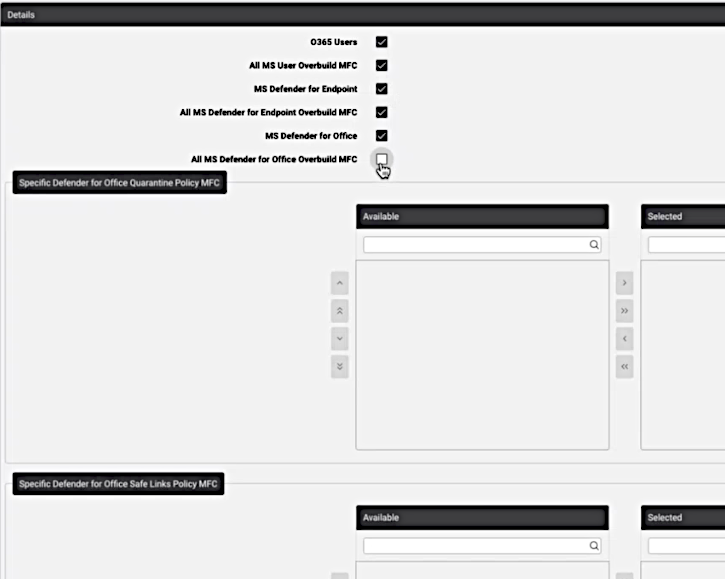
Upon selecting the initial overbuild option available according to your global settings, an all and specific choice will then be available for the option. By default, the all option is enabled. If this option is deselected (un-tick checkbox), the specific options are shown.
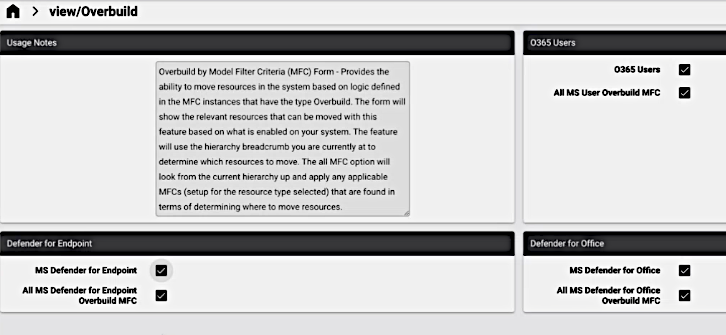
When selecting the all MFC option, the current hierarchy upwards (up to Provider level) is be checked for relevant MFCs that have been set up for the selected option. The listed instances are MFC instances where Automated Overbuild setting has been enabled.
When selecting an option to specify specific MFC instances, the form displays all the MFC resources up to the
syshierarchy - including instances where the Automated Overbuild setting has been disabled - in an Available list of a transfer box that can then be selected by moving these to the Selected list. The inclusion of instances with Automated Overbuild disabled here allows you to run selected MFCs without running them automatically by accident.
Note
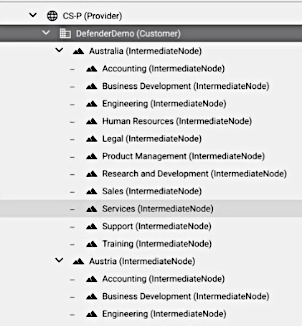
The current hierarchy where the feature is used determines which resources specified in the MFC to move to the Target Hierarchy as specified in the MFC. This target hierarchy is thus not only limited to sites, but can be any created intermediate nodes representing an organizational structure.
Example hierarchies:
Example MFC:
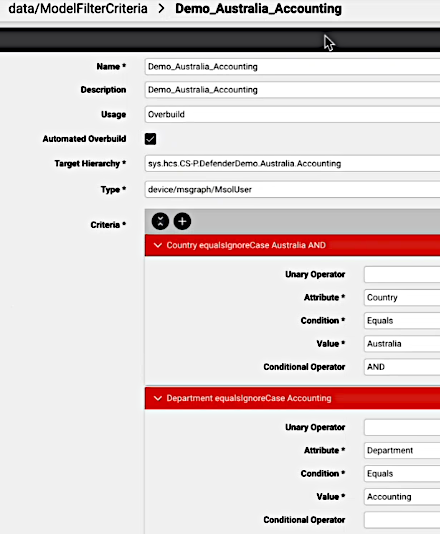
When specific MFCs are selected, the overbuild move sequence will be carried out according to the MFC order in the Selected list (top-down).
The following list shows overbuild options (not all may be enabled in your settings) and the conditions of their selection or de-selection:
O365 Users: checkbox. If checked, then either:
All MS User Overbuild MFC: checkbox (enabled by default)
or disabled, then:
Specific MS User MFC: transfer box
MS Defender for Endpoint: checkbox. If checked, then either:
All MS Defender for Endpoint Overbuild MFC: checkbox (enabled by default)
or disabled, then:
Specific Defender for Endpoint Machine MFC: transfer box
MS Defender for Office: checkbox. If checked, then either:
All MS Defender for Office Overbuild MFC: checkbox (enabled by default)
or disabled, then:
Specific Defender for Office Quarantine Policy MFC: transfer box
Specific Defender for Office Safe Links Policy MFC: transfer box
Specific Defender for Office Safe Attachment Policy MFC: transfer box
An example of option selection is show in the image below:
Microsoft Defender models and move rules#
The items below indicate which Microsoft Defender models are moved and by what rules they are moved during overbuild.
Type models move via Model Filter Criteria (MFC) for the policy where Usage is Overbuild to Target Hierarchy according to Criteria. See: Model filter criteria.
Office
If Microsoft Defender for Office is enabled as a service in global settings and the tenant configuration has synced collection data to the tenant hierarchy, overbuild moves attachments, links and quarantine policies according to the specified criteria for the Type:
device/msexchangeonline/SafeAttachmentPolicy: move according to Model Filter Criteriadevice/msexchangeonline/SafeLinksPolicy: move according to Model Filter Criteriadevice/msexchangeonline/QuarantinePolicy: move according to Model Filter Criteriadevice/msexchangeonline/QuarantineMessage: move to the first recipient address on each instance if theMsolUseris at a lower hierarchy.
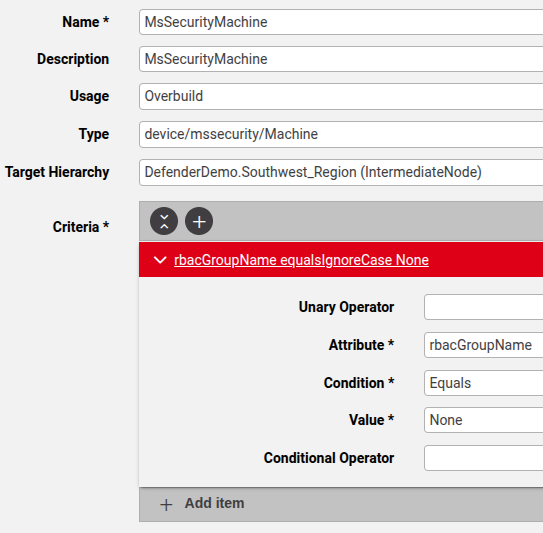
Example MFC instance:

Endpoint
If Microsoft Defender for Endpoint is enabled as a service in global settings and the tenant configuration has synced collection data to the tenant hierarchy, overbuild moves attachments, links and quarantine policies according to the specified criteria for the Type:
device/mssecurity/Machine: move according to Model Filter Criteria instances that are set up.device/msgraphsecurity/Alert: move Alert models based on hierarchy level of related Machine models at a lower hierarchy, since all the alerts follow a machine.device/msgraphsecurity/Incident: move Incident models based on hierarchy level of related Alert models that are at a lower hierarchy, based on the incident IDs in the alert of the first matching alert. (Alert ID is referenced)
Example MFC instance:
Related topics