
Role Management#
Overview#
Provider administrators can manage the roles that are available for administrators, operators, and users at lower levels in the hierarchy.
Note
You cannot change your own role.
Edit a role#
To edit an existing role:
Log in as provider administrator.
Go to the Role Management page.
Locate the role you want to change; then, click on the role to open it.
Update the role settings, as required.
Note
The following settings are read-only for existing Self Service roles and cannot be modified:
Interface
Access Profile
Menu Layout
dashboard
Save your changes.
Note
If hierarchy node types are removed from the Permitted Hierarchy Types list while users or Site Defaults reference this node type, the transaction fails with the following message:
“Cannot update Role. Some User(s) or Site Defaults exist with the hierarchy rules defined in this role.”
Add a role#
To add a new role:
Log in as provider administrator.
Go to the Role Management.
Click Add.
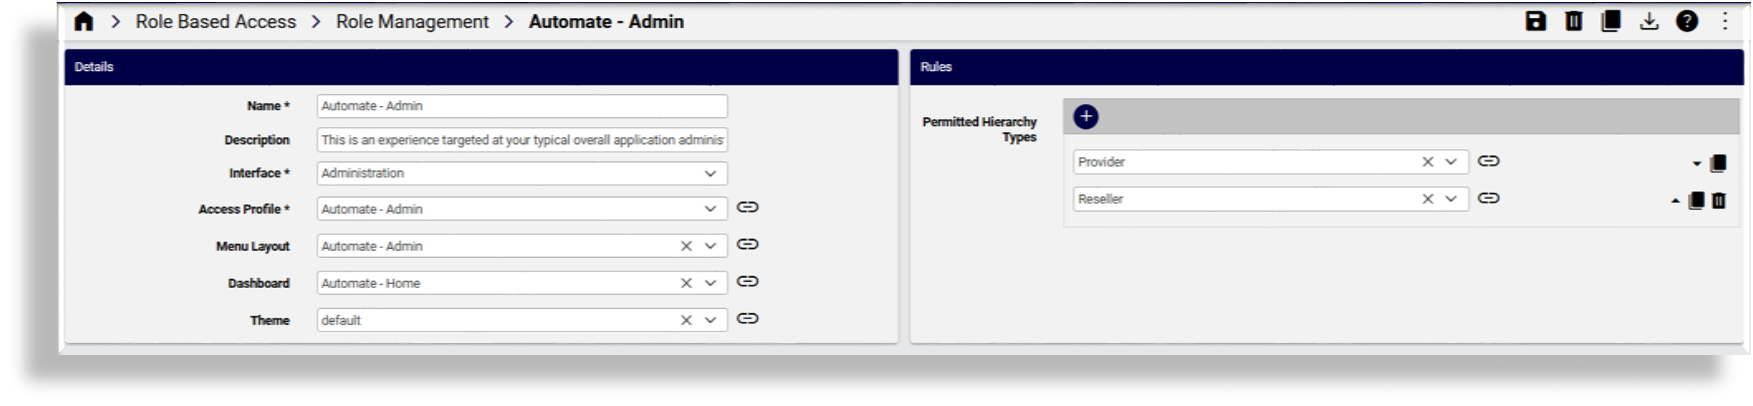
Fill out details and hierarchy rules for the role:
Setting
Description
Name
Mandatory. The name of the role.
Description
Description of the role.
Access Profiles
Mandatory. Specifies permissions for resources.
Menu Layout
Mandatory. Controls navigation and available actions.
Dashboard
Mandatory. Defines the landing page and widgets shown after login.
Interface
Defines whether the role applies to the Administration or Self Service interface.
When selecting the Self Service interface the following fields are auto-populated and change to read-only (disabled) fields:
Interface (with value Self Service)
Access Profile (with value default_selfservice_access_profile)
Menu Layout (with value selfservice)
Dashboard (with value selfservice_dashboard)
Theme
Controls the visual appearance of the interface.
Self Service Links
Provide useful links to Self-service end users.
Permitted Hierarchy Types
Hierarchy types the role you’re working with can be added under. If no hierarchy types are specified, the role can be added under any (non-sys) hierarchy.
Once you add a permitted hierarchy type, the system validates that a user you’re creating with this role is at that hierarchy level before it creates that user. If the user does not exist at that hierarchy the transaction fails.
Refer to Permitted Hierarchy Types List Impact below.
When the role is saved, the selected Hierarchy Type is added to the Hierarchies Allowed list if it is not included.
Click Save to add the role.
Permitted Hierarchy Types List Impact
The following areas in the system are impacted by list entries available in the Hierarchies Allowed List of a role:
Microsoft-only role#
Starting with version 21.3-PB1, Automate ships with a Microsoft-only role (MicrosoftOnlyRole) and
accompanying role-based
access control elements, which are predefined for a Microsoft-only user interface experience.
These elements include
predefined field display policies, dashboards (MicrosoftOnlyDashboard), and menus (MicrosoftOnlyMenu). Installing
these templates provides the baseline for a Microsoft-only version of Automate, and hides
non-Microsoft GUI elements, such as the FDPs, menus, and dashboards
reflecting functionality used for managing Cisco devices.
To use the MicrosoftOnlyRole in Automate:
Log in to Automate as hscadmin.
Go to the Roles page.
Locate MicrosoftOnlyRole in the list view.
Select the role in the list (or click on the role to open it).
Note
This role ships with a standard access profile and a predefined menu layout and dashboard.
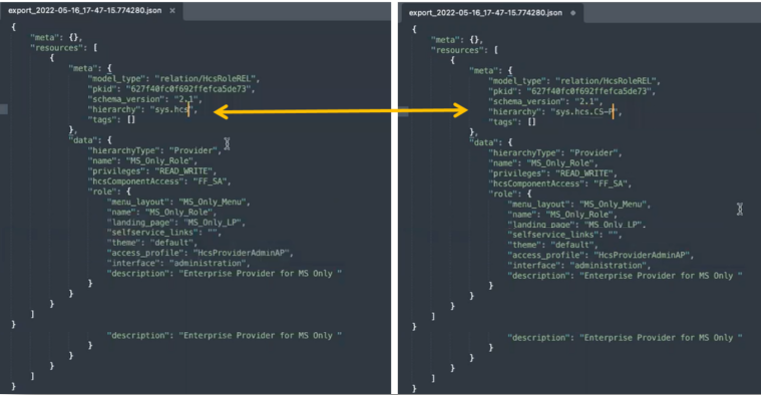
Click Export to export the role to a JSON file, and save the file to your local computer.
Edit the JSON file to specify the hierarchy where you want to use the role.
Go to the Import page.
Browse to the location you saved the JSON file, then click Import.
Go to the Role Management list view to verify that the role now exists also at the hierarchy you specified.
At the hierarchy where you wish to assign the role to a user (Provider or Customer), go to the Admins page. Choose a user (or add a user), then on the User Details tab, from the Role field, choose the role (
MicrosoftOnlyRole) you imported to this level, and save your change.