
Customers#
Overview#
Customers exist as a node in Automate’s hierarchical structure. Typically, the structure has the following order (from highest level to lowest level).
Provider
Reseller
Customer
Sites (locations)
Optional intermediary nodes can also be created.
Automate employs hierarchies (organization levels), user roles, and access profiles to secure access to resources in the system. For details, see Introduction to Hierarchies in the Core Feature Guide.
Sites can only be created under a customer. You have to add and configure the customer before you can add sites. Onboarding of customers is done at the Provider hierarchy. For details around onboarding customers, see the Customer On-boarding Quick Start Guide in the Core Feature Guide.
Related topics
Add or update a customer#
This procedure adds or updates a customer.
Note
You can enable or disable number management for a customer via the Customer page, if required.
The system no longer automatically creates cloned roles when you add a hierarchy node. Automate
roles are now all managed via the data/Role model and can be assigned directly without being cloned
across hierarchies.
If you have custom bulk loaders and need to carry out this automatic cloning task, add a new boolean field to the bulk load sheets and set to TRUE:
"name": "clone_admin_role"
"title": "Clone Admin Role"
To add or update a customer:
Log in as Provider or Reseller administrator (depending on which organization manages the customer).
Note
Log in using the Provider or Reseller admin’s email address (case-sensitive). You can find this email address via the Admins page, then click on the admin’s name to view the email address.
Choose the hierarchy.
Note
If logged in as Provider and the Customer is to be added under a Reseller, set the hierarchy path to the Reseller.
Go to the Customer page.
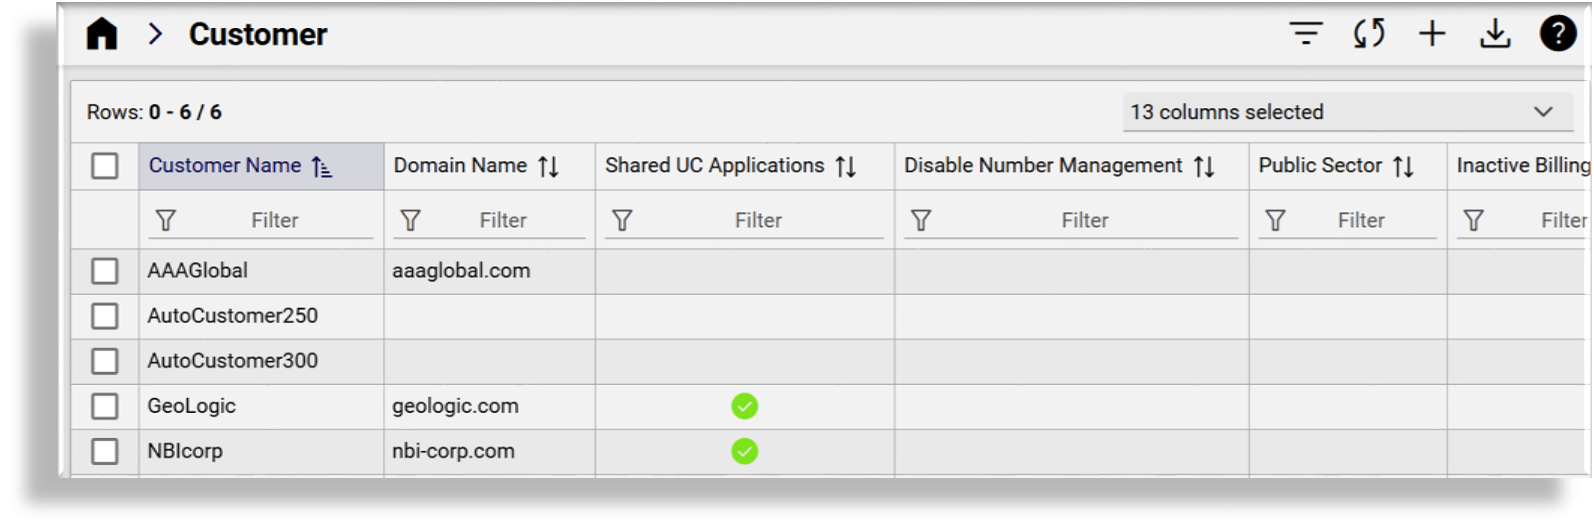
Choose an option:
Add a new customer? Click the Plus icon (+) to add a new record, then, fill out details for the new customer, including contact information and, optionally, enable or disable number management.
Update an existing customer? Click on the customer name in the list view to view its details. Modify customer details, including contact information and, optionally, to enable or disable number management.
Important
Additional custom string and boolean fields may be exposed via field display policies for the Customers configuration form. For details, see Add custom fields to customer configuration screens
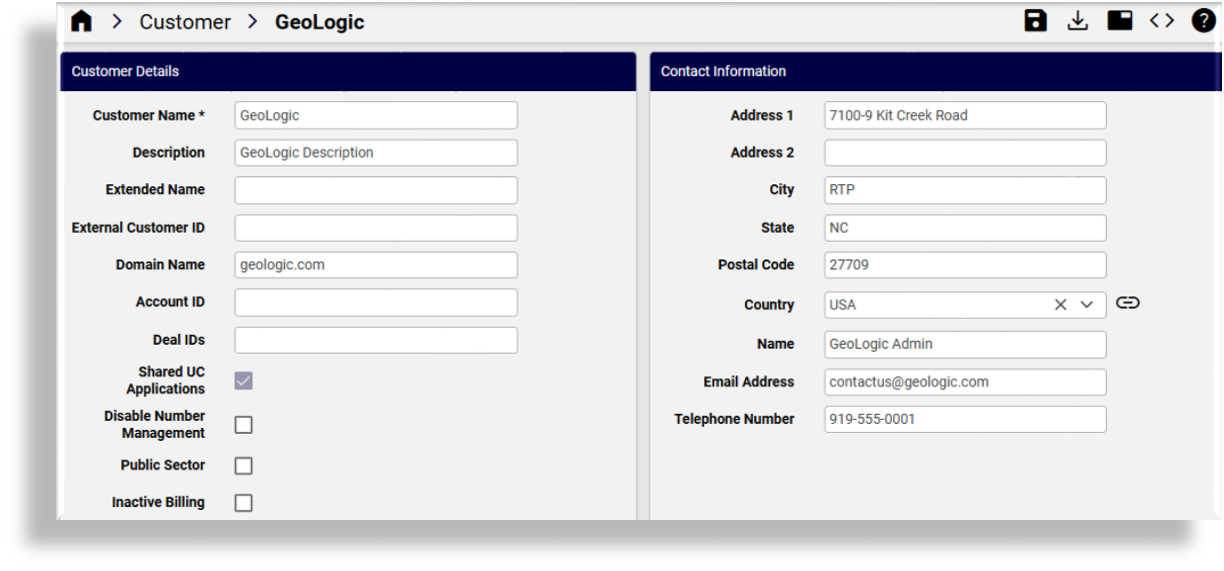
Customer Details
Description
Customer Name
Mandatory. The name of the customer.
Description
Customer description
Extended Name (Provider)
Descriptive name for the customer, used by external clients to correlate their own customer records with customer records stored in HCS.
External Customer ID (Provider)
External customer ID used by the Service Inventory service, and included as a column in the customer record of the service inventory report. Specify an External Customer ID in this field that matches the customer ID used by the external inventory tool that receives the Service Inventory reports. If the Service Inventory service is not being used, this field is not required. However, it can be used to correlate customer records in external systems with customer records in HCS.
Domain Name
Customer domain. This field is used to create email addresses for:
The customer default local administrator, for example: Customer1Admin@customer1.com
Site default local administrators under the customer, for example: Site1Admin@customer1.com
If the customer domain is omitted, the provider domain (or reseller domain, if the customer is under a reseller in the hierarchy and the reseller domain was provided) is used instead.
Account ID
The Account ID is used by external clients to correlate their own customer records with the customer records stored in HCS. This Account ID value is synced to the Customer record in the Shared Data Repository.
Deal IDs
Deal IDs are used by the Hosted License Manager (HLM) service. HLM supports Point of Sales (POS) report generation. The report includes all customers on the system with aggregate license consumption at customer level. The optional Deal ID field associated with the customer is included in the report. Each customer can have zero or more Deal IDs. The Deal ID field is free text format and each deal ID is separated by a comma.
Customer Details
Description
Shared UC Applications
Indicates whether the customer can use Shared UC Apps. If selected, the customer sites can use Network Device Lists that contain Shared UC Apps. Shared UC Apps are UC Apps that are defined above the Customer hierarchy level.
Disable Number Management
Enable or disable Number Management for this customer.
When disabled (checkbox selected), you cannot add directory numbers and E164 numbers to inventories for this customer.
When enabled (checkbox clear), you can add directory numbers and E164 numbers to inventories for this customer.
Public Sector
Defines whether the customer is a Public Sector customer. Used for License Reporting.
Inactive Billing
Defines whether to exclude the customer from billing (for testing). Used for License Reporting.
Note
If you enable number management for a customer after it was disabled, run the DN Audit Tool. See Number inventory audit.
Save your changes.
Related topics
Add custom fields to customer configuration screens#
You can add up to ten custom string fields and up to 10 custom boolean fields to the field display policy you apply to the Customer data model (relation/HcsCustomerREL). This provides flexibility to add additional details for a customer, if required.
The summary attributes in the Customers list view always display three Boolean fields and three String fields, regardless whether they’ve been included in the FDP. If you wish to change the title of these fields in the summary attributes you can add a field override entry in the FDP.
When configuring a customer (add or update), you may specify field values or use named macros to populate values for these fields.
Macros for custom string fields for relation/HcsCustomerREL:
macro.HcsVossCustomerDAT_custom_string_1
macro.HcsVossCustomerDAT_custom_string_2
macro.HcsVossCustomerDAT_custom_string_3
macro.HcsVossCustomerDAT_custom_string_4
macro.HcsVossCustomerDAT_custom_string_5
macro.HcsVossCustomerDAT_custom_string_6
macro.HcsVossCustomerDAT_custom_string_7
macro.HcsVossCustomerDAT_custom_string_8
macro.HcsVossCustomerDAT_custom_string_9
macro.HcsVossCustomerDAT_custom_string_10
Macros for custom boolean fields for relation/HcsCustomerREL:
macro.HcsVossCustomerDAT_custom_boolean_1
macro.HcsVossCustomerDAT_custom_boolean_2
macro.HcsVossCustomerDAT_custom_boolean_3
macro.HcsVossCustomerDAT_custom_boolean_4
macro.HcsVossCustomerDAT_custom_boolean_5
macro.HcsVossCustomerDAT_custom_boolean_6
macro.HcsVossCustomerDAT_custom_boolean_7
macro.HcsVossCustomerDAT_custom_boolean_8
macro.HcsVossCustomerDAT_custom_boolean_9
macro.HcsVossCustomerDAT_custom_boolean_10
The macros can be applied in workflows and configuration templates to reference the custom field values. For example, executing macro.HcsVossCustomerDAT_custom_string_1 will return the value in the field where the macro is used.
Expose custom fields for relation/HcsCustomerREL
Log in to Automate as Provider admin or higher.
Create or update the Customers data model field display policy:
Go to the Field Display Policies page, then locate the entry for target model type, relation/HcsCustomerREL.
Click on the default field display policy (FDP) for the model (the FDP named default).
Clone (copy) the default FDP for the model, and give the clone a new name.
Note
You can’t modify default FDPs that ship with the system. This allows you to refer to or revert to a system default at any time, if required.
Modify the new FDP (the clone).
Note
You can add a new group of fields containing only the new custom fields, or add fields to existing field groups.
You can also create field overrides, which allow you to define that a custom field value will be referenced in place of an existing field.

Save your changes.
Update the menu layout to apply the field display policy:
Go to Menu Layouts, and locate the Provider admin menu layout (HcsProviderMenu).
Click on HcsProviderMenu, and create a clone with a new name.
Note
You can’t modify default menu layouts that ship with the system. This allows you to refer to or revert to a system default menu layout at any time, if required.
Modify the clone (copy) of HcsProviderMenu:
Expand the Customer Management menu.
At Customers, click in the Field Display Policy cell, and choose the FDP you configured to add the custom fields.
Save your changes.
Log out, then log in again as Provider admin.
This allows the role-based access profile changes to refresh so that you can view the updated menu layouts and field display policies you applied, including new custom fields.