
Add and Edit Roles
Overview
Provider administrators can manage the roles that are available for administrators, operators, and users at lower levels in the hierarchy.
Note
References to HCM-F and Shared Data Repository (SDR) are only relevant if installed.
Edit a Role
To edit an existing role:
Log in as provider administrator.
Go to Role Management > Roles.
Locate the role you want to change; then, click on the role to open it.
Update the role settings, as required.
Save your changes.
Add a Role
To add a new role:
Log in as provider administrator.
Choose Role Management > Roles.
Click Add.
Define role settings:
Setting |
Description |
|---|---|
Name* |
Name of the role. This field is mandatory. |
Hcs Component Access* |
Controls which HCM-F components (FF or SA) that users with this role have access to. Used with Hierarchy Type and Service Assurance Role Type when mapping roles to HCM-F. This field is mandatory. |
Service Assurance Role Type* |
Controls read/write access to HCM-F components. Used with Hierarchy Type and Hcs Component Access when mapping roles to HCM-F. This field is mandatory. |
Hierarchy Type* |
The type of hierarchy nodes applicable at the selected hierarchy level. For example, at Provider level, the following values are allowed: Provider, Reseller, Customer, and Site. While at the Reseller level, the following values are allowed: Reseller, Customer, Site. Controls which roles are available at which levels in the hierarchy. Also used with Hcs Component Access and Service Assurance Role Type when mapping roles to HCM-F. This field is mandatory. |
Description |
Description of the role. |
Access Profile* |
Permissions for resources are defined in Access Profiles. This field is mandatory. |
Menu Layout |
The menu layout assigned to the role. Controls the menu options available to users assigned to the role. |
Landing Page |
The home page assigned with the role. Controls what the home page looks like for users assigned to the role. |
Theme* |
The name of the theme assigned to the role. The theme controls the overall look and feel of the Admin Portal. This field is mandatory. |
Self Service Feature Display Policy |
The selected Self Service Feature Display Policy that is associated to the role. |
Self Service Links |
Provide useful links to Self Service end users. |
Custom Interfaces |
Add Interface Types and Names for the role. The available custom Interface Type is InterfaceBusinessAdminPortal, which provides access to the Business Portal Admin Portal. |
Click Save to save the role.
Microsoft-only Role
Starting with version 21.3-PB1, VOSS Automate ships with a Microsoft-only role (MicrosoftOnlyRole) and
accompanying role-based
access control elements, which are predefined for a Microsoft-only user interface experience.
These elements include
predefined field display policies, landing pages (MicrosoftOnlyLP), and menus (MicrosoftOnlyMenu), and a MS-only Business Admin Portal profile. Installing
these templates provides the baseline for a Microsoft-only version of VOSS Automate, and hides
non-Microsoft GUI elements, such as the FDPs, menus, and landing pages
reflecting functionality used for managing Cisco devices.
To use the MicrosoftOnlyRole in VOSS Automate:
Log in to VOSS Automate as hscadmin.
Go to (default menus) Role Management > Roles.
Locate MicrosoftOnlyRole in the list view.
Select the role in the list (or click on the role to open it).
Note
This role ships with a standard access profile and a predefined menu layout, landing page, and Business Admin profile.
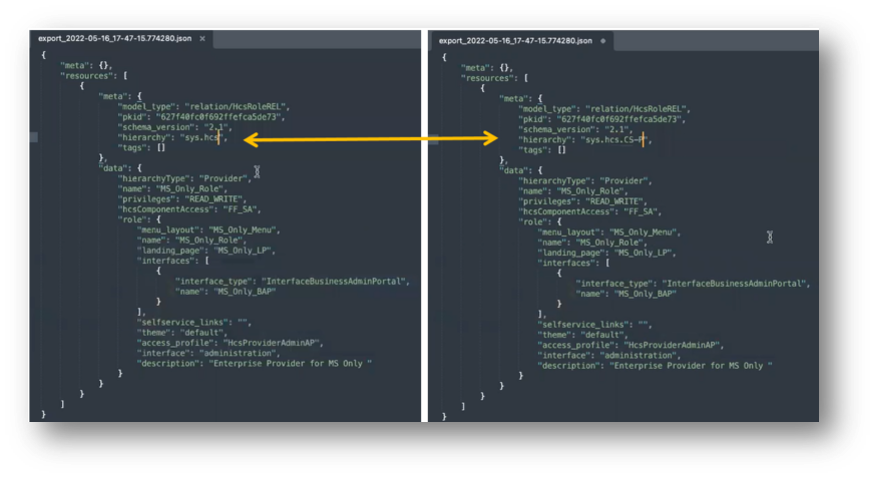
Click Export to export the role to a JSON file, and save the file to your local computer.
Edit the JSON file to specify the hierarchy where you want to use the role.
Go to (default menus) Administration Tools > Import.
Browse to the location you saved the JSON file, then click Import.
Go to (default menus) Role Management > Roles to verify that the role now exists also at the hierarchy you specified.
At the hierarchy where you wish to assign the role to a user (Provider or Customer), go to (default menus) User Management > Admins. Choose a user (or add a user), then on the User Details tab, from the Role field, choose the role (
MicrosoftOnlyRole) you imported to this level, and save your change.