
Intercom Lines
Overview
The Intercom Lines feature allow you to manage Intercom lines at a site level independently of the management of lines at a site.
Intercom lines are associated from phones or subscribers - they can then be set up and then associated to phones and subscriber phones simply by first selecting the Intercom Route Partition.
Managing Intercom Lines
When Intercom lines are set up, administrators can navigate to a site and access the Intercom Lines menu under the Subscriber Management menu for the site.
On the Intercom Lines page you can view a list of Intercom lines, and add, delete or modify Intercom lines.
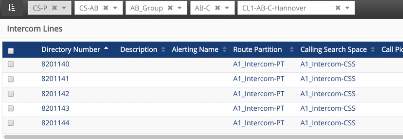
The Intercom lines configuration screen is simpler than the Lines configuration page, and shows only relevant fields.
Note
Intercom lines should be not be managed from the Lines menu.
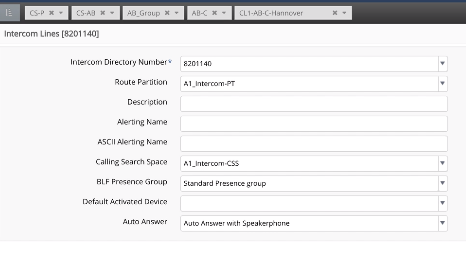
When adding or modifying Intercom lines:
The Route Partition drop-down only shows Intercom partitions.
The Calling Search Space drop-down only shows Intercom calling search spaces.
For Default Activated Device, select the supported device from the drop-down list.
The Auto Answer drop-down only shows supported options.
If the Description field is left blank, it takes a default value “Intercom Line”.
Associating Intercom Lines to Phones
Log in to the Admin Portal.
Choose the relevant site.
Go to (default menus) Subscriber Management > Phones.
On the Phones configuration page, select the Lines tab.
To associate Intercom lines, first specify an Intercom partition for the Route Partition Name.
On the Line page, view supported Intercom lines fields to be configured.
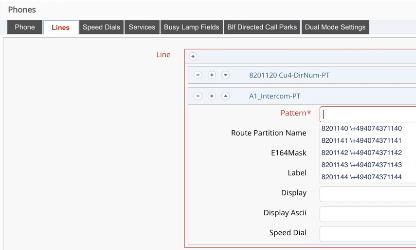
The Pattern drop-down only shows existing Intercom lines. No new lines can be added.
Intercom and non-Intercom lines can both be associated to a single phone.
Associated Intercom lines will also show as “used” in the list view of the Directory Number Inventory menu under Dial Plan Management and its Description in the list will also show as “Intercom Line”.
Deleting the phone on the Phones list view will then also show the Intercom line as not in use.
Intercom Lines in Subscriber Management
Log in to the Admin Portal.
Choose the relevant site.
Go to (default menus) Subscriber Management > Subscribers.
When adding a phone to a subscriber, to associate an Intercom line to the phone on the Phones tab, also first specify an Intercom partition for the Route Partition Name.
View supported Intercom line fields to be configured.
The Pattern drop-down only shows existing Intercom lines, including those in use.
No new lines can be added as a part of Subscriber management - they are added on the Intercom Lines menu.
Associated Intercom lines will also show as “used” in the list view of the Directory Number Inventory menu under Dial Plan Management and its Description in the list will also show as “Intercom Line”.
Deleting the phone on the Phones list view will then also show the Intercom line as not in use.