
Webex User Details#
Overview#
On the Webex User Details page (relation/SparkUser) you can view a list of Webex users in Automate,
and click on a user to view or configure their settings.
Webex Contact Center agents can be added if a user is assigned a Contact Center Premium Agent or Contact Center Standard Agent license. Refer to the Assigned Licenses entry below, particularly the Contact Center panel form that allows for Contact Center agent management.
You can choose phone numbers and assigned licenses. For phone number type, a Webex Calling license is required, and the Webex API (used for syncing with the Webex Control Hub) supports add or update for a single primary phone number of type Work.
Note
Webex-specific identity values for a user (such as the Webex username used for provisioning and service association) are automatically populated and maintained by VOSS provisioning and update workflows. These values are derived from the Webex Control Hub or associated directory sources and are not manually managed on the Webex User Details page.
Multiple phone numbers (primary and secondary)
A Webex user can have multiple phone numbers assigned. One number is treated as the primary (Work) number, while any additional numbers are provisioned as secondary calling lines.
Due to Webex API limitations, the primary number is created or updated as part of the user record, while secondary numbers are applied after user creation using Webex Calling telephony configuration.
Note
Webex only supports a single Work phone number during user creation via the /v1/people API. Any additional phone numbers are assigned as secondary lines using the Webex telephony endpoint after the user has been created. This behavior is handled automatically by VOSS.
Webex users created using Webex Quick User (Quick Add Subscriber) can have secondary phone numbers configured during onboarding, which are then visible and manageable on the Webex User Details page.
Related topics
Webex user details settings#
This topic describes the Webex user details settings you can configure when adding or updating a Webex
user on the Webex User Details page (relation/SparkUser).
The Webex User Details page provides the following settings:
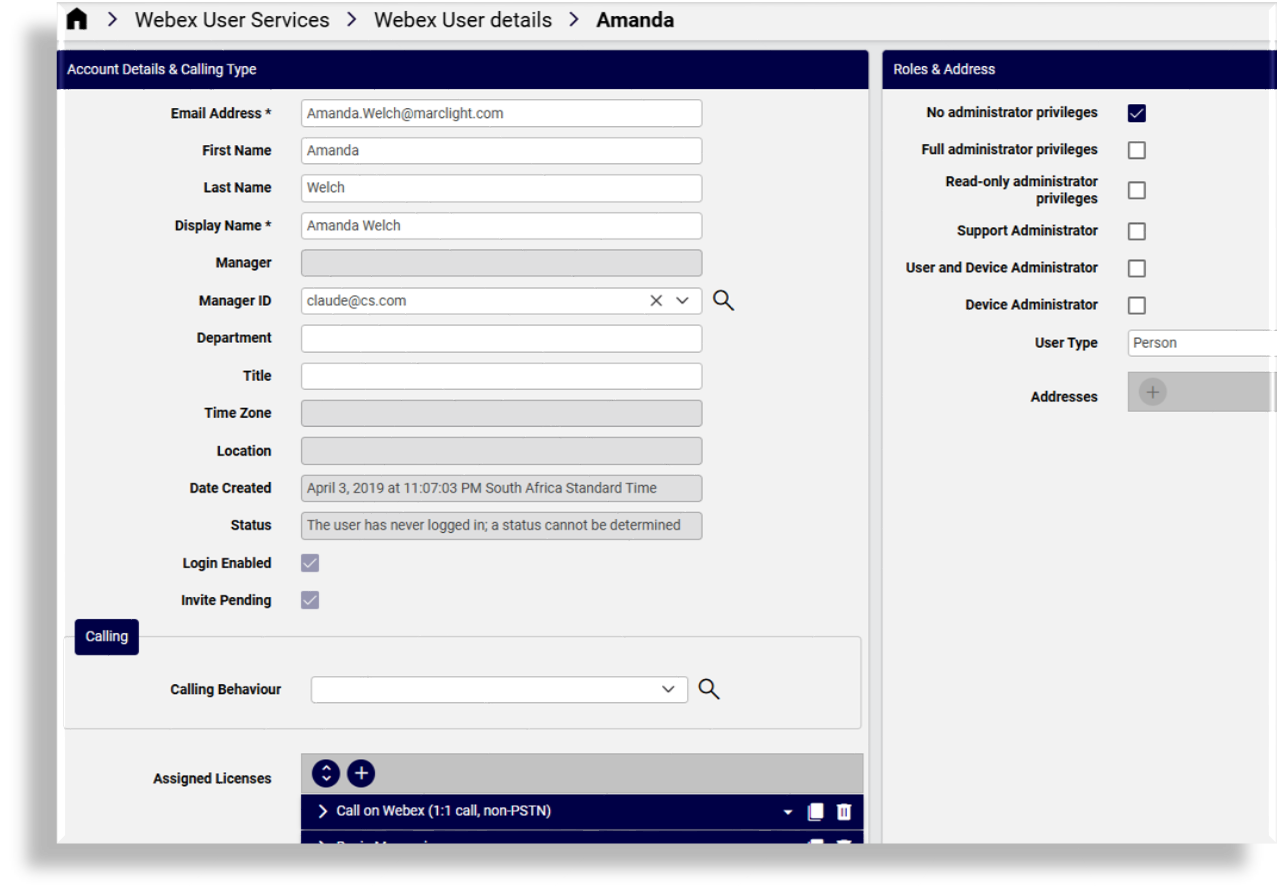
Account Details & Calling Type
Roles & Address
Wholesale Package
Calling Settings
Contact Center
Account Details & Calling Type tab/panel#
This tab/panel configures a Webex user’s account details and calling type.
Important
On directory-synced Webex Control Hubs, certain identity fields are managed externally (for example, by LDAP) and can’t be modified in Webex. To prevent failures during provisioning, VOSS automatically suppresses updates to these fields.
The following fields are read-only in the VOSS GUI - Webex Quick User and Webex User Details
(relation/SparkUser) and are ignored (not sent to Webex) during provisioning when the customer
is directory‑synced:
First Name
Last Name
Display Name
Title
Department
Manager
Email Address
If you attempt to change one of these values, VOSS preserves the existing value from Webex Control Hub and does not attempt an update. This prevents Webex from returning update errors for directory-synced users.
Email Address: (Mandatory). Identity key used for matching during moves.
First Name / Last Name: Identity fields.
Display Name: (Mandatory). Display name. Typically, name and surname.
Manager: The manager’s name.
Manager ID: The manager’s email address.
Location: Read-only, synced from Control Hub.
Roles & Address tab/panel#
The Roles & Addresses tab/panel configures the Webex user’s roles and addresses. Here you can select the relevant roles:
No administrator privileges: Default
Full administrator privileges: Assigns access to all portal features, including:
Assign roles
Company policy and templates
Device management
Licenses and upgrades
Read-only administrator privileges: Assigns read-only access to content available to a full privilege admin
Support administrator privileges: Assigns access to user information and support logs
User and Device Administrator
Device Administrator
Wholesale Package settings#
The Wholesale Package tab/panel (if available) manages settings for packages in the Webex for Wholesale service, and their status, for example, provisioned.
This tab/panel displays only when the Webex for Wholesale service is available. See Webex Application Access (Webex Organization) in the User Guide.
Depending on the package selected, the user’s assigned licenses, as available on the Webex for Wholesale service, are then also updated when the user is provisioned.
Note
When modifying a Webex user and UCM Calling Licensing is deleted and the work phone number is also set to empty, the number is removed from the user. Work phone number remains assigned to the user if it’s not set to empty.
Calling settings tab/panel#
This tab/panel configures a Webex user’s calling settings:
Calling Behavior: Determines license use. Choose an option to auto-populate settings:
Calling in Webex App: Allows calling via the Webex app using native Webex calling
Cisco Jabber app: Allows calling using a Cisco Jabber client registered to UCM
Third Party app: Allows calling using a third party app registered to UCM
Calling in Webex App (Unified CM): Default. Allows calling via the Webex app using a registration to UCM
Note
Calling in Webex App (Unified CM) is the default calling behavior. When choosing this option, fields for device creation (Iphone, Android, CSF, Tablet) are displayed and checked by default.
Phone Numbers:
You can assign multiple phone number entries to a Webex user. Each entry includes a Type (for example, Work) and a Number, and may also include an extension if Webex Calling is enabled. One phone number is treated as the primary (Work) number. Any additional entries are provisioned as secondary calling lines for the user.
A Webex Calling license is required to assign phone numbers. Secondary numbers are provisioned automatically after the user record has been created in Webex.
Note
Secondary phone numbers are provisioned using Webex Calling telephony configuration. The maximum number of secondary lines supported per user is determined by Webex Calling service limits.
Extension: Webex Calling extension is available if a user has a Webex Calling license.
Assigned Licenses: Selected from licenses available on the Cisco Webex service as synced in from the Webex Control Hub.
Depending on a user’s license, services such as Collaboration, Conferencing and Contact Center are available.
If Webex calling is enabled and a user is assigned a Webex Calling - Professional license, a Calling Settings panel on the form allows for the user management of Calling Settings (such as Barge In, Caller ID, Call Forward, Call Recording, Call Waiting, Intercept).
Note
If a user has Calling Settings available, these need to be removed and to be re-provisioned if it is necessary to move the user to another site. For details, see Move user (without services).
How Caller ID works for Webex users in VOSS
Cisco Webex has deprecated (March 2026) the old Caller ID and dial-by name fields (firstName, lastName, and virtual-line callerIdFirstName/callerIdLastName).
VOSS now users the updated Webex schema fields (directLineCallerIdName.selection, directLineCallerIdName.customName, dialByFirstName, dialByLastName) and includes transition logic where the new fields take precedence when both are present. Deprecated-only inputs are converted automatically, ensuring full compatibility with the updated Webex APIs for both users and virtual lines.
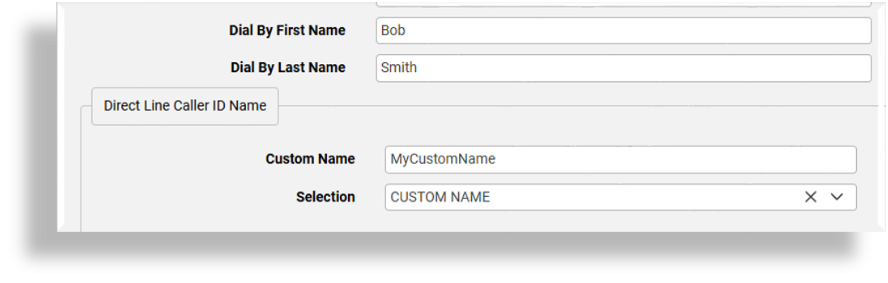
Where Caller ID is configured for Webex users in VOSS, the Caller ID uses the Direct Line Caller ID Name fields:
Selection (
directLineCallerIdName.customName)Custom Name (
directLineCallerIdName.selection)
The caller ID name is determined by the value of Selection:
DISPLAY NAME: Webex uses the user’s Display Name.
CUSTOM: Webex uses the value in Custom Name.
FIRSTNAME_LASTNAME / LASTNAME_FIRSTNAME: Webex constructs the caller ID using the user’s first and last name values returned by Webex.
Dial-by names are generated via the following fields:
Dial by First Name:
dialByFirstNameDial by Last Name:
dialByLastName
Contact Center tab/panel#
This tab/panel configures Contact Center settings, which display only if a user is assigned a Contact Center Premium Agent license. Settings include:
User profile ID
Site ID
Team IDs
Skill Profile ID
Agent Profile ID: All global and only desktop profiles assigned to the same contact center site as the user are available.
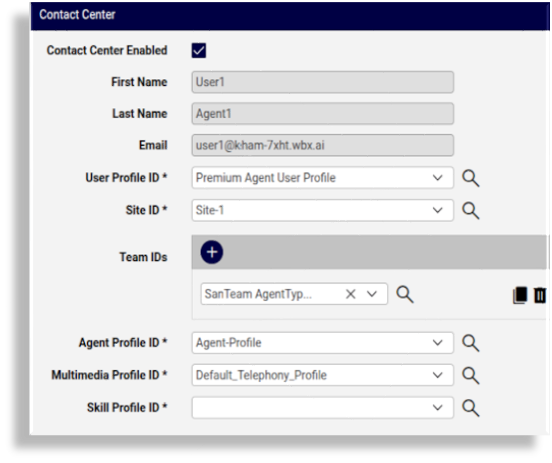
Multimedia Profile ID
Related topics
For further details, see:
Introduction to Webex Contact Center in the User Guide
- Webex Contact Center Desktop Experience
Manage a Webex user#
This procedure displays, updates, or adds a Webex user via the Webex User details page
(relation/SparkUser).
Log in to the Admin Portal as a Provider, Reseller, Customer, or Site administrator.
Go to the Webex User Details list view. This summary view provides details for existing users:
On-Prem UCM Calling Service (True/False): Defines whether calling services are on-premise or cloud. The On-Prem UCM Calling license is removed if the Cisco Webex Calling (with UCM) is removed from the user.
Calling Behavior
Use Organization’s Domain (True/False): When enabled, the Cisco Webex organization domain is used for calling in Cisco Webex (Unified CM)
UC Manager Profile: May be used to identify the required UCM cluster when a calling behavior using UCM is selected. If the default UCM domain is selected, this is not required.
User Type: “Person”, “Bot” or “App User (Guest User)”.
Status: The current Cisco Webex App user status. For example, active/inactive, in a call/meeting/presenting, and so on. If unknown, then displayed as, “The user status could not be determined”.
Select a user to view or manage their account.
Choose an option:
Add Webex user: Click the Plus icon (+) to add a new record. Choose a the relevant site. Configure the user. Save.
Delete Webex user: From the list view, select users to delete, one or more, then click the Delete icon. Click Yes to confirm.
The internal number inventory (INI) is updated as the number status is changed to Available, and its description is removed. This applies to all phone numbers assigned to the user (both primary and secondary numbers).
Update Webex user: Click on a user to open its settings, make your changes, then save.
Related topics