
Manage users#
Overview#
VOSS supports multi vendor users, which allows you to provision and manage services from one or more vendors on the VOSS platform. For example, to use both Microsoft meeting and collaboration tools and Cisco tools.
Note
When managing users across single-vendor, multi-vendor, and hybrid deployments, vendor-specific usernames (for example for Microsoft, Cisco, or Webex services) are automatically maintained by provisioning, update, offboard, and merge workflows.
These identity values are stamped or updated based on the user’s current service associations and sync source, and do not require manual maintenance during normal user management operations.
Related topics
Single vendor and multi vendor users#
VOSS supports provisioning for a number of categories of user, representing either a single or multi vendor deployment:
Single or Multi Vendor |
Description |
|---|---|
Single vendor user |
Users services from a single vendor, for example, either all Cisco services, or all Microsoft services. |
Multi vendor user |
Users using services from two or more vendors. |
Multi vendor hybrid user |
Users using services from two or more vendors, with services configured for integration, for example, with dial plans and routing. |
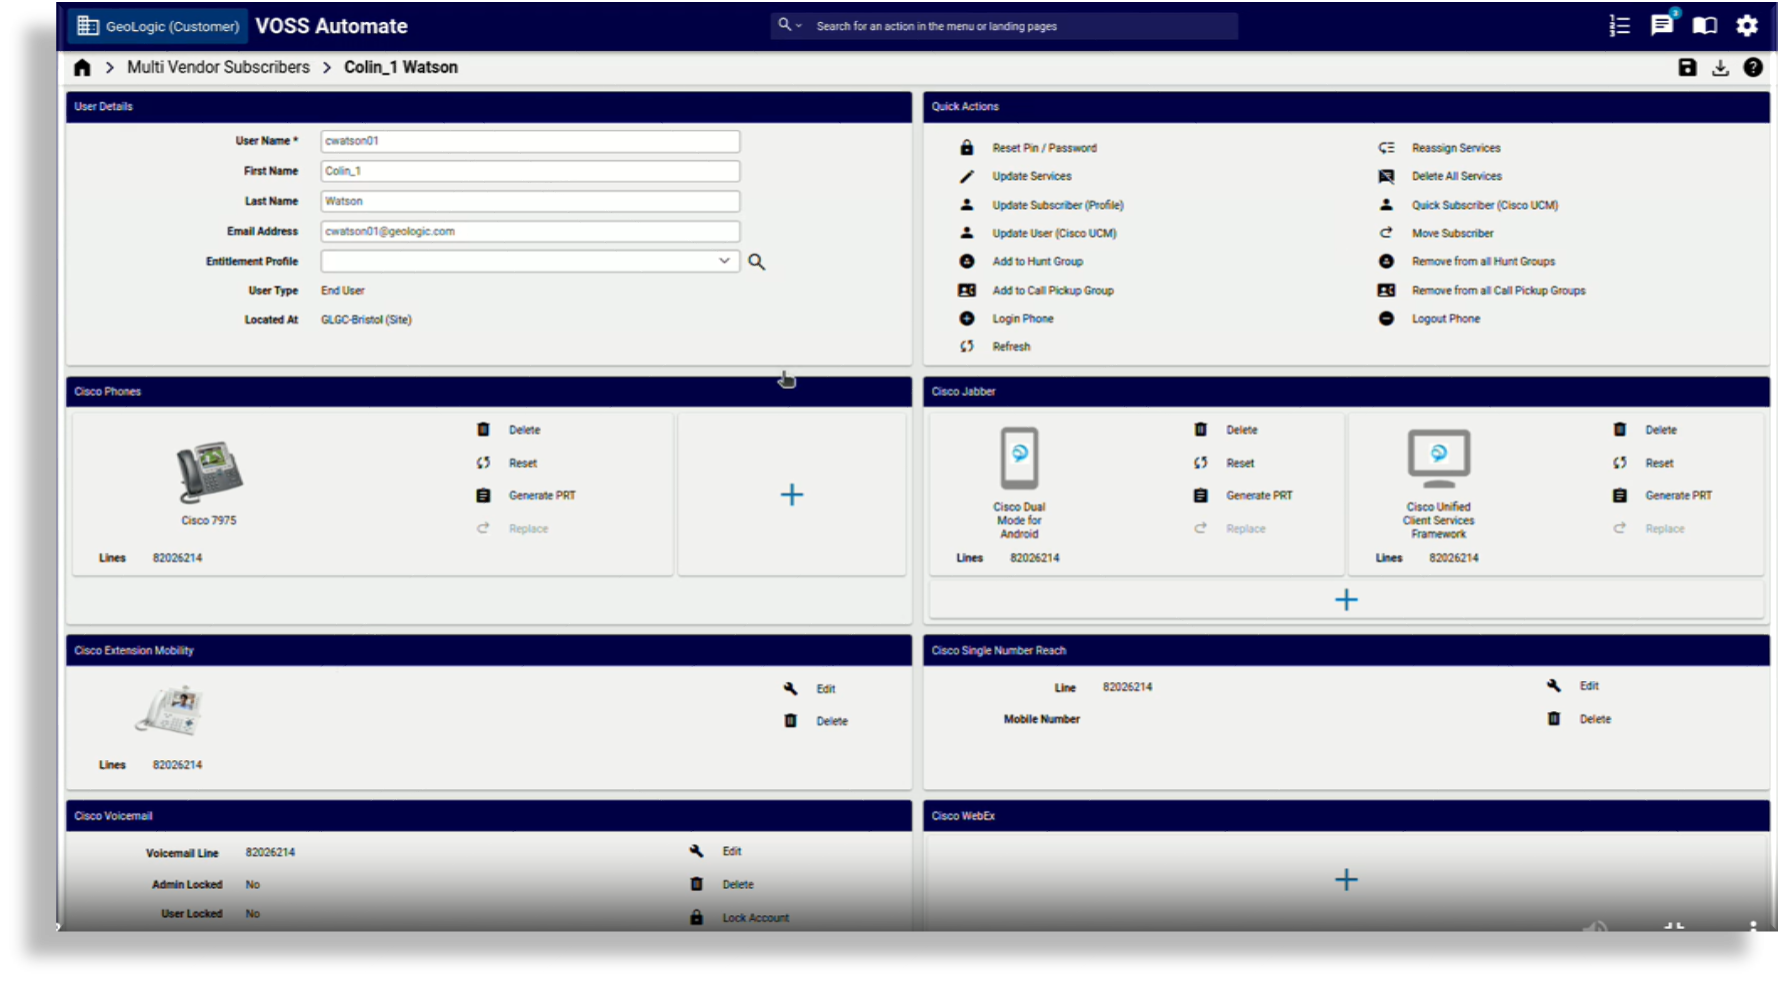
Example: Multi vendor user with Cisco services
Example: Multi vendor user with Microsoft Teams
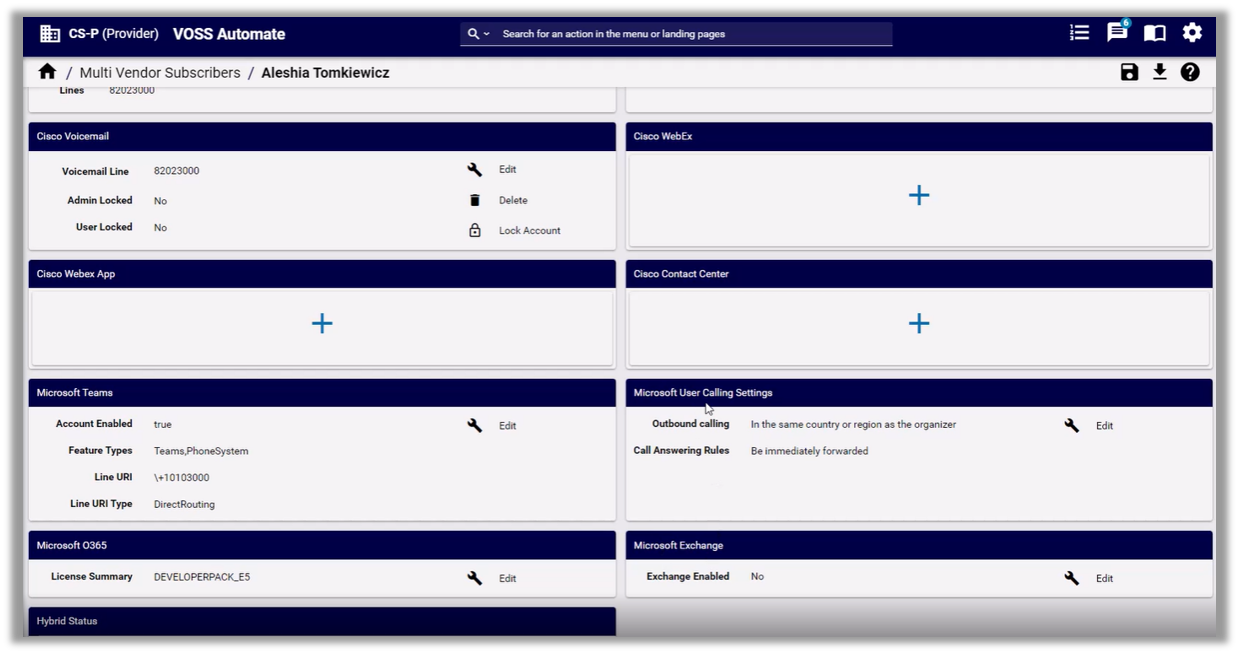
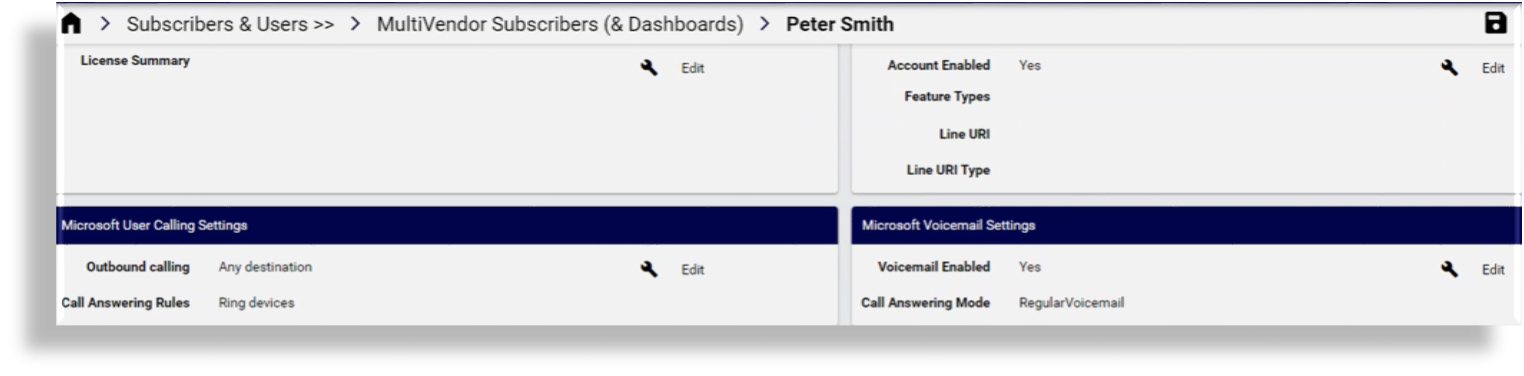
Example: Multi vendor user’s user calling and voicemail settings
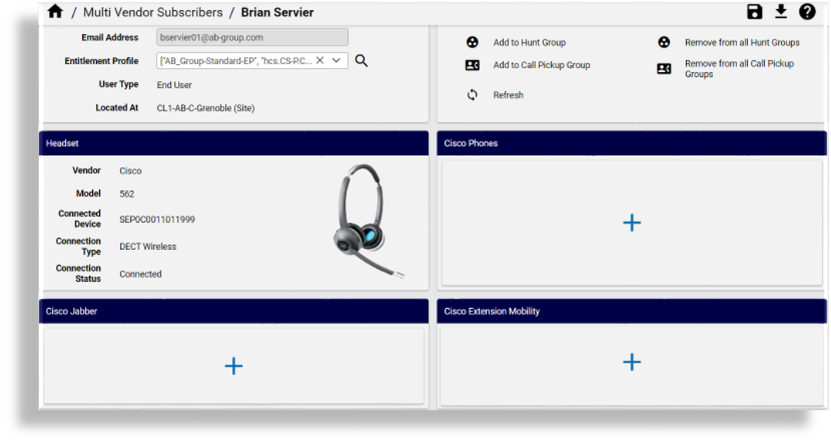
Example: Multi vendor user’s headset settings
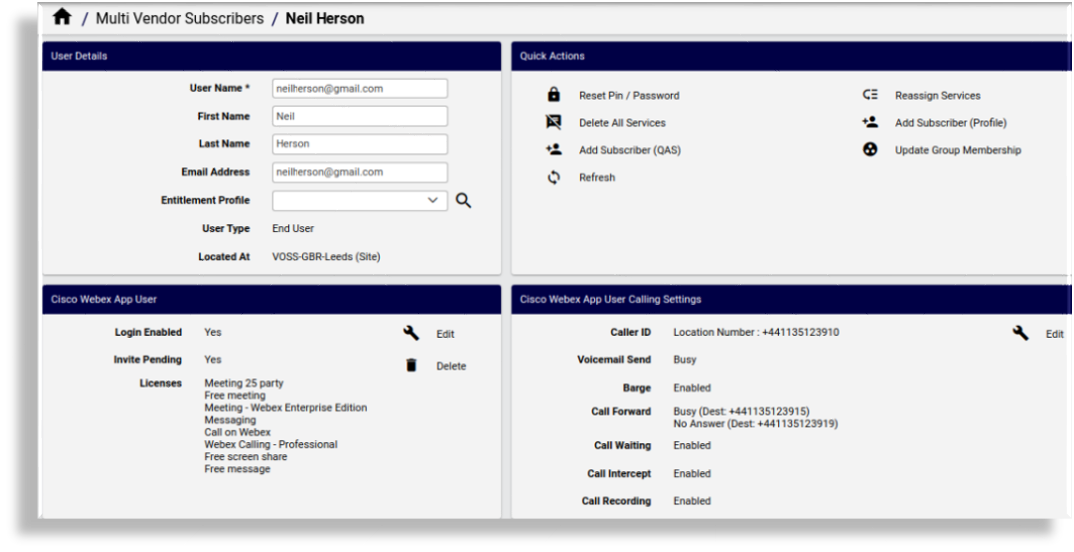
Example: Multi vendor user - Cisco Webex App User with Webex Calling Professional license, showing Cisco Webex App User Calling Settings
Update multi vendor users#
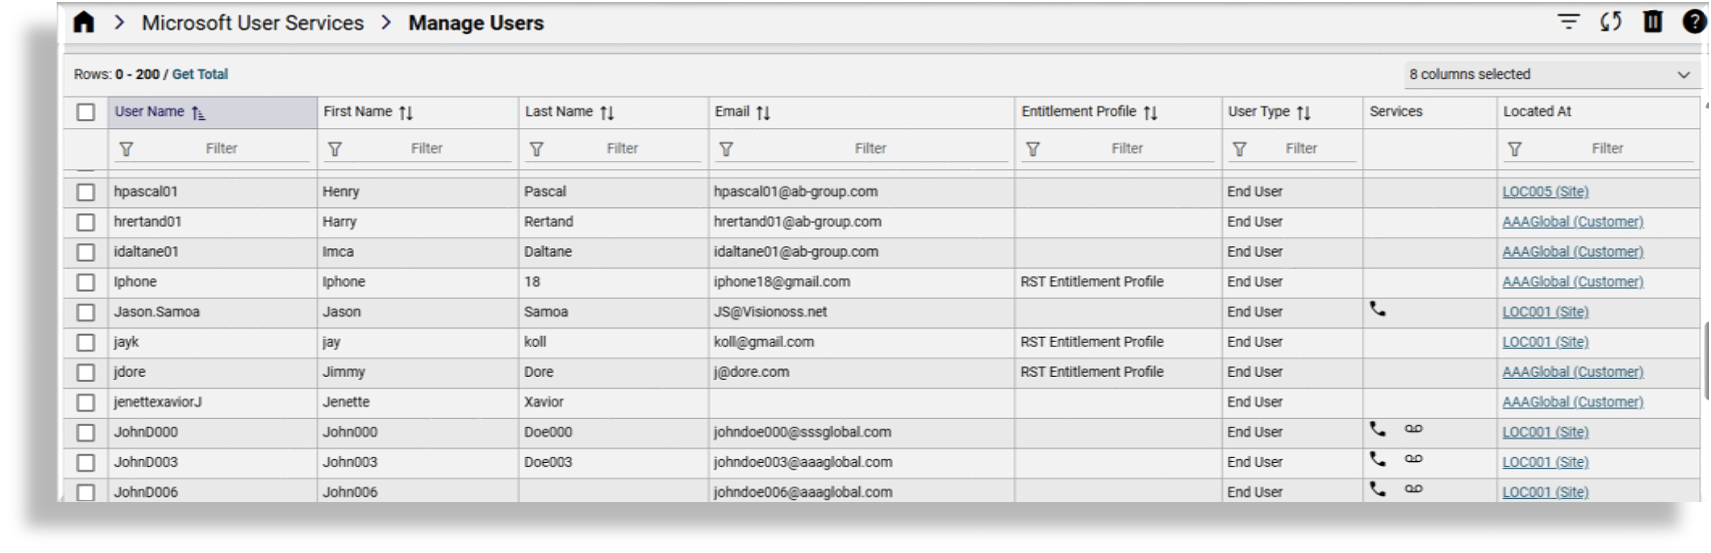
This procedure displays the summary list view of users (Microsoft, Cisco, Webex) and updates users and their services.
Go to Users & Services, then, choose an option:
User Overview: A dashboard displaying a summary of totals for users in the system.
User Details: A dashboard displaying a summary of services, and service details by vendor (Microsoft, Cisco, Webex, as relevant for your system).
Microsoft User Services: A dashboard for viewing and managing Microsoft users, if relevant for your system.
Webex User Services: A dashboard for viewing and managing Webex users, if relevant for your system.
Cisco User Services: A dashboard for viewing and managing Cisco users, if relevant for your system.
Go to Manage Users. Choose an option:
Note
The list view uses an
[OR]condition to filter users:End User[OR]End User + AdminFor details on the filter, see: Working with lists.
Microsoft users: Go to Microsoft User Services, then, in the Quick Actions, select Manage Users.
Webex users: Go to Webex User Services, then, in the Quick Actions, select Manage Users.
Cisco users: Go to Cisco User Services, then, in the Quick Actions, select Manage Users.
Note
Quick Actions for multi vendor user are defined via the Multi Vendor FDP (
MultiVendorFDP) in the field display policy (FDP) for the page. See Enable multi vendor users.For details around the available quick actions for multi vendor user, the user type they apply to, and the impact of changes via the Quick Actions, see:
On the Manage Users [username] page, you can view and update the user details and services, or delete the user.
Note
To add a user, see System User Details.
To move a user, see Move user & services.
Delete users: You can delete one or more users from the list view, or delete the user from their management page.
Non-Microsoft multi vendor user: deletes the user along with their services
Microsoft multi vendor user: deletes the user along with their services, and offboards the user (removes their license)
If applicable, the user’s hybrid status is updated
LDAP or MS365 users: The system user is retained.
Hybrid multi vendor user with MS365 elements: Moves the user and their Microsoft models to the customer level. See Hybrid Cisco-Microsoft Conversion.
Bottom-up LDAP multi vendor user: Deletes
device/cucm/Useranddata/UserTop-down LDAP user: Deletes the user, retains
data/Useranddevice/ldapuser instancesMicrosoft provisioned user: Retains
data/Userif there is an associated Microsoft user
Update user:
Choose an entitlement profile
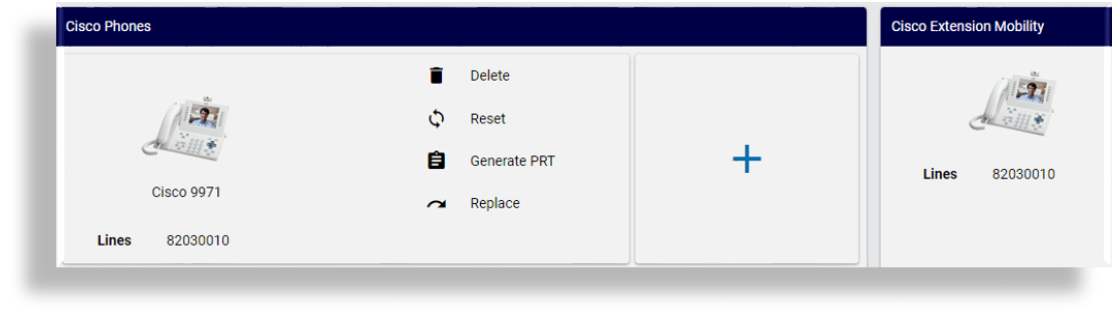
View and manage phones and lines
Note
For users with associated softphones, the phone product model name displays below the Phone icon on the cards. This is useful where the user has multiple phones and you need to easily distinguish between different phone models.
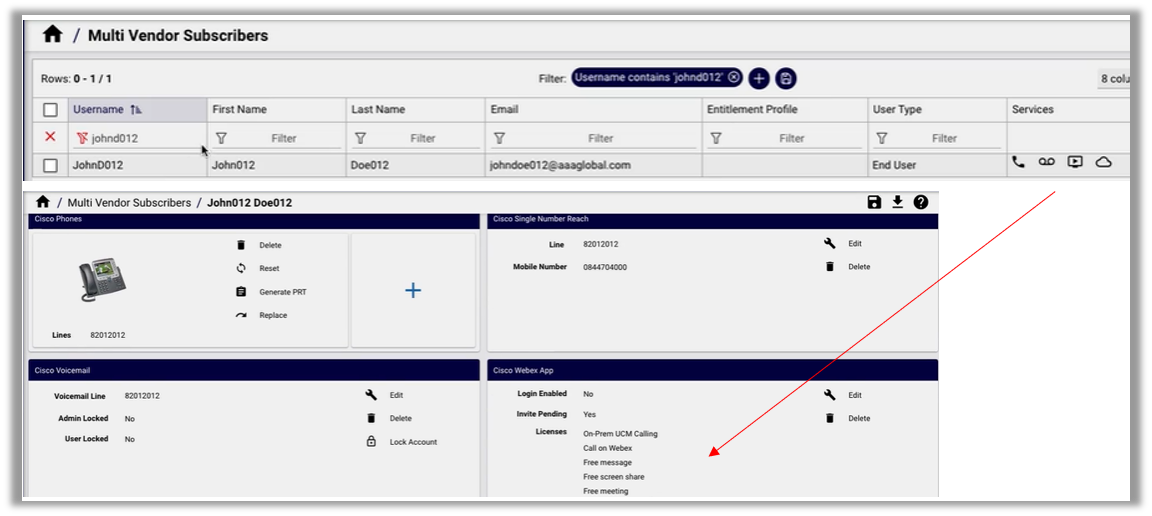
View and manage the user’s existing, enabled services, which may include Microsoft user calling settings, Microsoft voicemail settings, Microsoft Teams, Cisco Webex, Cisco Voicemail, and other enabled services.
For users with multiple remote destinations associated to their single number reach (SNR), the Cisco Single Number Reach card on the management page displays only the first associated SNR remote destination profile and the first associated remote destination to that SNR.
For users licensed with a Webex Calling Professional license, the following cards display:
Webex Devices: Devices available to the user
Webex Voicemail: If the Voicemail setting is enabled, options for sendAllCalls, sendBusyCalls, sendUnansweredCalls, edit link to Voicemail
Webex Calling Settings: Barge In, Caller ID, Call Forward, Call Recording, Call Waiting, Intercept, edit link to Calling Settings
The image shows users with Webex App, and how they show up in the list view and on their configuration details page:
Related topics
Multi vendor user service icons#
The table describes caveats for icons in the Services column of the multi vendor user list view:
Users with Microsoft services |
|
Users with Webex App |
Included icons may be for collaboration, conferencing, voice, and/or voicemail, contact center agent, provided the user has the required license. For example:
|
Headset and phone |
A headset icon displays in the Services column for users that have a headset connected to an associated phone. |
Merge two users into a single multi vendor user#
VOSS provides a merge tool for consolidating
duplicate user accounts from two different vendors (two data/User instances with the
same email address) that have been imported from different vendors,
into a single, Cisco-Microsoft multi vendor user.
This case is required where you have imported two user accounts from different vendors,
for example, Cisco and Microsoft, and you add or update their email addresses
to the same email address. In this case, the merge tool workflow (Merge_Relation_User workflow)
is triggered when it finds the duplicate email address for the two data/User instances.
You can use the view for the merge tool (view/ConsolidateUsers) to define the
primary user (which is retained once merged), and the secondary user (which is
deleted once merged). The services of the secondary user will then be merged into the primary user.
When consolidating these two accounts, the default provisioning workflow of the merge tool (ConsolidateUsers)
copies details of the secondary user into the primary user, and moves any device models associated with the
secondary user to the hierarchy of the primary user:
Copies the username (Cisco or Microsoft) of the secondary user to the primary user
Copies the Zoom username of the secondary user to the primary user
Copies the email address of the secondary user to the primary user
Copies the email address to the Cisco user, if the primary Cisco UCM user is local
Deletes the secondary user (the
data/Userinstance of the secondary user
Once successfully merged, a log entry is added to data/HcsUserManagementLogDAT, and
the primary user is assigned a system username, as a multi vendor user.
Note
The secondary user can’t be a Cisco UCM user as it cannot be deleted. Only secondary users that match the primary user can be merged.
The secondary user can’t be configured as a hybrid user; remove this setting before merging users.
The merge tool doesn’t allow consolidation of the user accounts if both the primary and secondary user accounts are Cisco UCM users.
Quick actions for multi vendor user#
Quick actions allow you to easily access frequently used activities, for example, to
reset a PIN or password, or to add a user. Multi vendor user includes a set of quick actions that are configured via the
multi vendor user field display policy (MultiVendorFDP; fallback FDP is default).
Quick actions added to
the MultiVendorFDP field display policy (FDP) appear as links on the Quick Actions card on
the management page of the selected multi vendor user.
While some quick actions are also available as stand-alone features or functionality that can be accessed via a menu or dashboard link (or via the Search bar), other quick actions, such as Update User (Cisco UCM), are only available as a quick action.
The availability of a quick action also depends on the user type or the environment, for example,
Cisco or Microsoft, multi vendor or hybrid. You’ll also require appropriate permissions on your access
profile to have some quick actions available to you. By default, the access profiles
that ship with the system (except for Operator access profiles) have read, write, and export permissions on
all multi vendor user quick actions and service card actions that are views, for example, view/DeleteCucmHuntGroupAllMembers
(quick action, Remove from all Hunt Groups), view/DeleteSubscriberService (quick action Delete all services), or
view/AddExtensionMobility (service card action, Add Extension Mobility).
Quick action links trigger the following behavior in the system:
Some quick actions, such as Update User (Cisco UCM), are only available as a quick action link that launches a dialog (or overlay) on the current page, and allows you to perform a specific action (related to the quick action).
Some quick actions are shortcuts to a menu or dashboard for the feature, such as the Cisco Quick User or Microsoft Quick User link, which opens the Quick Add User page directly from the quick link.
In some cases, the quick action launches a dialog (or overlay) on the current page for performing a specific action related to the quick action, such as Add to Hunt Group or Remove from All Hunt Groups, while the full functionality for the feature is also available via a menu or dashboard.
In this case, you may also access the functionality via the menu (or fill out the feature name, for example, Hunt Groups, in the Admin Portal Search bar, and press Enter to locate the page).
Related topics
Access profile dependencies for multi vendor quick actions#
This section describes the access profile dependencies for quick actions in Multi Vendor User service panels.
All Add (+) quick actions require both read and create operations on the listed access profile entries.
Edit quick actions (for SNR and Contact Center) use
relation/models.
Access is granted when the user’s profile has the required operations on the listed model. Multiple rows for the same Quick Action means all listed model/operation pairs are required (typically any one is used for permission checks).
Each entry in the table states the required model and operations (read/create). Refer to the table to correctly configure visibility.
Quick Action |
Access profile model |
Operation |
|---|---|---|
Refresh Subscriber |
|
read |
Delete All Services |
|
read / create |
Update Subscriber (Profile) |
|
read / create |
Quick Subscriber (Cisco UCM) |
|
read / create |
Quick Subscriber (Webex App) |
|
read / create |
Quick Subscriber (Microsoft) |
|
read / create |
Update Group Membership |
|
read / create |
Move Subscriber |
|
read / create |
Re-assign Services |
|
read / create |
Update Services |
|
read / create |
Update CUCM User |
|
read / update |
Add To Hunt Group |
|
read / create |
Remove from all Hunt Groups |
|
read / create |
Add To Call Pickup Group |
|
read / create |
Remove from all Call Pickup Groups |
|
read / create |
Login Phone |
|
read / create |
Logout Phones |
|
read / create |
Reset Pin / Password |
|
read / create |
Add Cisco Phone |
|
read / create |
Add Cisco Jabber |
|
read / create |
Add Cisco Extension Mobility Profile |
|
read / create |
Add Cisco Voicemail |
|
read / create |
Add Cisco WebEx User |
|
read / create |
Add Cisco Webex App User |
|
read / create |
Add Cisco Single Number Reach |
|
read / create |
Add Cisco Contact Center |
|
read / create |
Add MS Teams |
|
read / create |
Add MS O365 |
|
read / create |
Add MS EXCHANGE |
|
read / create |
Add Pexip Conference |
|
read / create |
Add Hybrid User |
|
read / create |
|
|
read / update |
|
|
read / create |
Reset Phone |
|
ResetPhone |
Generate PRT |
|
GeneratePrtPhone |
Replace Phone |
|
read / create |
|
|
read / update |
|
|
read / create |
|
|
read / update |
Delete Single Number Reach |
|
read / create |
|
|
read / update |
|
|
read / create |
|
|
read / update |
|
|
read / create |
|
|
read / update |
|
|
read / create |
|
|
read / update |
|
|
read / create |
|
|
read / update |
|
|
read / create |
Lock / Unlock Voicemail Account |
|
read / create |
|
|
read / update |
|
|
read / delete |
|
|
read / update |
|
|
read / update |
|
|
read / update |
View Headset Inventory |
|
read |
Note
Custom device operations (such as ResetPhone or GeneratePrtPhone) are valid RBAC operations defined
in the backend for relation/SubscriberPhone, even though they do not use the standard
create/read/update/delete verbs.
Quick actions (all users)#
The table describes quick actions that support all users:
Quick Action |
Description |
|---|---|
Refresh |
|
Delete all Services |
Note The To hide a specific delete quick action, remove the field (model) from the
field display policy (FDP) for |
Note
You can find more information about VOSS’s caching policies in Default Cache Control Policy in the Core Feature Guide.
Quick actions (Cisco and Microsoft)#
The table describes quick actions that support Cisco UCM and Microsoft:
Quick Action |
Description |
|---|---|
Update User (Profile) |
|
Quick actions (Cisco UCM)#
The table describes quick actions that support Cisco UCM:
Quick Action |
Description |
|---|---|
Quick Add User (Cisco UCM) |
|
Update User (Cisco UCM) |
|
Quick Action |
Description |
|---|---|
Move User |
|
Add to Hunt Group |
|
Quick Action |
Description |
|---|---|
Remove from all Hunt Groups |
|
Add to Call Pickup Group |
|
Quick Action |
Description |
|---|---|
Remove from all Call Pickup Groups |
|
Login Phone |
|
Logout Phone |
|
Reset PIN/Password |
|
Quick Action |
Description |
|---|---|
Update Services |
|
Reassign Services |
|
Quick actions (Microsoft)#
The table describes quick actions that support Microsoft:
Quick Action |
Description |
|---|---|
Quick Add User (MS) |
|
Update Group Membership |
|
Quick Action |
Description |
|---|---|
Microsoft Exchange |
|
Related topics
Manage group membership in the Core Feature Guide
Quick actions (Webex)#
The table describes quick actions that support Webex:
Quick Action |
Description |
|---|---|
Quick Add User (Webex) |
|
Related topics
Update multi vendor Cisco user for IM and Presence and/or Conference Now
Manage group membership in the Core Feature Guide
Configure quick actions for multi vendor users#
This procedure configures the quick actions that display on the Quick Actions card when viewing a multi vendor user.
To configure the quick actions that display on the card:
In the Admin Portal, go to Field Display Policies.
In the list view, search for and click on the default multi vendor user field display policy (
MultiVendorFDP).Clone the FDP, then edit the clone for your requirements:
Fill out a name and a description for the FDP.
Leave the target model type as
relation/MultiVendorSubscriber.For Display Groups As, choose whether the default display is panels, tabs, or field sets.
Click the down arrow at Quick Actions, then configure the fields to display:
Note
Leave the Quick Actions card in its default position at the top of the dashboard.
Add fields to the card by selecting and moving fields from Available to Selected.
Remove fields by selecting and moving fields from Selected to Available.
Important
You must select valid fields for the model (allowed services), which in this case is
relation/MultiVendorSubscriber.Only valid fields will display on the service cards once you apply the FDP. For multi vendor user, valid field names are prefixed
mvs_user_qa, where:mvsis the alias for multi vendor user*_qais Quick Action
If a service or action is disallowed in the global settings or in the entitlement profile, or if required servers are not installed for the service, the system verification check does not allow display of the service or action on the User Management dashboard (defined via the FDP), and the user can’t be provisioned with this service.
Click Save.
The next time you view the Quick Actions for a selected multi vendor user, you’ll be able to use the quick action to update the user.
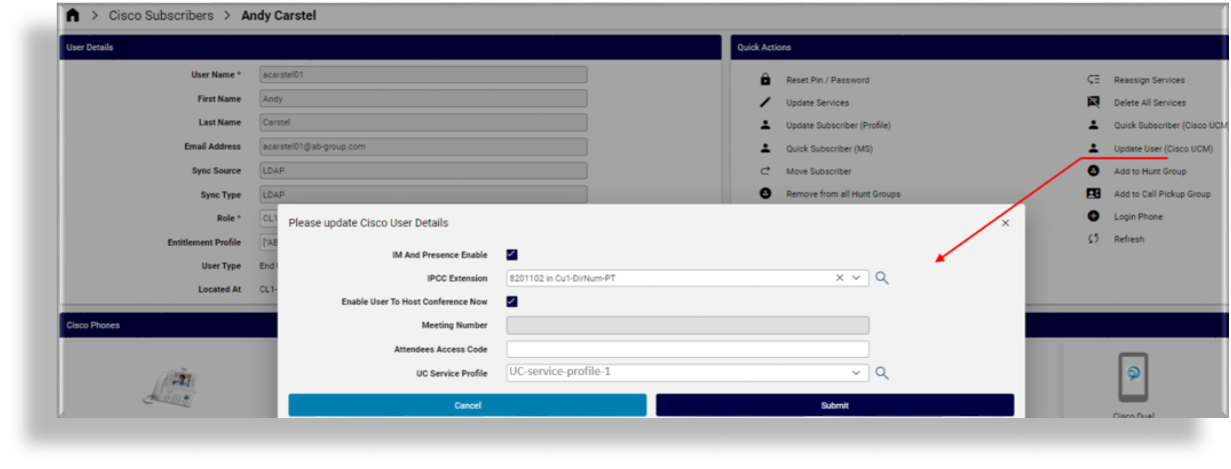
Update multi vendor Cisco user for IM and Presence and/or Conference Now#
This procedure enables or disables IM and Presence, chooses the IPCC extension, defines whether the user has permissions to host a conference, and assigns a UC service profile.
Note
Conference Now is a Cisco Call Manager Ad Hoc conference service, available only to Cisco users. See the Cisco Unified Communications Manager documentation for more information about Conference Now.
The Update User (Cisco UCM) quick action is only available for Cisco users who are also multi vendor users, on the Quick Actions card on the user’s management page. The field for this quick action (
mvs_user_qa.qa_update_cisco_user) must be added to the user’s field display policy,MultiVendorFDP, in the Quick Actions card (via the Field Display Policies page).
In the Admin Portal, go to Manage Users (via Cisco User Services).
From the list view, click on the relevant user.
In the Quick Actions, click Update User (Cisco UCM) to open the dialog, then update the Cisco user:
To enable IM and Presence, select IM and Presence Enable.
Select the IPCC extension from the drop-down.
Note
The IPCC Extension drop-down lists the line/route partitions associated with this user.
To enable Conference Now, select Enable User to Host Conference Now. When enabling Conference Now:
The meeting number displays in the read-only Meeting Number field.
You can fill out an access code in the Attendees Access Code field.
Optionally, you can also assign a UC service profile via the drop-down.
Click Submit.