
PowerShell Proxy Setup
Overview
VOSS Automate accesses and provisions Microsoft Teams using PowerShell. It
does this by generating PowerShell scripts ‘on the fly’, then pushing
them to one or more customer-owned Windows servers (the PowerShell
Proxy) for execution. Results are then returned to VOSS Automate for further
processing. The PowerShell scripts generated by VOSS Automate utilize the
MicrosoftTeams PowerShell module provided by Microsoft.
This document describes the setup of the PowerShell Proxy servers,
including the installation of the MicrosoftTeams PowerShell module.
You will have to have local Administrator privileges on the PowerShell
Proxy server to complete this procedure.
Deployment Topology Options
PowerShell Proxy Server Domain Membership
PowerShell Proxy servers may be joined to an Active Directory domain. If you are using VOSS Automate to manage or extract data from any on-premises component, such as Skype for Business Server, on-premises Active Directory, or on-premises Exchange Server, then domain membership is required. In all other cases domain membership is optional.
Redundancy
You can deploy two or more PowerShell Proxy servers to provide redundancy. This configuration requires a load balancer (not provided by VOSS) between VOSS Automate and the PowerShell Proxy servers. If you choose this topology option, be aware of the following load balancer configuration requirements:
The load balancer must forward incoming HTTP and HTTPS requests on TCP ports 5985 and 5986.
The load balancer must be configured in “IP Affinity” mode, such that all incoming requests from a specific IP address are preferentially routed to the same PowerShell Proxy. This is done to maintain the integrity of HTTP sessions that can consist of multiple HTTP requests.
When VOSS Automate is deployed as a multi-node cluster and the load balancer is configured in “IP Affinity” mode, each Unified Node will have all its requests routed to the same PowerShell Proxy. A properly configured load balancer will distribute the overall load from all the Unified Nodes across the deployed PowerShell Proxy servers. When a PowerShell Proxy goes out of service the load balancer will route incoming traffic to the surviving servers, bypassing the failed one.
Outbound Internet Proxy
Some organizations require all traffic outbound to the public Internet - including traffic to Microsoft 365 tenants - to traverse an outbound Internet proxy server for audit logging and, optionally, authentication. This document describes the configuration in VOSS Automate and on the PowerShell Proxy server(s) that are required to support this topology option.
Important
CAVEAT: Although VOSS Automate fully supports the configuration of
an outbound Internet proxy for communications between the PowerShell
Proxy server and the Microsoft tenant, Microsoft’s current
implementation of the MicrosoftTeams PowerShell module does not
completely support this functionality.
Specifically, Microsoft does not currently support proxy authentication. If you deploy an outbound Internet proxy that requires authentication, and provision those proxy authentication credentials in VOSS Automate, you will receive authentication error responses from the PowerShell proxy.
Service Account
VOSS Automate utilizes a single service account for access to the PowerShell Proxy. This account must be a server-local account (as opposed to a domain account, should the server be domain-joined), and must have the following properties:
Account Type |
Local Computer Account (not a domain account) |
Local Group Membership |
|
VOSS Automate PowerShell Proxy Configuration
VOSS Automate utilizes the Web Services-Management protocol (WSMan) to create the PowerShell sessions used to manage Microsoft UC applications. On Windows computers, WSMan is implemented by the Windows Remote Management (WinRM) service.
This section defines how to configure WinRM on a PowerShell Proxy running on Windows Server 2019.
Local hosts File Configuration
If you are not deploying multiple PowerShell Proxy servers behind a load balancer, you may skip this step.
If you are deploying multiple PowerShell Proxy servers with a load
balancer, each of the PowerShell Proxy servers must be able to address
itself with the Fully Qualified Domain Name (FQDN) corresponding to the
load balancer’s virtual IP address. You can accomplish this by adding
that FQDN to the local hosts file on each of the PowerShell Proxy
servers. To do this, on each of the PowerShell Proxy servers open an
elevated PowerShell window and issue the following command:
PS C:\WINDOWS\system32> notepad C:\Windows\System32\drivers\etc\hosts
In the Notepad window uncomment (delete the hash) the 127.0.0.1 line and
append the FQDN of the load balancer virtual IP:
# Copyright (c) 1993-2009 Microsoft Corp.
#
# This is a sample HOSTS file used by Microsoft TCP/IP for Windows.
#
# This file contains the mappings of IP addresses to host names. Each
# entry should be kept on an individual line. The IP address should
# be placed in the first column followed by the corresponding host name.
# The IP address and the host name should be separated by at least one
# space.
#
# Additionally, comments (such as these) may be inserted on individual
# lines or following the machine name denoted by a '#' symbol.
#
# For example:
#
# 102.54.94.97 rhino.acme.com # source server
# 38.25.63.10 x.acme.com # x client host
# localhost name resolution is handled within DNS itself.
127.0.0.1 localhost psproxy.domain.com
# ::1 localhost
Outbound Internet Proxy Configuration
If your deployment does not require the use of an outbound Internet proxy to access the public Internet (including Microsoft tenants), skip this step.
Before attempting to deploy a PowerShell Proxy behind an outbound Internet proxy, please note the important caveat regarding proxy authentication in the Deployment Topology Options section above.
To configure a PowerShell Proxy server to use an outbound Internet proxy, configure the proxy as described in this section.
Sign into the PowerShell Proxy server using the local service account that VOSS Automate will use to connect to the proxy.
Note
The requirements for this account are described in the previous section.
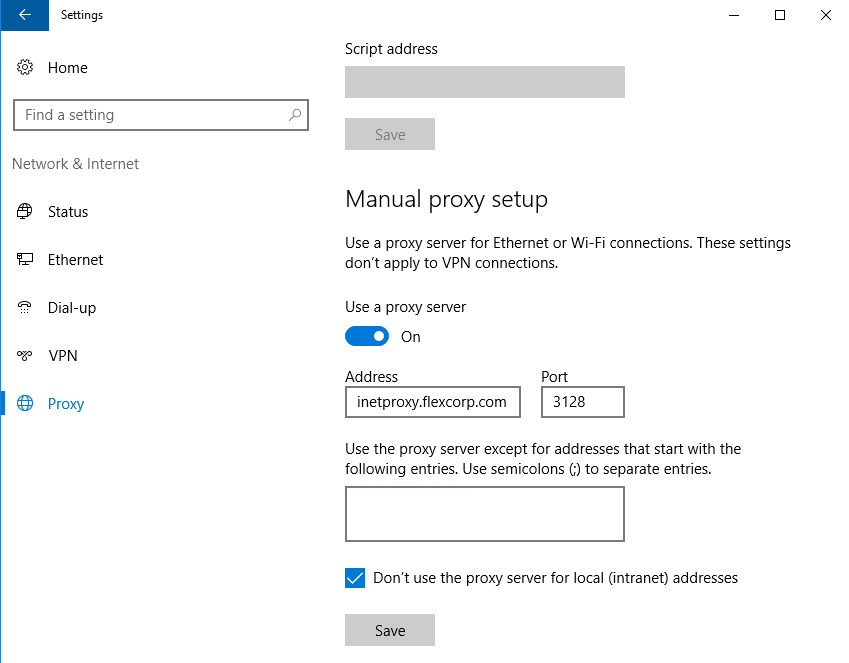
Open Windows Settings and select Network & Internet, then select Proxy from the navigation bar. Under Manual proxy setup flip the Use a proxy server switch to On. In the Address text box enter the IP address or FQDN of the outbound Internet proxy server. In the Port box enter the port number required by the proxy – typically 3128, but your organization may require a different port. Check the Don’t use the proxy server for local (intranet) addresses checkbox. Click Save.
Note
This is a per-user configuration, so be sure sign in using the VOSS Automate service account before performing this step.
The outbound Internet proxy may require authentication. If it does, obtain those credentials and configure them in VOSS Automate as described in the Provider Core Feature Guide. You will not configure those credentials directly on the PowerShell Proxy server.
Outbound Proxy Setup
Make this the default setting for all HTTP clients by issuing the following command from an elevated PowerShell session:
netsh winhttp import proxy source=ie
WinRM Configuration
Configure WinRM with the appropriate settings for VOSS Automate by issuing the following commands from an elevated PowerShell session.
Note
When setting the TrustedHosts value below you will have to provide the identity of this server – that is, the server on which you are executing these commands. If this is a standalone PowerShell Proxy (not behind a load balancer) then provide the server’s IP address and FQDN, with a comma between them. If this PowerShell Proxy is behind a load balancer, then append the FQDN of the load balancer’s virtual interface.
For example, assume the server’s FQDN is psproxy01.domain.com and its
IP address is 10.1.1.10. If the server is not behind a load balancer,
then the value to supply for TrustedHosts, including the quotes, will
be:
'10.1.1.10,psproxy01.domain.com'
If the server is behind a load balancer, and the FQDN of the load
balancer’s virtual interface is psproxy.domain.com, then the value to
supply for TrustedHosts, including the quotes, will be:
'10.1.1.10,psproxy01.domain.com,psproxy.domain.com'
Enable-WSManCredSSP -Role Server -Force
Enable-WSManCredSSP -Role Client -DelegateComputer \* -Force
Set-Item WSMan:\localhost\Service\AllowUnencrypted $true
Set-Item WSMan:\localhost\Service\Auth\Basic $true
Set-Item WSMan:\localhost\Client\AllowUnencrypted $true
Set-Item WSMan:\localhost\Client\Auth\Basic $true
Set-Item WSMan:\localhost\Client\TrustedHosts '{server identity}'
Firewall Settings
Any firewalls between VOSS Automate and the PowerShell Proxy, including Windows Firewall on the proxy, must permit the connections listed in the table below.
Note
These firewall exceptions are enabled by default in Windows Server 2019.
WinRM Firewall Settings
Service |
Protocol |
Port |
|---|---|---|
WinRM 2.0 (HTTP) |
TCP |
5985 |
WinRM 2.0 (HTTPS) |
TCP |
5986 |
Installing the Management Software on a New PowerShell Proxy
The following software components must be installed on the PowerShell Proxy server. Install these components in the order listed.
Note
You will use the Install-Module command in the steps below to install the Microsoft Teams PowerShell module. The Install-Module command downloads the specified PowerShell module from an online repository called the PowerShell Gallery. The PowerShell Gallery has deprecated the use of TLS versions earlier than TLS 1.2, so for Install-Module to work correctly Windows PowerShell must use TLS 1.2. This is the default in Windows Server 2019 and later. If you are using an earlier release of Windows Server you must force PowerShell to use TLS 1.2. You do this by issuing the command below. The command affects only the current PowerShell session, and its effect persists until the session ends (i.e., you close the PowerShell window).
If you see the “Unable to resolve package source” warning or the “No match was found…” error shown below when using Install-Module, the likely cause is this TLS version mismatch.
TLS Version Mismatch Error and Resolution

[Net.ServicePointManager]::SecurityProtocol = [Net.SecurityProtocolType]::Tls12
.NET Framework 4.8
Browse to https://dotnet.microsoft.com and navigate to the download for .NET Framework 4.8 Runtime or do an Internet search for “.NET Framework 4.8 download”. Download and run the .NET Framework 4.8 Runtime installer. Following installation, a reboot of the server will likely be required.
Important
Be sure to download only from a URL ending in “microsoft.com”. Do not download software from any third-party web site as the authenticity of that software cannot be guaranteed.
Microsoft Teams PowerShell Module
From an elevated PowerShell session issue the following command:
Install-Module MicrosoftTeams -RequiredVersion 2.0.0
Test Your Tenant Connection
You can test your ability to connect to Microsoft Teams by performing the following procedure from a non-privileged PowerShell session.
Configure Your Test Session for Outbound Internet Proxy
If your PowerShell Proxy server is behind an outbound Internet proxy that requires authentication, issue the following commands from your PowerShell session (but note the caveat regarding proxy authentication in the Deployment Topology Options section above):
$w = New-Object System.Net.WebClient

$w.Proxy.Credentials = (Get-Credential) (when prompted, enter your
outbound proxy credentials)
Note
The credentials you enter above persist only for the duration of this PowerShell session. When you exit the PowerShell session the credentials are deleted.
Keep this window open for the remainder of this section.
Test Connection to Microsoft Teams
Connect to Microsoft Teams and do a test query by issuing the following commands. If your PowerShell Proxy is behind an outbound Internet proxy that requires authentication, first refer to the steps at the beginning of this section.
When prompted, enter your Teams service account credentials.
Connect-MicrosoftTeams -Credential (Get-Credential)
Get-CsOnlineUser -ResultSize 1 | Select DisplayName
The above commands should successfully connect to the tenant and retrieve one random user.