
Business Admin Portal Profiles
Business Admin Portal profiles (Disabled, default, Read Only, or Full Access) are assigned to
user roles via the Business Admin Portal custom interface type (InterfaceBusinessAdminPortal),
and define the level of access a user has to the following functionality in the
Business Admin Portal.
Features (menus)
MACDs/Day 2 functionality
Dashboard widgets, such as charts
The table describes the predefined Business Admin Portal profiles that ship with
InterfaceBusinessAdminPortal:
Profile |
Description |
|---|---|
|
A user role with this profile is unable to access the Business Admin Portal. |
|
This profile is applied by default to new user roles, at the user’s hierarchy level or the first level up. System-level administrators can clone this profile down the hierarchy and modify it to create custom default profiles for the Business Admin Portal interface type. A user role associated with the
|
|
The profile applied by default to all operator
administrator user roles, with the same permissions
as the
|
|
This profile is applied by default to the provider admin role for new installations. User roles assigned with this profile have have full access to all Business Admin Portal menus and features. |
|
Select this profile if you have a Microsoft-only environment. In this case, assign this Business Admin Portal profile to user roles that will be used for the Business Admin Portal. |
Note
When upgrading to Release 19.1.2 or higher, only the roles at the sys.hcs level
are updated.
Business Admin Portal Profiles and Field Display Policies
The default Business Admin Portal profile is associated with the following field
display (FDP) policies:
BusinessAdminPhoneFDPBusinessAdminLineFDPBusinessAdminVoicemailFDPBusinessAdminWebexTeamsUserFDPBusinessAdminUccxAgentFDPBusinessAdminUccxTeamFDPBusinessAdminUccxContactServiceQueueFDPBusinessAdminHuntGroupFDPBusinessAdminCallPickupGroupFDP
These FDPs can be cloned and edited to create new customized FDPs. Or you can create completely new FDPs for the Business Admin Portal profile.
Multi Vendor and Business Admin Portal Profiles
The default FDP for multi vendor scenarios (MultiVendorFDP) is not associated
with any Business Admin Portal profiles by default. You will need to
manually enable multi-vendor for any of the Business Admin Portal profiles, which will
then use the multi-vendor FDP.
To enable multi vendor for a Business Admin Portal profile:
Log in to the Admin Portal as a provider administrator (or higher).
Go to (default menus) Customizations > Business Admin Portal Profiles.
Click on the relevant profile to open the editing screen.
Clone the profile to create a new custom Business Admin Portal profile.
On the Subscribers tab, select Enable Multi Vendor.
Save the profile. Allowed features will now be determined via the multi vendor FDP.
Microsoft-Only Business Admin Portal Profile and Field Display Policy
The default FDP for a Microsoft-only scenario (MS_Only_FDP) is associated with the default
Microsoft-only Business Admin Portal profile, MS Only. This profile may be
assigned to user roles that will be used in the Business Admin Portal in a Microsoft-only environment.
Additionally, VOSS Automate allows you to (optionally), apply the same look and feel of the Business Admin Portal to the Admin Portal via a custom component.
For user roles that will access the Business Admin Portal in a Microsoft-only environment:
Go to Customizations > Business Admin Portal Profiles, and edit a cloned version of the
MS OnlyBusiness Admin Portal profile:On the Details tab, select Enable Business Admin.
On the Subscribers tab, select Enable Multi Vendor, and from User Details Display Policy, select the default Business Admin Portal field display policy for Microsoft-only environments,
MS_Only_FDP.
Assign the
MS-onlyBusiness Admin Portal profile to user roles that will use the Business Admin Portal in a Microsoft-only scenario.Optionally, to apply the same look and feel of the Business Admin Portal to the Admin Portal (new VOSS Automate GUI only), go to (default menus) Role Management > Menu Layouts and select custom component
list-mv-subscribers.
Add a Business Admin Portal Profile
This procedure adds a new Business Admin Portal profile.
Perform these steps:
Log in to the Admin Portal as a provider administrator (or higher).
Go to (default menu) Customizations > Business Admin Portal Profiles.
Click on an existing Business Admin Portal profile to open its editing screen:
If you’re using the VOSS Automate legacy Admin GUI, click Actions > Clone.
If you’re using the new VOSS Automate Admin Portal, click the toolbar Clone icon.
Configure options on the Details tab of the Business Admin Portal profile:
Note
This is the Base tab in the legacy Admin GUI.
Define a new name, and a description.
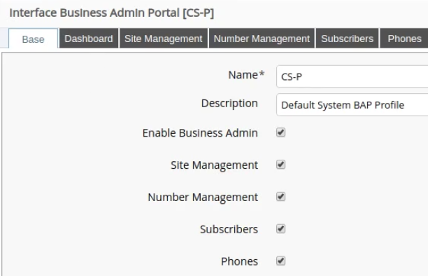
Select Enable Business Admin to display the Dashboard tab.
Select or clear the relevant checkboxes to enable access to menus and other functionality in the Business Admin Portal for this profile. The rest of the tabs on this form are hidden or display depending on whether the relevant checkbox is selected on this tab.
To add custom features to the Quick Actions card for a feature, click the Plus icon (+) in Custom Features; then, configure the custom feature:

Select an icon and an icon title.
From the Feature Area drop-down, select the feature, for example, Extension Mobility, or Phones.
From the Type drop-down, choose a model type.
Note
Similar to menu layout configuration, you’ll need to set up additional configuration associated with the model type. The model type must be exposed in the user’s access profile, if the custom interface type is associated with a user.
Choose a field display policy, and a configuration template.
Click OK.
Configure options on the Dashboard tab of the Business Admin Portal profile:
Enter a title for the dashboard.
Optionally, select a landing page. When selecting a landing page, the header and line text details on the landing page Welcome Header tab display. See Create a Landing page in the Core Feature Guide.
To select MACDs the admin will have access to on the dashboard, move options from the Available transfer box to the Selected transfer box.
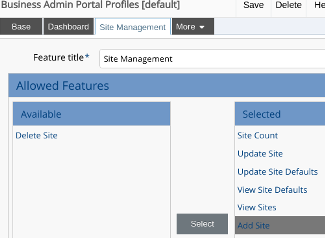
On each feature tab you enabled via the Details tab, move required options from the Available transfer box to the Selected box to enable these features on the relevant dashboard.
On the Miscellaneous tab, configure functionality and display options for the Business Admin Portal:
In Display About Information, define whether to show or hide the Settings > About menu.
To display the Export action on the lists and forms, enable Allow Data Export; else, clear the field (disable).
To display options such as Replay and Cancel on the transaction instances and the list view, enable Transaction Log Actions; else, clear the field (disable).
To display options for showing and hiding selected information on the transaction when viewing a transaction instance, such as logs and sub-transactions, enable Transaction Log Display Fields; else, clear the field (disable).
On the Subscribers tab, configure functionality available on subscriber dashboards. Available options are defined via the User Details Display Policy you choose.
To enable multi vendor, select Enable Multi Vendor. The multi vendor subscriber field display policy (default name: MultiVendorFDP) is applied. To change any fields and available functionality, edit
MultiVendorFDP, via (default menus) Customizations > Field Display Policies.To disable multi vendor, clear the Enable Multi Vendor checkbox. In this case, the Subscribers landing page will now display a count card for both subscribers (total number of provisioned users) and for end users (total number of end users).
Save the profile.
A provider level admin can assign the new profile and the InterfaceBusinessAdminPortal interface type when adding or updating a user role.
Related Topics
Multi Vendor Subscribers in the Core Feature Guide
Assign a Business Admin Portal Profile to a Role in the Business Admin Portal Guide
Add and Edit Roles in the Core Feature Guide