
Manage Items
Editing Items
Edit on GUI Forms
Provided you have the necessary user and model permissions, you can edit and save items directly on the GUI forms. Note the following:
Displayed field names are customizable and provide tooltips according to a Field Display Policy for the model.
Form GUI rules control the default field availability and pre-populated values.
When opening a form, form details are initially rendered using cached data. Save is disabled while non-cached data loads, and is enabled once the non-cached data has been loaded.
Most forms provide a Help button for editing guidance.
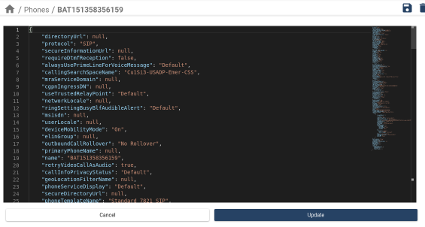
Edit in the JSON Editor
You can edit items in the JSON editor if your high-level administrator has enabled the Json Editor permission for your access profile. See Access Profile Permissions and Operations.
If you have the required permissions, the
JSON Edit button displays on the toolbar. ![]()
Note
The JSON Editor is available only in the new Admin Portal. See Conventions Used in this Guide.
Navigate to a page that provides access to a JSON editor, for example, transactions, or phones.
Click the JSON Edit button to open the JSON editor.
Edit the JSON format data on the form.
Click Update to update data on the GUI input form.
Click Save to commit your changes.
Important
Accessibility Options in the JSON Editor
When using the JSON editor with a screen reader application, note the following:
Pressing ALT+F1 enables accessibility options.
Pressing the Escape key closes the accessibility help dialog.
Pressing Ctrl+M enables and disables editor tabbing.
Pressing SHIFT+TAB while inside the editor allows you to move focus to various components and controls inside the editor. For example, to update modified data, press SHIFT+TAB until focus reaches the Update button; then, press the Enter key to update the data.
At the time of writing (21.2), the JSON editor does not support the use of the TAB key on its own to move focus from one component to another within the editor. The workaround is to use SHIFT+TAB for navigation within the editor.
Create a Clone
VOSS Automate allows you to create copies (clones) of certain items, such as roles, credential policies, devices, and phones. Cloning provides a quick way to create new items, based on data from the cloned item.
You can create a clone wherever you see a Clone button in the Admin Portal. For example, you can’t create a clone in the list views. Saving a new cloned item creates the clone.
If an item refers to other items, only the current item is cloned, and not the referenced items. For example, when cloning a phone, referenced device models (Phone and Remote Destination) aren’t added to the clone.
On the cloned item, you will need to edit the cloned key field(s), such as Name, and provide new values to create the new item in the system. If you don’t change a key field value, the system displays the following error message: “Error, Duplicate Resource Found.”
To clone an item:
Log in to the Admin Portal.
Choose the hierarchy level of the item to be cloned.
Choose the item you want to clone.
Click Clone. The page refreshes and the form displays the cloned item.
Edit the required details.
Click Save to create the new item.
Selecting Items
You can select one or more existing items in a list to delete or modify these items at once.
To delete or modify one item in a list view, click on the relevant item, and click the action, for example, the Delete button.
To delete or modify multiple items in a list view, select the checkbox for each item. If the list view spans multiple pages, you can select items on each page before performing the bulk action. The table header displays the number of selected items. Once you have all the items selected, click the action, for example, Export.
Note
Actions such as Export Bulk Load Template, Field Display Policy, and Configuration Template apply to the type of item and are not affected by the item selection.
Actions such as Bulk Modify depend on whether your administrator has given you the required permissions.
When selecting items, note the following:
Items selected across multiple pages remain selected until the transaction (or export) is complete, at which time all selected items are cleared.
Items selected while on a specific menu, e.g. Subscribers, are automatically cleared as soon as you select a different menu.
Items selected across multiple pages are automatically cleared when you select the ‘All’ checkbox in the header of the first column (on any of the list pages).
Manually clear selected items on one or more pages by selecting and then clearing the checkbox located on the left of the first column in the header row.
Where the Admin Portal user interface provides a list of check boxes, a “toggle all” checkbox allows you to quickly select or deselect of all checkboxes.
Transfer Boxes
Side-by-side transfer boxes (Available / Selected) are used on various forms in the system, such as Audit Number Inventory, Reskill Agents (Contact Center) and Upload Multiple Files to MOH Clusters.
Transfer boxes allow you to select only certain items to process in a specific transaction. For example, you may want to perform an audit on numbers from selected sites only.
A maximum of 200 items can be displayed in the Available transfer box. In cases where there are more than 200 available items, VOSS recommends that you use the bulk load functionality and populate a bulk load template with the required entries. You can then load this into VOSS Automate using the Bulk Load administration tool. Refer to Bulk Load Template Export and associated topics for more information.
Bulk Delete and Modify
When more than one item is selected from the list view of items, the selected items can be deleted in bulk by using the Delete button on the button bar.
If your administrator has given you the required permissions, you can also bulk modify certain items, for example Roles.
Select the check boxes of the items you want to modify and choose the Bulk Modify action on the button bar. The input form for the item is opened. Values entered on this form are modified for all selected items when you choose the Bulk Modify action.