
Cisco Quick User#
Cisco
Overview#
Cisco Quick User provides a single page where you can add a Cisco UCM user with a line, a voicemail, and a Webex account, and provision the user with services such as voice, extension mobility, single number reach (SNR), and conferencing and collaboration services.
Important
Cisco Quick User is a simple, generic method for provisioning users that applies single values from configuration templates (via Quick Add Groups), and the site defaults.
For more complex provisioning requirements, such as adding route partitions or multiple values for other service fields (such as two or more lines), use Automate’s advanced user management functionality (Cisco Advanced User), or bulk loaders. For example, you could use Cisco Quick User to add users with only the first line on phones, then use advanced user management to add the second line to the phone.
For details around how Quick Add User handles the application of a Line configuration template associated with a selected Quick Add Group (QAG) when adding or updating a user, see Shared lines.
Supported User Types
Quick Add User for UCM users supports several user types, including:
LDAP users
UCM-integrated users
LDAP-integrated users on UCM
Manually created users
Note
If the default Self-service Language is set on the site default docs (SDD), users are assigned the corresponding Self-service language.
Related topics
Configure Cisco Quick User#
To create or configure users, to enable users with services, or to associate users with devices, configure the following items on the system:
Configuration |
Description |
|---|---|
|
Configure the following servers in Automate:
|
|
Provider deployment only. Configure a dial plan at both the customer and site hierarchies. |
|
Deploy voicemail service with a pilot number created and associated to a site in Automate (via the Voicemail page). This step is required to create a “Default CUC User Template” (via the Site Defaults page for CUC. The template is required to create CUC voicemail users. |
|
Configure a Webex Server in Automate to deploy any Webex users provisioned through Quick Add User. Set a password for Webex users in the Site Defaults. |
Add a user via Cisco Quick User#
This procedure adds a UCM user via Cisco Quick User.
Prerequisites:
Configure Phones settings in the Global Settings to select phones by their description or description and line.
Default user template (
voicemailusertemplate) must exist on UCM. You can update the default by editing the default CUC User Template value in the SDD.Configure Quick Add Groups. See Quick add groups
Note
For details around how Quick Add User handles the application of a Line configuration template associated with a selected Quick Add Group (QAG) when adding or updating a user, see Shared lines.
If required, expose device pools and Class of Service (CoS) in Quick Add User. See Expose device pools and Class of Service in Cisco Quick User
Ensure site defaults are correctly configured.
Enable filtering at the hierarchy to use inventory filters. See Enable/disable filtering.
Add user via Quick Add User
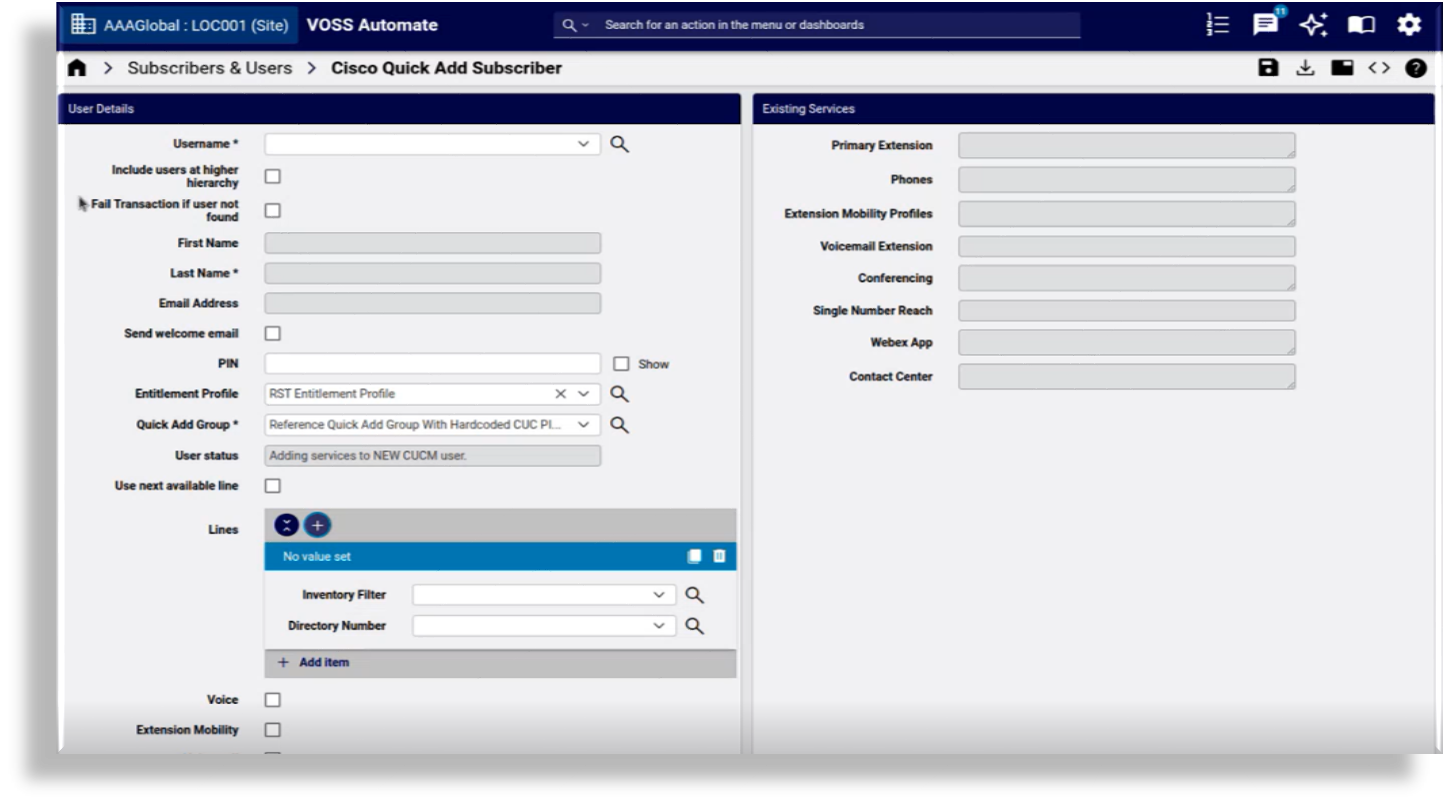
In the Admin Portal, go to Cisco Quick Add User.
Note
You can switch between a tab or panel layout on this form.
The Existing Services tab/panel displays devices and services associated with the user you choose. If the user has existing dual mode devices, the Phones field includes details for mobile identity, remote destination, and CTIRD remote destination. Existing services are associated with services enabled/disabled at the customer level via the Global Settings.
Configure user details on the User Details tab/panel:
Note
LDAP-synced or LDAP-integrated at UCM user fields are read-only.
Mandatory. Select the username.
If the username you require doesn’t exist at the current site, select Include users at higher hierarchy to add users above the current site.
Note
You can only edit existing UCM users via Quick Add User if these users exist at site level.
The field associated with this checkbox (
lookUpForUser), is hidden by default. You can expose it via a custom field display policy. This setting is also available for bulk load sheets and API calls.
To prevent adding users that don’t exist on UCM, select Fail Transaction if user not found.
Note
The field associated with this checkbox (
failIfNotFound) is hidden by default. You can expose it via a custom field display policy.By default, the transaction won’t fail. This option is used when users have not been synced from LDAP to UCM. This setting is also available for bulk load sheets and API calls.
Mandatory. Fill out a first name and a last name.
Note
First name is mandatory only if you’re provisioning the user with a Webex account. You can set only one Webex account per user. The first name and last name is auto-populated as a display name on the Webex user record. The display name is used when making Webex calls.
Optionally, fill out an email address. If you wish to send the user a welcome email, select Send welcome email.
Note
Send welcome email displays only once you add an email address, provided you have the following enabled and configured:
SMTP server must be set up (Add a SMTP Server)
In the Global Settings (Email tab), enable (for the relevant hierarchy) Allow email to be sent to user after Quick Add User. See Global settings
A welcome email is sent to the user email address using the configured “Quick Add User” HTML email template that applies to the hierarchy. See Email.
Fill out a PIN.
Choose an entitlement profile, if one exists, to associate with the user you’re adding.
Choose a Quick Add Group (QAG), or select the default.
Note
Quick Add Groups are filtered by vendor (see Quick Add Groups and vendor filtering), and are restricted to those available at a selected hierarchy, based on the option selected for Quick Add Group & Subscriber Profile lookup level in the Global settings (General Settings).
Choose a device pool.
At Use next available line, select the checkbox to have the system automatically select the next available line that the system finds. This functionality is disabled by default.
When enabling Use next available line, and filtering is enabled at the hierarchy, select an inventory filter to have the system choose the first available line it finds from the filtered list of numbers. If filtering is disabled, the system automatically selects the next available line.
When disabling Use next available line, and filtering is enabled at the hierarchy, select the inventory filter, then select the line from the Directory Number drop-down. If filtering is disabled, select a number from the Directory Number drop-down.
For details around how Use next available lines integrates with inventory filters, see Inventory filters and “Use next available line”.
Note
You can create directory numbers in UCM in two ways:
Create a voice mail line in Quick Add User
Create a line in Quick Add User
When creating a voicemail or voicemail line using Quick Add User, the Directory Number Used field is set to “true” in the Number Inventory. A directory number created without any device associations (for example, a voice mail line), is tagged in the user Lines page as DN created without device from QAS’.
Select services:
Service
Description
Voice
Provisions the voice service. Since you can create multiple devices for a user, this checkbox is always available. Selecting the Voice service displays these additional fields:
Phone Type (Lists phone types allowed by the entitlement profile, if one exists, else, phone type is retrieved from the QAG)
Phone Protocol
Phone Button Template (You can override the default phone button template value by entering a custom value in this field. However, the new value is only applied on the UCM if allowed for the phone type.)
Phone Security Profile
Phones
Add one or more phones. You can associate a line with multiple phones, and you can associate a phone with multiple lines. The Phone Name drop-down lists available phones at the user’s site, based on the phone type specified in the SDD for this site, in the associated QAG at the customer level, or synced from UCM. To add a new phone, you can enter a valid name in the Phone Name field. The phone name must consist of a prefix, for instance SEP, followed by a MAC address (12 hexadecimal characters). The transaction will fail if you enter the phone name incorrectly (for example, too few or too many characters).
Choosing alternative options in these fields overrides values set up in the Quick Add Group (QAG), configuration template (CFT), site defaults document (SDD), or any other backend (read-only) CFTs. If the QAG does not specify a phone template, or if the specified phone template has blank values for the phone fields, the phone field values are pulled from the SDD. To avoid conflicting Quick Add User settings, it is recommended that you configure settings on the Quick Add User page in the following order:
Entitlement Profile (only if these exist on the deployment, and are associated with the user)
Quick Add Group
Voice (then choose phone type, phone protocol, phone button template, and phone security profile)
Extension Mobility
Provisions extension mobility. Only one extension mobility profile per user, so the checkbox displays only until you create an extension mobility profile.
Voicemail
Provisions voicemail service.
Service
Description
Single Number Reach
Provisions single number reach (SNR) service, and allows you to specify the SNR mobile number. If a mobile number is already configured for a user, it is used to pre-populate the Mobile Number field when adding SNR for that user. You can enter a different mobile number for SNR, if required. SNR mobile numbers are formatted with a Plus (+) and the number, for example +99218732876. SNR mobile numbers cannot include include spaces, dashes, or other special characters. The SNR mobile number can be the same as the user’s number that displays on the Users page.
Jabber / Dual-Mode Device
Provisions Jabber / Dual-mode device service, and allows you to add Jabber and Dual-Mode devices. You can associate multiple Jabber and Dual Mode devices to a user. Jabber and Dual Mode devices get the first line assigned to them (specified in Quick Add User).
Enable self-provisioning
Defines whether to enable self-provisioning for this user, and allows you to choose the relevant self-provisioning user profile. When enabled, phone lines are added using the Universal Line Template (ULT) referenced in the selected self-provisioning user profile. When adding a user with lines but no devices, or when adding a user with devices and lines, enabling self-provisioning here automatically sets the UCM User Primary Extension to the Quick Add User line pattern and ULT route partition. Existing self-provisioning user profiles display on the User Profile page, (and can be seen in the site’s Site Defaults). You can change this default, if required.
Save your changes. The user is added.
If you’ve provisioned SNR (single number reach), verify, on the Existing Services tab/panel, that the Single Number Reach field displays the SNR profile name, which is the user name, followed by "-RDP". For example: jsmith-RDP.
If you wish to update a user or their associated services (after adding the user via Quick User), this is done from the relevant service menu items.
For self-provisioned phones to show as being associated with a user, perform a UCM data sync after setting up a self-provisioned phone.
Related Topics
Enable services in Cisco Quick User#
When adding a user via Cisco Quick User, you can enable user services, such as voicemail, extension mobility, single number reach, conferencing (meetings), and collaboration (messaging) services (such as Webex App).
The Quick Add User page displays services included in a selected entitlement profile (if entitlement profiles are used). For example, if the entitlement profile excludes voice services, the checkboxes for Voice, Jabber, and Self Service ID won’t appear on the page. The selected entitlement profile also filters options available in the Phone Type drop-down (showing only devices enabled in the entitlement profile).
Note
It is possible to use Cisco Quick User to add a user without an entitlement profile. For example, entitlement profiles may not exist on the deployment, or they may not be associated with the user. In this case, a phone type, for example, may still be associated with the user via the Quick Add Group (QAG).
For the Voicemail service:
Configuration settings are only available if the site’s SDD has a default value on the CUC Defaults tab for the Default CUC User Template.
The default value (
voicemailusertemplate) should already exist on the UCM and is automatically populated on an HCS system when a voicemail pilot is created.A CUC device must be configured at the related Network Device List (NDL), at site level.
If the selected QAG specifies any CFT entries for UserPin or UserPassword, these are applied. Otherwise, the values from the User Template defined on CUC apply. For default CFTs, see: Quick Add Groups, default model.
While the Admin Portal hides configuration settings for unavailable services, API and bulk load operations have provisioning workflow checks that check for the presence of the Default CUC User Template in the SDD and a configured Webex server in the NDL, before the selected services can be added.
A UCM (call manager) must be configured at the user’s hierarchy. If this does not exist, the Quick Add User bulk load transactions and API calls display the following warning: No Call Manager has been configured
Add Webex App service using Quick Add User#
Note
When using Quick Add User to provision WebexApp services, the SiteDefaultsDoc - User Defaults tab values should be set to either:
Webex App - Use Organization’s Domain = True
or
Webex App - UC Manager Profile = <Selected UC Profile>
Selecting the Webex App checkbox on the Quick Add User page displays the Webex Teams User Template drop-down, where you can select a Webex Teams User Template to apply to the user.
Choosing a template from the drop-down overrides the default user template referenced in the Quick Add User Group (QAG) associated with the user.
If you don’t select a Webex Teams User Template from the drop-down, the Webex App User Template referenced in the associated QAG is applied.
If you want customized values, clone the Webex Teams User Template (Customizations > Configuration Templates) and edit as required. The Webex Teams User Template for UCM Calling provides for a Settings group of controls for the specification of Calling Behavior and provisioning of Jabber devices if relevant to the calling behavior.
Add a Contact Center agent using Quick Add User#
You can use Quick Add User to create a Contact Center (UCCX) agent.
The Contact Center Agent check box becomes visible if:
The associated Entitlement Profile has Contact Center enabled
A Contact Center Server is available at the hierarchy - Configure UCCX server
The selected user is not already associated with an Agent
If the check box is selected:
A Contact Center Agent Profile drop-down list is available to select an agent profile.
Note
The Contact Center Agent Profile needs to be created before adding the Contact Center Agent from the Quick Add User feature.
The agent profile will determine the team, resource group and skills assigned to the newly created agent. See: Agent profiles.
The Agent Extension can be selected.
The extension will be a list of specified Lines, in other words, the administrator must specify the Line to be created or reused before selecting the Contact Center check box.
The Agent Device Type can be selected: either Extension Mobility or Phone:
If Extension Mobility is selected, the Extension Mobility check box is automatically enabled.
If Phone is selected, the administrator must first enable Voice and specify a Phone to be created or reused before selecting the Contact Center check box.
An IPCC extension is automatically managed for the UCM user associated with the Contact Center agent.
Quick Add User device pool#
When adding a user via Cisco Quick User, you can associate a device pool to the user’s newly associated devices or services (other than the device pool provided in the Site Defaults Doc or referenced configuration template in the Quick Add Group).
A device pool contains system, device, and location-related information, and is mandatory when adding a user using Cisco Quick User.
A device pool can be referenced by:
Site Defaults Doc (SDD)
Reference Configuration Template (CFT) referenced in the Quick Add User Group (QAG)
Admin Portal (if exposed)
Device pool and Site Defaults Doc
The device pool referenced in the SDD ensures that a user’s devices are always associated to a device pool. If there is no device pool referenced in either the QAG or Admin Portal drop-down (see below) the value defaults to the SDD.
Device pool and Quick Add Group
The device pool referenced by a Configuration Template (CFT) in the QAG takes precedence over the device pool referenced in either the SDD or the Admin Portal drop-down (if exposed). See Quick Add Groups for details.
Device pool and Admin Portal
An administrator can expose a Device Pool drop-down on the Quick Add User page on the Admin Portal by editing or cloning the Field Display Policy. See Expose device pools and Class of Service in Cisco Quick User. The Device Pool drop-down allows an administrator to overwrite the value in the SDD by selecting a custom device pool from the drop-down list. The options available in the list are the site-level device pools if they are available, otherwise it displays all device pools available at customer level (NDLR aware).
Note
Where multiple device pools are available at a site, a load balance check is available on the number of phones using the Device Pools in order to assign the phone to the least used device pool. Contact VOSS if this load balance check is required.
When exposing the Device Pool drop-down, the administrator must remove the value in the Device Pool field of the CFT referenced in the QAG, that is, the field must be blank. This is done to ensure that the value in the CFT does not overwrite the custom value in the drop-down.
The CFTs and their target models for which the device pool name can be made blank to allow the Portal to drive the device pool selection include:
Phone templates (device/cucm/Phone)
Jabber device templates (device/cucm/Phone)
Remote Destination Profile templates (device/cucm/RemoteDestinationProfile)
Cisco Quick User Class of Service#
With Cisco Quick User you can associate Calling Search Space (CSS) values to a user’s newly associated lines, devices, or services (other than the CSS’s provided in the Site Defaults Doc or referenced configuration template in the Quick Add Group), by selecting a Class of Service (CoS).
A Class of Service (CoS) allows you to specify a Calling Search Space (CSS) for devices and lines. A CSS is mandatory for lines and devices when adding a user using Quick Add User.
A CSS can be referenced by:
Site Defaults Doc (SDD)
Reference Configuration Template (CFT) referenced in the Quick Add Group (QAG)
Admin Portal, via the Class of Service field (if exposed)
Class of Service and Site Defaults Doc
The Calling Search Space values referenced in the SDD ensure that a user’s lines and devices always have a Calling Search Space associated to it. If there are no Calling Search Space values referenced in either the Quick Add Group or via the Class of Service field in the Admin Portal drop-down (see below) the value defaults to the SDD.
Class of Service and Quick Add Group
The Calling Search Space values referenced by a Configuration Template (CFT) in the Quick Add Group take precedence over the Calling Search Space values referenced in either the SDD or the Class of Service via the Admin Portal drop-down (if exposed). See Quick Add Groups for details.
Class of Service and Admin Portal
An administrator can expose a Class of Service drop-down on the Quick Add User page on the Admin Portal by editing or cloning the Field Display Policy. See Expose device pools and Class of Service in Cisco Quick User. The Class of Service drop-down allows an administrator to overwrite the Calling Search Space values in the SDD by selecting a custom Class of Service from the drop-down list. The Class of Service, in turn, contains a custom Calling Search Space for lines and devices, respectively. The options available in the list are the customer-level Class of Service instances, as created by the relevant administrator.
Note
When exposing the Class of Service drop-down, the administrator must remove the values in the Calling Search Space fields of the CFT’s referenced in the QAG, that is, the field must be blank. This ensures that the value in the CFT does not overwrite the custom Calling Search Space value as defined in the selected Class of Service.
The CFTs and their target models for which the Calling Search Space name can be made blank to allow the Portal to drive the Calling Search Space values include:
Line templates (device/cucm/Line)
Phone templates (device/cucm/Phone)
Jabber device templates (device/cucm/Phone)
Remote Destination Profile templates (device/cucm/RemoteDestinationProfile)
Expose device pools and Class of Service in Cisco Quick User#
This procedure exposes the Device Pools field and Class of Service (CoS) field on the Cisco Quick User form, at a specified hierarchy.
Pre-requisites:
You must be logged on as an administrator with access to Field Display Policies (FDP)
Perform these steps:
In the Admin Portal, go to Field Display Policies.
Filter the Target Model Type on
view/QuickSubscriber.Choose an option, depending on the hierarchy where the Device Pools or Class of Service fields should be exposed in Cisco Quick User:
The FDP exists at the correct hierarchy? Click on the FDP to open it.
The FDP does not exist at the required hierarchy? Clone one of the FDPs at a hierarchy above the required hierarchy.
Open the FDP to edit it, and go to the first group’s Available list in the Fields block.
Select device_pool or class_of_service, then click the Move icon to move the device_pool or class_of_service from the Available list to the Selected list.
Use the Move up and Move down icons to move the label to the desired position relative the the other field labels.
Ensure that the cloned FDP name is “default”, then click Save.
If you’re at the hierarchy where the cloned FDP is created or at a lower hierarchy, go to Cisco Quick User, where you will see the relevant field exposed (either Device Pools or Class of Service).