
Configuration
The menu bar at the top of the screen provides options to navigate to each of the configuration sections. Each will be covered in its own section of this guide.

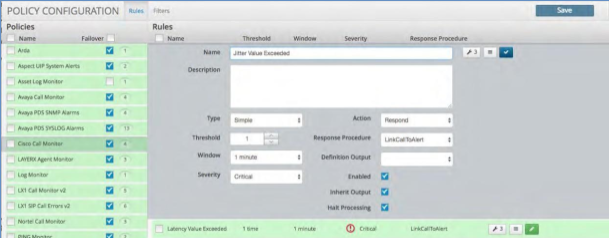
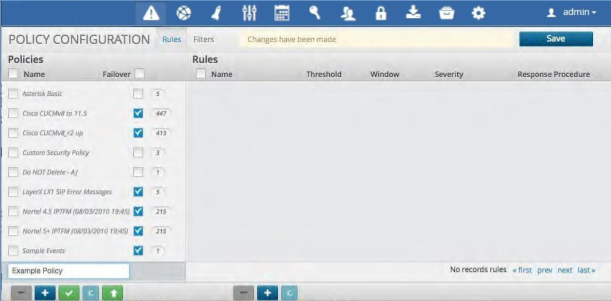
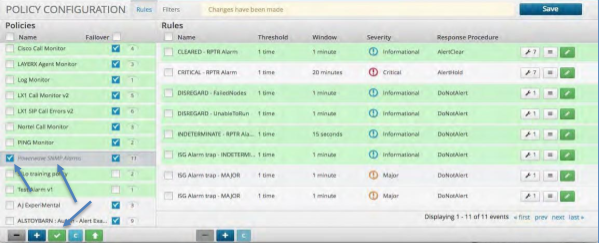
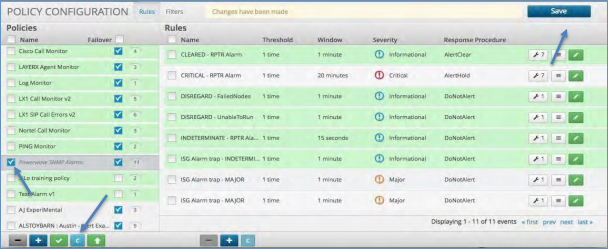
Policy Configuration
Polices are a modular groupings of correlation rules, actions and response procedures that define how to respond to certain situations that happen on the monitored systems. Policies are usually system and manufacturer specific but can contain custom scripts for actions and response procedures. Each policy will also contain several correlation rules that are designed to create Alerts based on the best practices of that particular system manufacturer. These alerts can apply to:
Business Processes
Infrastructure
Security
Applications
Unified Communications
Network behavior
Metrics and Threshold Violations
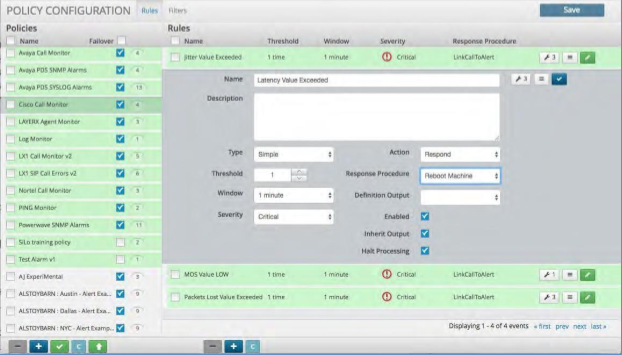
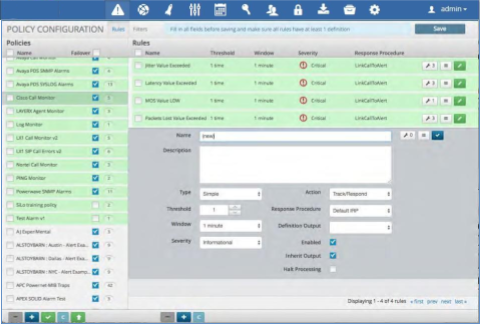
Correlation Rules
A Correlation rule extracts data from the various sources and then defines the parameters for Alert creation within a Policy. It may contain 1 or more Correlation Definitions along with specific actions and Response Procedures. Each correlation rule consists of the following parameters:
Parameter |
Description |
|---|---|
Name |
Descriptive name for the correlation rule which will be displayed within an Alert and viewed in Alert Analyzer. |
Description |
Enter a complete description of the problem that created the alert along with any specific remediation steps that should be taken to resolve the problem. |
Type |
Simple: Select if the rule is to analyze a single log and as a result of the rule, you want to execute an action. Compound: Select if the rule is to correlate more than one log, the results of another correlated event or multi-tiered rules. A compound rule can be one or more simple rules that feed into one primary rule, or it can come directly from the source. Unique: Same as Simple but as a definition will be the only one. |
Threshold |
Selects how many times this rule is to match before an action occurs. |
Window |
Select the time window for the rule to match before an action occurs. |
Parameter |
Description |
|---|---|
Severity |
Indicates what is to appear in the Status field on the Alert Viewer monitor. Select the severity for this rule:
|
Action |
Choose the action that is to occur for this rule, based on the selection in the Severity field
Engine so that the event can be analyzed and re-correlated. Then set a marker and send an alert. |
Response Procedure |
For any rule that is satisfied, an Incident Response Procedure occurs and an event is posted to the Alert Analyzer. Select the Response Procedure from the drop-down menu to execute when conditions have been met. |
Definition Output |
Selects a single Correlation Definition’s extracted value to be displayed with the Alert. |
Enabled |
Toggle to enable/disable the rule |
Inherit Output |
Toggle to enable/disable whether the rule will include the results of the filter attached to the policy module. |
Halt Processing |
Toggle to halt processing of logs to any other rules within the policy if the rule matches. This will highlight the Policy in Green to indicate that this function is in use. |
Correlation Definitions |
Click the wrench icon where you can define one or more definitions match and or extract the required data from a log or event. See Correlation Definitions. |
Output Order |
Sets the preferred order to output the extracted data from the Correlation Definitions. |
Done |
Click the Done box when the rule is complete |
Save |
Be sure to click the Save button so your rule (or changes) are saved and committed. |
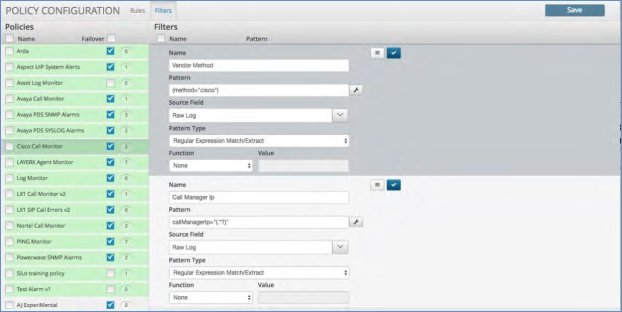
Correlation Filters are a very quick and easy way to ensure that all of the correlation rules within the policy are firing on the correct set of data. The engine will look at the filter criteria first, select only the data that matches the criteria and then look to apply the correlation rule. The user can add as many of these that are required or desired. The options in each filter are:
Name: Name this as close as possible to the data elements being filtered. That way the output matches the name once viewed in the alert text.
Pattern: This is the extraction methodology utilized to pull the particular data point out. Click the “wrench” icon beside this box and it will bring up the “Regex Wizard” to assist in finding and extracting the data.
Within the Regex Wizard there are 2 sections:
Select a Log: In the top section you can search and select the log or data set you will be utilizing. That will then show up in the bottom portion under the phrase “Select log from the list above or paste log here:”. As the phrase indicates you can copy and paste a log into this section as well.
Create Regex: Once you have your log then go to this section. Here you can utilize the wizard to create the Regular Expression required. Close the wizard and copy this pattern the Regex into the box under Pattern.
Source Field: In the drop-down box select the source from which the data is being extracted.
Pattern Type: Select from the drop-down box the type of expression you want to utilize:
String Match
Regular Expression Match
Regular Expression Match/Extract (Most Often Used)
Regular Expression Multi-Valued Extract
Function: If the extracted data is integer based then you can apply the following functions that will allow you to compare the data:
None
Greater Than
Less Than
Same
Value: This field will only be available if the data extracted is an integer.
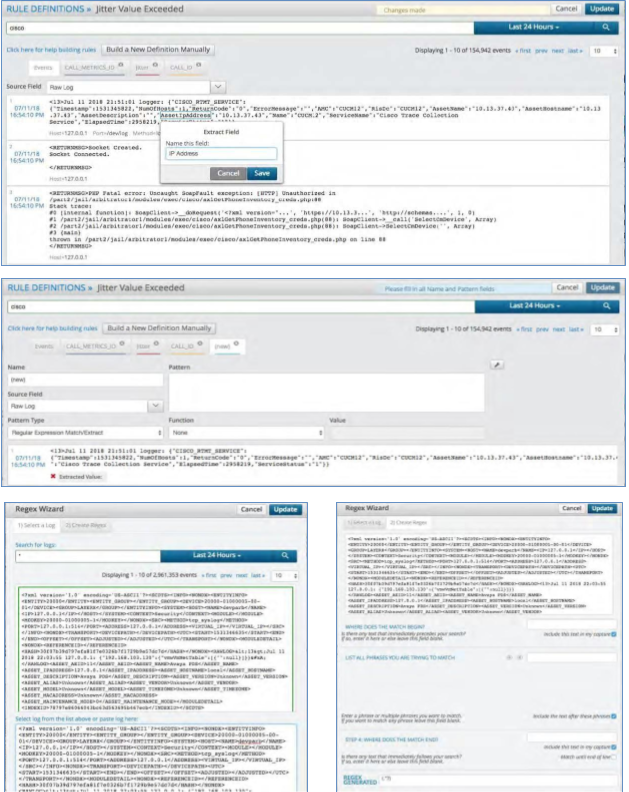
Correlation Definitions
A Correlation Definition defines what criteria to match within the data. Each definition will consist of the following parameters:
Parameter |
Description |
|---|---|
Name |
Name this as close as possible to the data elements being extracted. That way the output matches the name once viewed in the alert text. It is also utilized in the key value pair within the alert text. This is the extraction methodology utilized to pull the particular data point(s) out. Simply find the log containing the data by utilizing the search bar above. Within that log you can highlight the text you want to extract. Once highlighted a box will pop up allowing you to name the field and extract it. This will automatically create the Regex to extract the data. The highlight method is about 95% accurate. If you have trouble with this method due to special characters in the data set, then you can utilize the “wrench” icon beside the Pattern box and it will bring up the “Regex Wizard” to assist in finding and extracting the data. |
Pattern |
Within the Regex Wizard there are 2 sections:
|
Parameter |
Description |
|---|---|
Source Field |
In the drop-down box select the source from which the data is being extracted. |
Pattern Type |
Select from the drop-down box the type of expression you want to utilize:
|
Function |
If the extracted data is integer based, then you can apply the following functions that will allow you to compare the data:
|
Value |
This field will only be available if the data extracted is an integer. |
Creating a Policy
To Create a Policy:
Click the Policy View from the Configuration Menu Bar at the top of the page.
Click the Plus Icon at the bottom left of the Policies panel
Fill in the Policy name and press enter.
Creating a Correlation Rule
To Create a new Correlation Rule:
Click the Policy to which you wish to add the rule.
Click the Plus icon at the bottom of the Rules panel.
Fill in the rule name and the parameters.
Creating a Definition
To create a new definition:
Click the wrench icon within any rule to bring up the search engine.
Enter a search term that is relevant or is in the log that you would like to match and press Enter. This will return the last 10 logs with this term in them.
Utilize the highlight and extract procedure or the Regex Wizard as described in the in “Correlation Definitions” section above.
Once finished click Update in the top right of the screen and be sure to save your Definition on the next page.
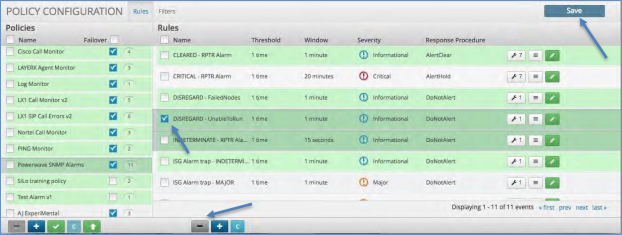
Deleting a Correlation Rule
To delete a Correlation Rule:
Click the policy name on the left side of the screen.
Click the check box on the Correlation rule you wish to delete.
Click the minus icon at the bottom of the correlation panel.
Click the Save icon in the upper right to save your change.
Deleting a Policy
To delete a Policy:
Click the check box next to the name of the Policy you wish to delete.
Click the minus icon in the bottom left of the policy panel.
Click the Save icon in the upper right to save your change.

Disabling and Enabling a Policy
To Disable and Enable a Policy:
Select the Policy by clicking the check box next to the name of the policy.
Click the Green Check Box at the bottom of the Policies listing column.
The Name of the Policy will become italicized indicating that the Policy is Disabled
To Enable the Policy: Click the Green Check Box again. The name will turn back to a normal font indicating it is enabled.
Cloning a Policy
Cloning a Policy allows the quick replication of all of the Correlation Policy rules and definitions. The user then can simply change only the required elements for the new policy.
To Clone a Policy:
Select the Policy by clicking the check box next to the name of the policy.
Click the Blue “C” Box at the bottom of the Policies listing column.
Rename the Policy and make your modifications.
Be sure to click Save to save the new policy.
Import a Policy
The Arbitrator platform allows for full export / import of all of its configuration. Within the Policy Configuration section, you can import a policy that you exported from another system. To Import a Policy:
Click the green Up Arrow button at the bottom of the policy panel.
A pop-up box will appear asking you choose your file.
Click the “Choose File” button and select the exported file that you have saved to your computer.
Click the “Import” button.
Check that the policy has been imported and click Save.

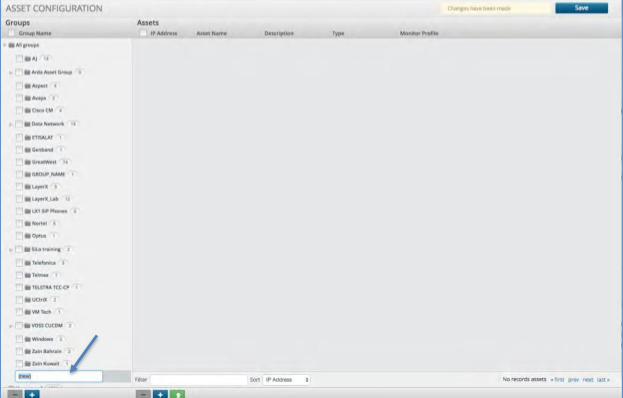
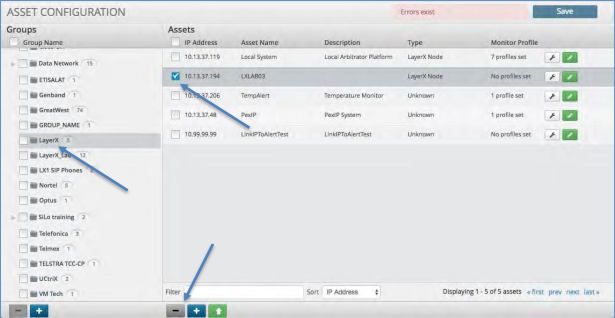
Asset Configuration
The Asset Configuration panel allows you to create Assets and Asset Groupings. Assets can be any devices that are either sending data or from which data is being retrieved. Each Asset can be assigned to a specific customer to create a multi-tenant environment.
Creating an Asset Group
To create a new Asset Group:
Click the Asset icon from the Menu bar.
Click the Plus icon in the bottom left corner of the Asset Groups panel.
Enter the Group name and press Enter.
Click the Save icon in the upper right.
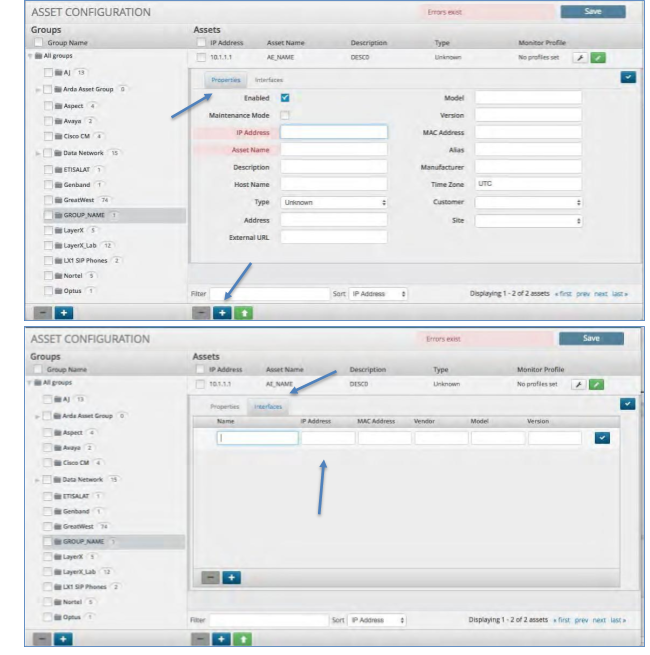
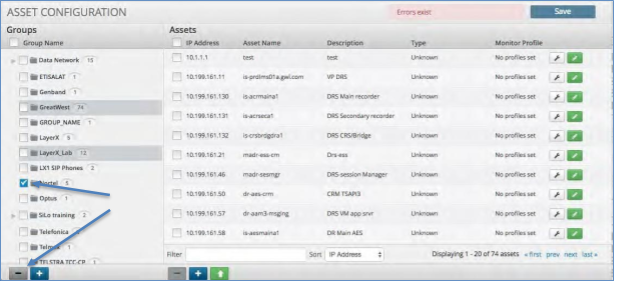
Adding an Asset to an Existing Group
To add a new Asset to a Group:
Click Asset Group to which you wish to add an asset.
Click the Plus icon at the bottom of the Asset panel.
An asset entry box will open up. Fill out all of the details for the asset under “Properties”.
Click the “Interface” tab and fill out the details, if applicable.
Click the check button to the right of the screen to add the asset.
Deleting an Asset
To delete an Asset:
Click the Asset Group in which your Asset is located.
Click the “check” box next to the asset you wish to delete.
Click the “minus” icon within the Asset panel.
Click the “Save” icon in the upper right corner.
Deleting an Asset Group
To delete an Asset Group:
Click the “check” box next to the Asset Group you wish to delete.
Click the “minus” icon in the bottom left of the Asset Group panel.
Click the “Save” icon in the upper right corner.
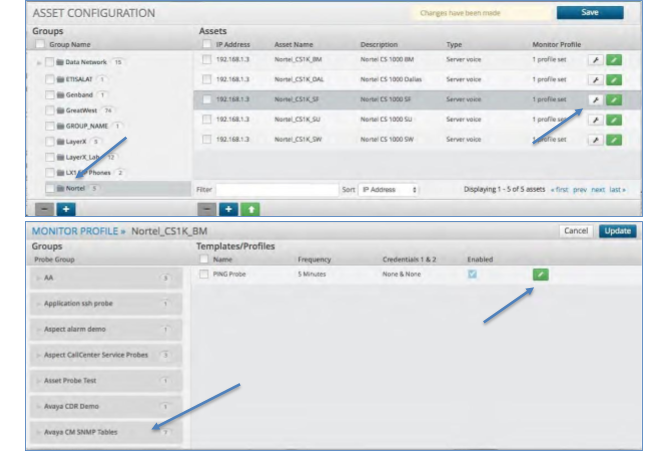
Assigning a Probe to an Asset
A Probe is a script or set of commands that are saved in the system and can be utilized to gather data, issue commands to systems, auto repair or send data. Assigning a probe to an asset is typically done to retrieve data from that asset. Commands such as an SNMP GET or an API call are utilized to retrieve data from a particular asset.
To assign a Probe to an Asset:
Click the asset group and then click on the actual asset within that group that the Probe will run against.
Click the wrench icon, which will add a monitor profile to the asset.
The Probe Group (covered in the next section) screen is opened where you can select from all of the saved Probes in the system.
Select the desired Probe
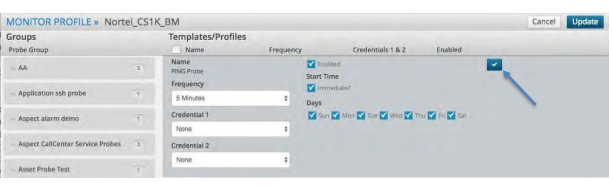
Next click the green pencil icon, which will open up a profile to define the frequency the probe runs, the credentials needed for the probe to run, the schedule for the Probe to run and the choice to start it immediately.
Note
For SP25, the frequency for Polycom devices is set at 5 minutes.
Once complete click the check button to finalize the probe. This will take you back to the Asset screen and to the asset you had selected.
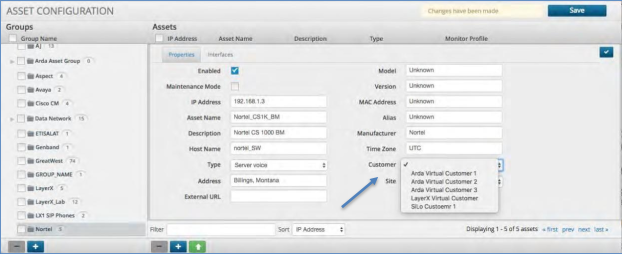
Assigning a Customer to an Asset
The Correlation Platform has multi-tenancy built in that provides the ability for different customers to see correlated or collected results of only their data. Within the configuration of assets, you can assign each asset to a specific customer. To assign a Customer to an Asset:
Click the asset group and then click on the actual asset within that group that is to be assigned to a Customer.
Click the pencil icon that will open up the details of that asset.
Click the field labeled Customer and a drop-down list of available Customers will appear.
Select the Customer that the asset belongs to and then click the blue check box in the top right.
Click the Save icon to save the changes.
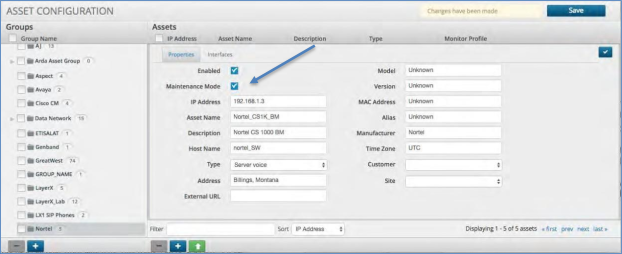
Placing an Asset in Maintenance Mode
The Correlation Platform allows any asset to be placed into Maintenance mode. Doing so will stop the platform from responding with alerts until it is removed from the mode. Data will still be collected but alerts will not be sent.
Click the asset group and then click on the actual asset within that group that is to be put into Maintenance mode.
Click the pencil icon that will open up the details of that asset.
Check the box next to the label Maintenance Mode and then click the blue check box in the top right.
Click the “plus” icon to return to the Asset Group and then click the “Save” icon to save the Maintenance Mode settings.
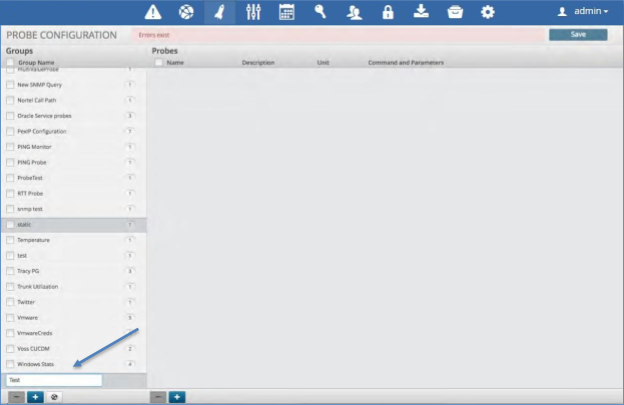
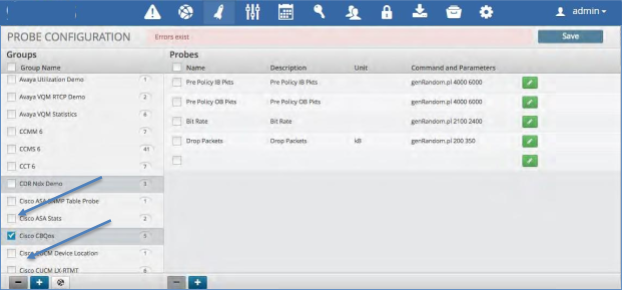
Probe Configuration
The Probes Configuration panel allows you to assign a group of scripts to an asset that can run on a set interval. These scripts will allow for data collection from many types of devices. The protocols can be API, SNMP or custom CLI scripts. The return data from the Probes can then be injected into the system for correlation or can be stored in the database to allow for analysis on the Dashboard/Reporting server.
For PRI and SIP Trunk probes for Cisco Voice Gateways, reference:
Arbitrator Cisco PRI and SIP Probe Configuration for instructions.Creating a Probe Group
To create a new Probe Group:
Click the Probe icon from the Menu bar.
Click the “Plus” icon within the Groups pane in the bottom left corner.
Enter the “Group” name and press Enter.
Click the “Save” icon in the upper right corner.
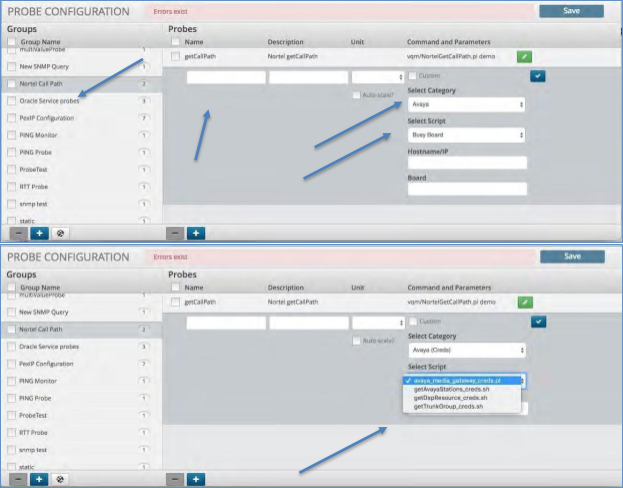
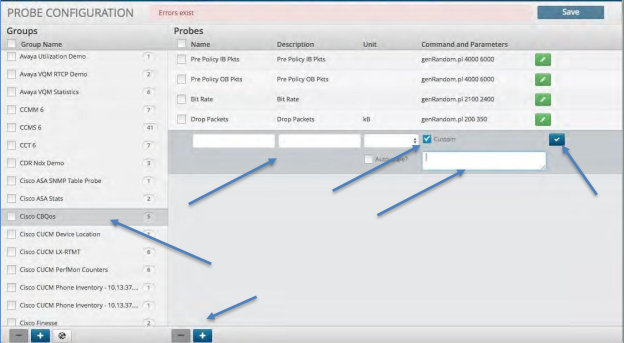
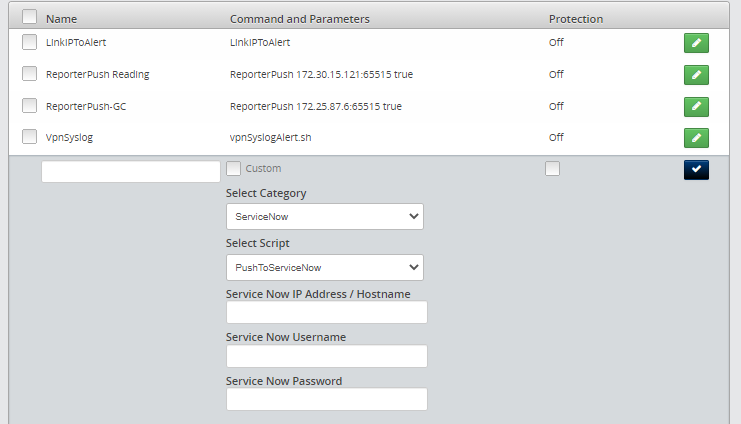
Creating a Probe
To create a new Probe:
Click the group in which you wish to create a new Probe.
Click the Plus icon within the Probes panel.
Enter the name and description of the Probe.
De-select the check icon from the field titled “Custom”. This field is utilized when putting a custom probe in place versus utilizing the ones within the system.
Note
For SP25, Polycom support requires Custom to be checked and the Command and Parameters field be entered as
polycom.sh.Select the Probe Category from the drop-down list. This will populate the scripts available in that category within the drop-down menu titled “Select Script”.
Select a script from the script drop-down list.
Enter any additional information required by the selected script, such as the hostname, IP, etc.
Click the “Check” icon to close the probe in the far right of the Probe panel.
Click the “Save” icon to save the added Probe.
Creating a Custom Probe
To create a new Probe:
Click the group in which you wish to create a new Probe.
Click the Plus icon within the Probes panel.
Enter the name and description of the Probe.
Select and click the check icon from the field titled “Custom”. This field is utilized when putting a custom probe in place versus utilizing the ones within the system.
Enter the path and script that you wish to run.
Click the “Check” icon to close the probe in the far right of the Probe panel.
Click the “Save” icon to save the added Probe.
Deleting a Probe Group
To delete a Probe Group:
Click the check box next to the group name you wish to delete.
Click the Minus icon within the Probe Group panel in the bottom left.
Click the “Save” icon to save the changes.
Deleting a Probe
To delete a Probe:
Click the check box next to the Probe name you wish to delete.
Click the Minus icon within the Probe panel in the bottom right.
Click the “Save” icon to save the changes.
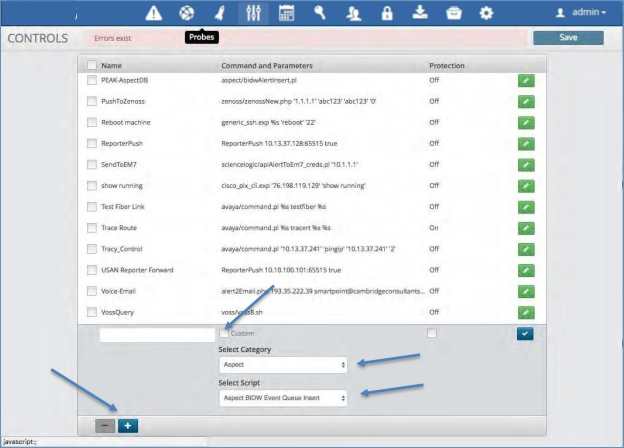
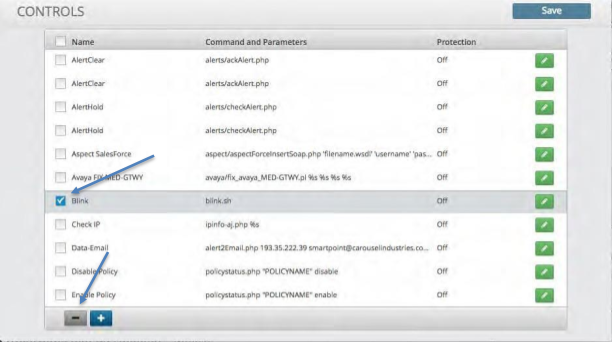
Controls
The Controls Configuration panel allows you to define a script or routine that can be executed by a response procedure or attached as a probe. These controls can be passed variables extracted from a correlation rule. The resulting return of the scripts execution can be mapped to the database, used as an action or can be injected back into the system to be correlated against another element.
Creating a Control
To create a new Control:
Click the Plus icon within the control panel.
Enter the name of the Control.
De-select the check icon from the field titled “Custom”. This field is utilized when putting a custom Control in place versus utilizing the ones within the system.
Click and Select from the categories dropdown list to populate the scripts dropdown.
Select a script from the script dropdown list.
Enter any additional information required by the selected script.
Click the Check icon to close the control in the far right of the control panel
Click Save icon.
Deleting a Control
To delete a Control:
Click the check box next to the Control name you wish to delete.
Click the Minus icon within the Control panel at the bottom.
Click the “Save” icon to save the changes.
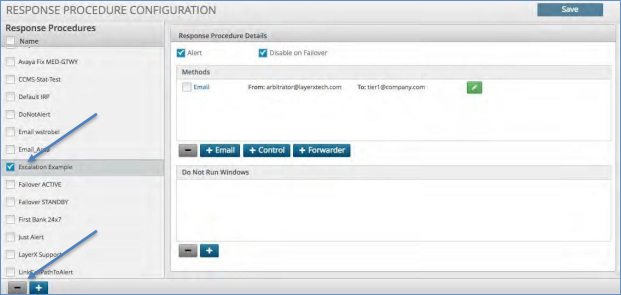
Response Procedure Configuration
The Response Procedure configuration panel allows you to define an automated response to a correlated event. Each Response Procedure can be assigned to one or more Correlation Rules while also containing and/or executing one or more of the following responses:
Action |
Description |
|---|---|
Alert |
Visually show the alert in the alert views within the User Interface. |
An email will be sent to the recipients address and contain the Policy and Correlation Rule details that are triggered. Additionally, any data that is extracted from the correlated event will be included. |
|
Control |
Executes the selected Control Script as a result of the correlated event. Data from the correlated event will be passed to the script as well. These scripts can be utilized as run-book and/or automated remediation. |
Forward |
The forward allows the correlated event to be forwarded to another Arbitrator Correlation platform. |
Creating a Response Procedure
To create a response procedure:
Click the “Calendar” icon at the top of the Configuration panel.
Click the plus icon in the bottom left of the Response Procedure name panel. A box will open up where you can fill in the name of your response procedure.
The panel to the right is broken into two sections:
Response Procedure Details – This is the section that you select to add the elements defined in the table above.
Do Not Run Windows – Allows you to define certain date and times that you don’t want the system to take the actions within the Response Procedure.
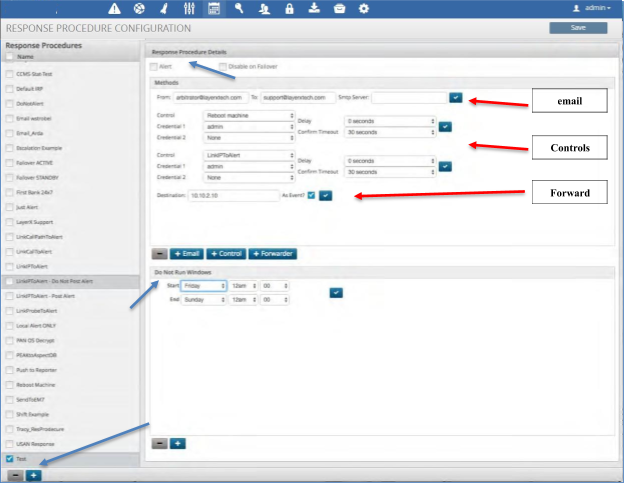
Assigning an Alert to a Response Procedure
To assign the Alert function to a response procedure:
Click the Alert check box in the top left of the Response Procedure Details panel.
If this system you are configuring is intended to be the redundant platform then click the Disable on Failover box to allow all data to flow but no actions to take place.
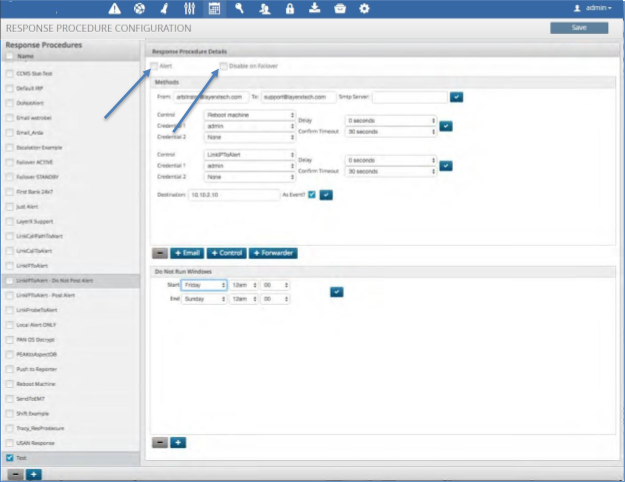
Deleting a Response Procedure
To delete a Response Procedure:
Click the box next to the Response Procedure name.
Click the minus icon at the bottom of the Response Procedure name panel.
Click the Save icon to save your changes.
How to Enable ServiceNow Intergration
Navigate to Configuration (cog icon) on the arbitrator.
Navigate to Control and click + to enter a new control.
In the Name text box enter ServiceNow.
Untick Custom.
Fill in the following details:
Select Category: ServiceNow
Select Script: PushToServiceNow
Service Now IP Address / Hostname:
Service Now Username:
Service Now Password:
Tick the blue tick box.
Click the Save.
Navigate to the Response Procedure Configuration menu.
Apply the control to the required IRP, such as the default IRP.
ServiceNow One Way Incident Integration
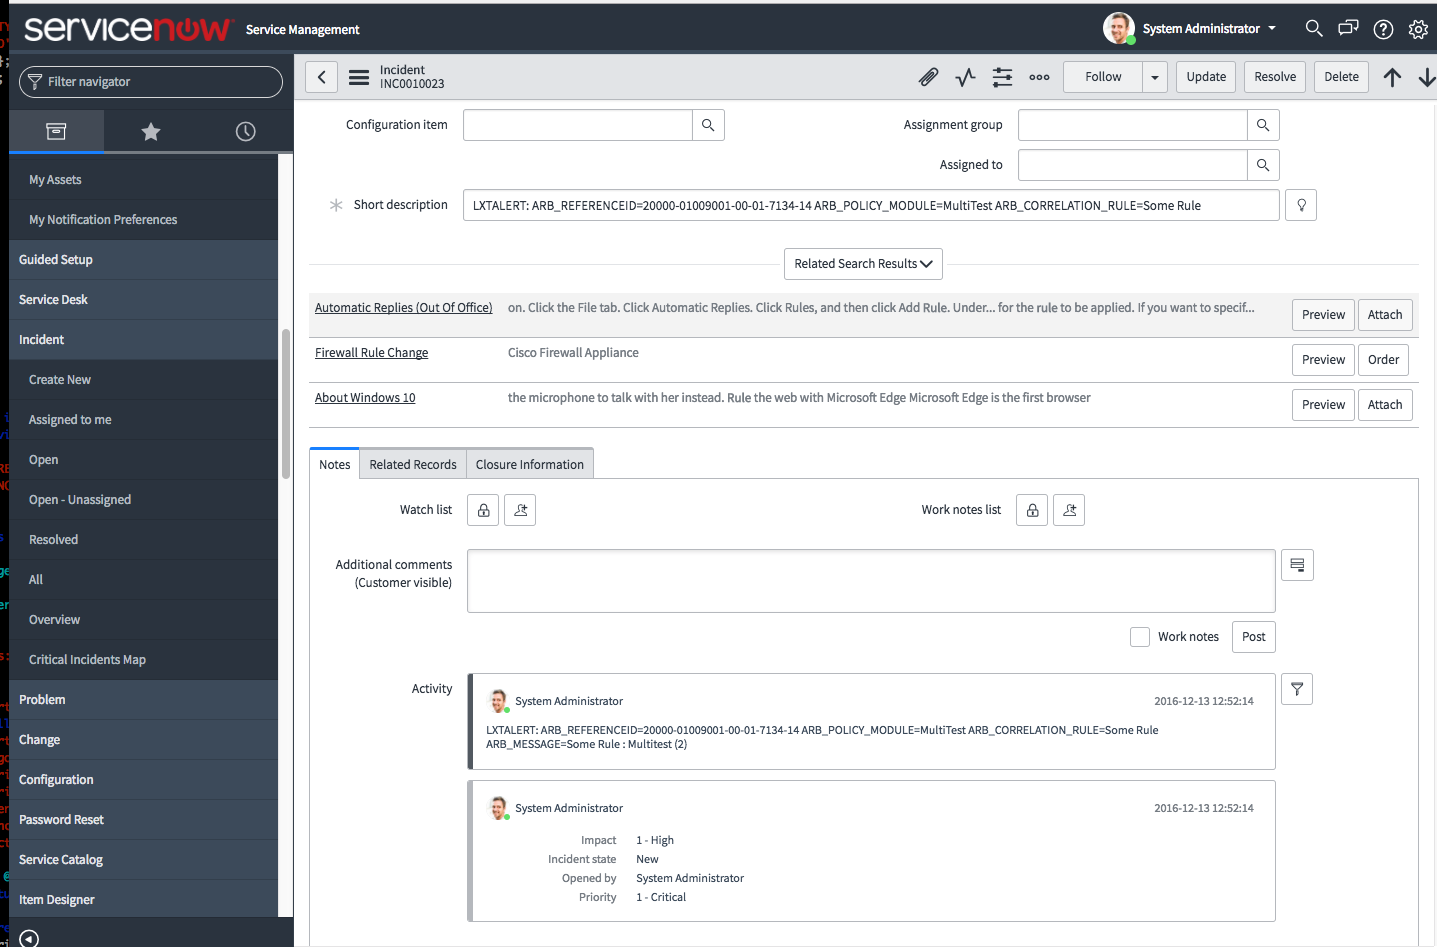
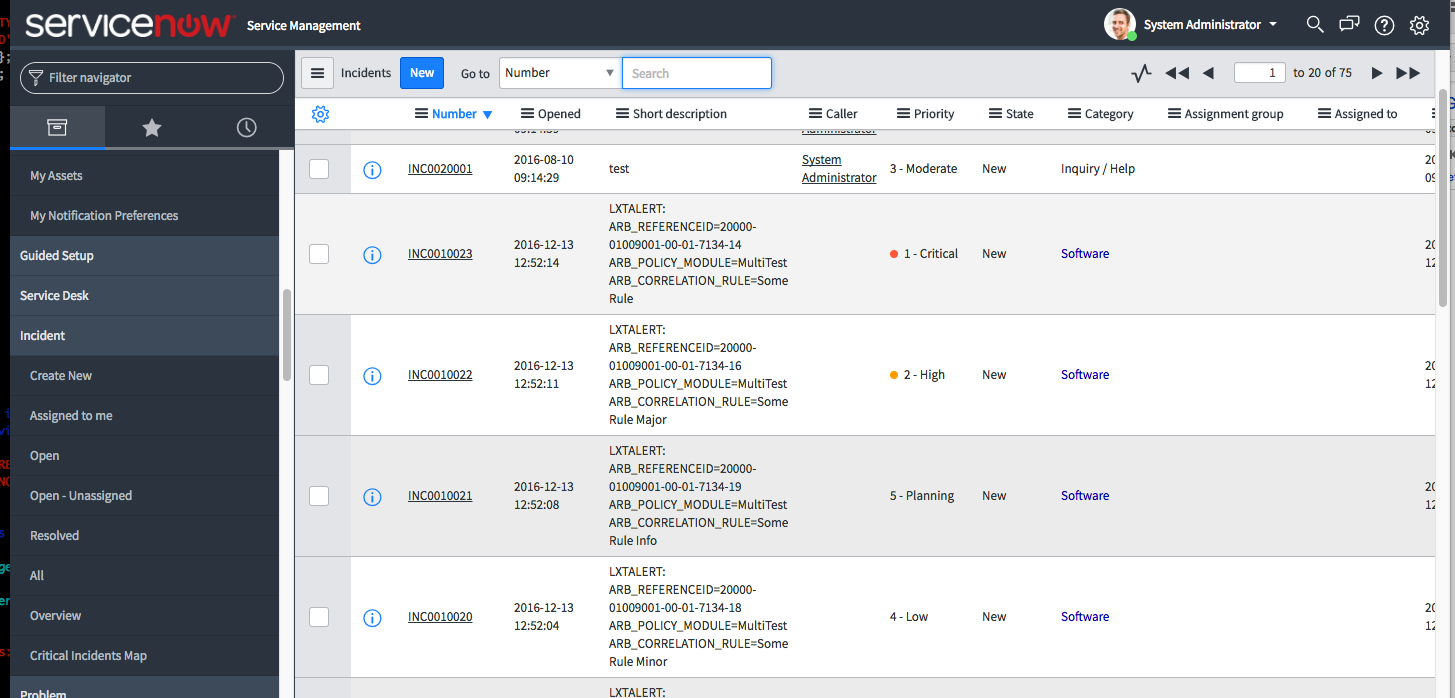
As the Correlation Platform detects new incidents a response procedure is defined to send the event into ServiceNow utilizing their API. Incident Response Procedures (IRP) are defined on an incident basis. Thus you can choose which events need to be sent to ServiceNow based on severity, type, threshold, or others. When the IRP kicks off it will create an event, insert the following fields and send it to ServiceNow:
short description: Arbitrator Policy, Rule and Reference_Id
description: full message from arbitrator
severity: severity
urgency: based on severity
impact: based on severity
category: software
comments: full message from Arbitrator
ServiceNow Requirements
ServiceNow URL
ServiceNow User with SOAP API rights to insert Incidents
ServiceNow Password
Arbitrator Correlation Configuration
Version Required: 4.0001-15b
Script:
servicenow/PushToServiceNow.plparameters:
URL_TO_SERVICENOW_INSTANCEUSERNAMEPASSWORD
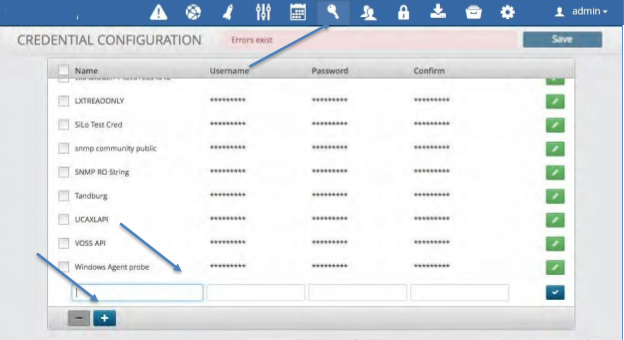
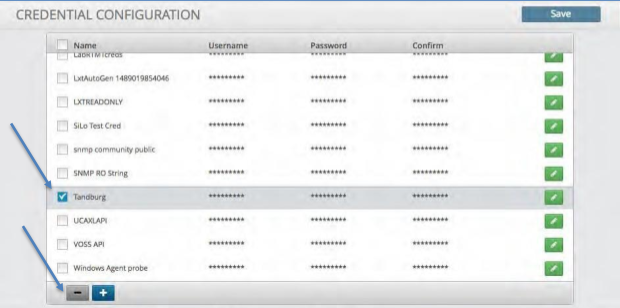
Credential Configuration
The Credentials configuration panel allows you to define and store credentials securely. These credentials can be assigned to a Probe or Control to allow for secure access to an asset, ticketing system or script. (See: Asset Configuration, Response Procedure Configuration)
Creating a Credential
To create a Credential:
Click the “key” icon in the menu bar at the top.
Click the plus icon in the bottom left corner.
Enter the name to be assigned to the Credential.
Enter the Username and Password fields.
Click the blue check box.
Click the Save icon to save the credential.
Deleting a Credential
To delete a Credential:
Click the check box to the left of the credential name you wish to delete.
Click the minus icon in the bottom left of the screen.
Click the Save icon to save your changes.
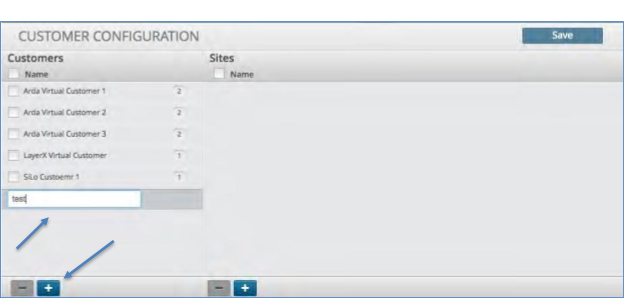
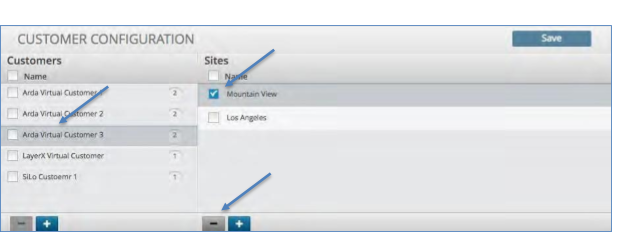
Customer Configuration
To enable multi-tenancy (assets, alerts and data) utilize the customer configuration panel to define a customer and their related locations (sites). Once defined, the Customer field can be applied to an asset and or a user to restrict access to other customers assets, alerts and data.
(See: Asset Configuration, Access Control Configuration).
Creating a Customer
To create a Customer:
Click the “customer” icon in the menu bar at the top.
Click the plus icon in the bottom left corner of the customer panel.
Enter the name of the Customer to be added and press Enter.
Enter the Username and Password fields.
Click the Save icon to in the upper right corner.
Proceed to creating a Customer Site.
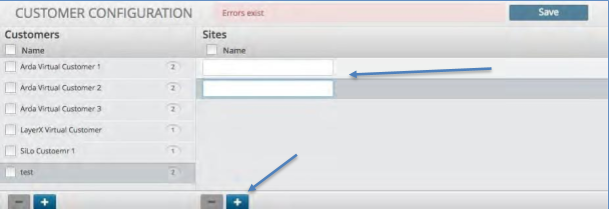
Creating a Customer Site
To create a site for a Customer:
Click the customer to which you wish to add the site.
Click the plus icon in the bottom of the site panel.
Enter the site name and press Enter.
Add additional sites if applicable.
Click the Save icon to in the upper right corner.
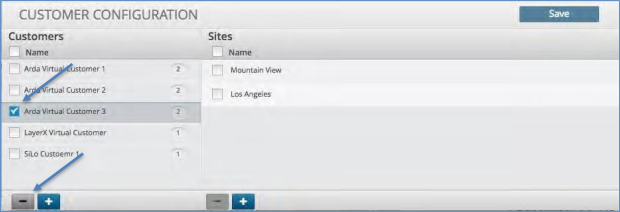
Deleting a Customer
To delete a Customer:
Click the check box of the customer you wish to delete.
Click the minus icon in the bottom of the site panel.
Click the Save icon to in the upper right corner.
Deleting a Customer Site
To delete a site for a Customer:
Click the customer in which you wish to delete the site.
Click the minus icon in the bottom of the site panel.
Click the Save icon to in the upper right corner.
Access Control
The Access Controls Configuration panel allows for specific Role Based Access Controls to be enabled. These controls are based on the role of the user and the customer to which they belong.
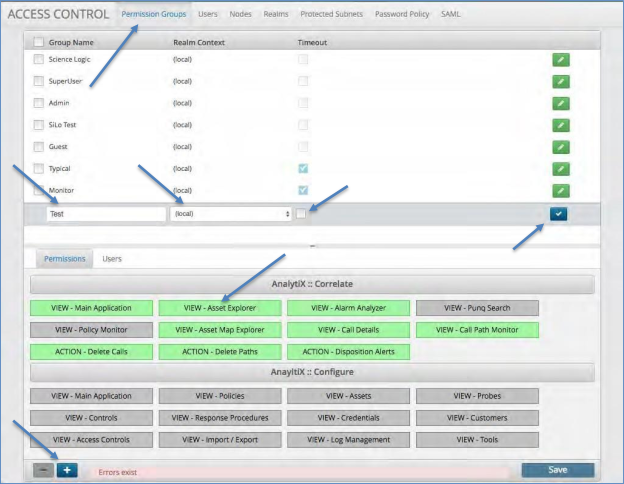
Permission Groups
The first tab under the Access Controls is the Permission Groups. This allows the admin to define a group that has specific capabilities/rights and subsequently add users to these groups.
Creating a Permission Group
To create a Permission Group:
Click the Permission Group tab under the Access Control panel. A list of defined groups will be displayed.
Click the blue plus icon at the bottom of the panel.
Fill in the name of the group and select Realm Context drop-down button. This will always be local for a single Arbitrator deployment.
Click the Timeout box if you wish this user group to have their session timeout for non- use and require them to log back into the UI.
Select each system screen name tab that you wish to grant access to this group. As you select each tab it will turn green indicating that this system screen will be available to this group.
Click the blue check icon when complete.
Click Save to complete the addition of the group.
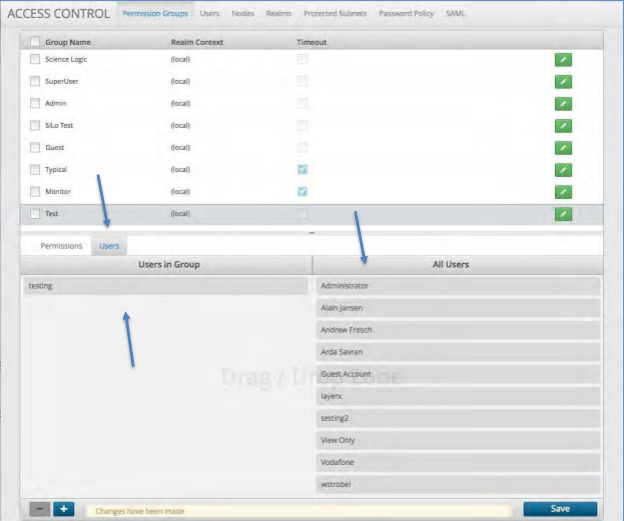
Assigning and Removing Users to and from a Permission Group
To Assign a User to a Permission Group:
Click User next to the Permission tab. A list of All Users and Users in Groups will be displayed.
Click the Group to which you wish to add a User.
Drag the desired user(s) from the “All Users” section to the drop zone under “Users in Group”.
To remove a User from a Permission Group simply drag the user from the “Users in Group” section over to the “All Users” section
Click Save to complete the action.
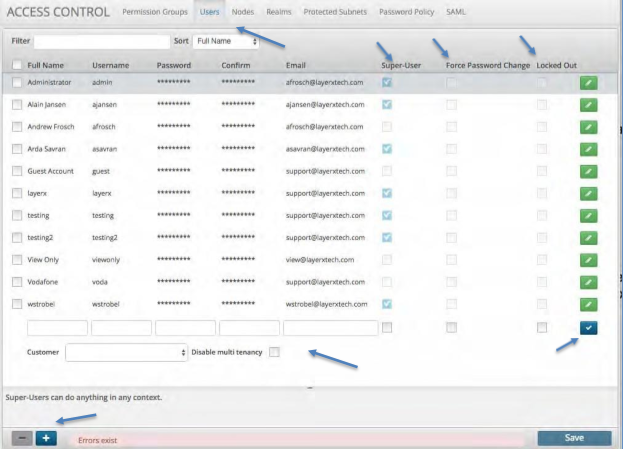
Users
The Users tab allows you to create a new user or modify an existing one. The users can be set up as “Super Users” or assigned roles in the permission groups. Once the user is added and saved then they will be available to add to the Permission Groups per the last section.
Creating a New User
To create a new User:
Click the User tab at the top of the screen next to Permission Groups.
Click the blue plus icon at the bottom of the screen.
Fill in the required fields. (Full Name, Username, Password, Confirm and Email).
Check the Super-User box if applicable.
Check the Force Password Change if you want this user to follow the Password Policy.
Click the Locked Out box if you want this user to time on inactivity on the UI.
Select the Customer drop-down box and assign the user to a customer.
Check the Disable multi-tenancy if this is a single customer and multi-tenancy does not apply.
Click the Blue check icon to set the user.
Click the Save button to save the user.
Deleting a User
To delete a User:
Click the check box next to the User name that you wish to delete.
Click the minus icon at the bottom of the screen.
Click the Save button to save your changes.
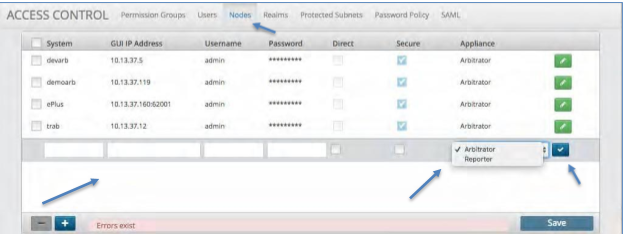
Nodes
The Nodes tab allows you to create a new Arbitrator Correlation or Dashboard/Reporting node. Once it is added and saved then the node can be added to a Realm with other nodes.
Creating a Node
To create a Node:
Click the Node tab at the top of the screen next to Users.
Click the blue plus icon at the bottom of the screen.
Fill in the required fields. (System, GUI IP Address, Username and Password).
Check the either the Direct box (http) or the Secure box (https) to select the communication method.
Select the Appliance drop-down box and choose the type of system you are adding.
Click the Blue check icon to set the Node.
Click the Save button to save the Node.
Deleting a Node
To delete a Node:
Click the check box next to the Node name that you wish to delete.
Click the minus icon at the bottom of the screen.
Click the Save button to save your changes.
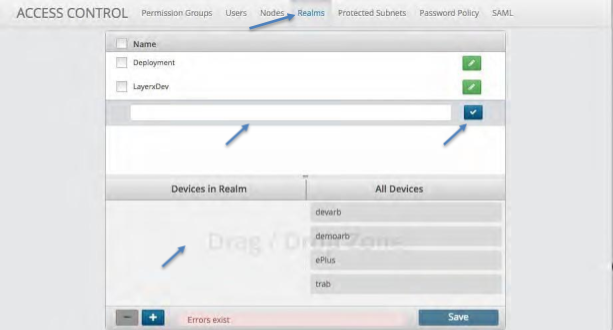
Realms
The Realm tab allows you to create a new Realm where VOSS Insights systems can be grouped to communicate with each other. Once it is added and saved then Nodes can be added to the Realm.
Creating a Realm
To create a Realm:
Click the Realm tab at the top of the screen next to Nodes.
Click the blue plus icon at the bottom of the screen.
Fill in the Realm name that you desire.
Click the Blue check icon to set the Realm.
Drag the systems that you want in the Realm into the drop zone.
Click the Save button to save the Realm.
Deleting a Realm
To delete a Realm:
Click the check box next to the Realm name that you wish to delete.
Click the minus icon at the bottom of the screen.
Click the Save button to save your changes.
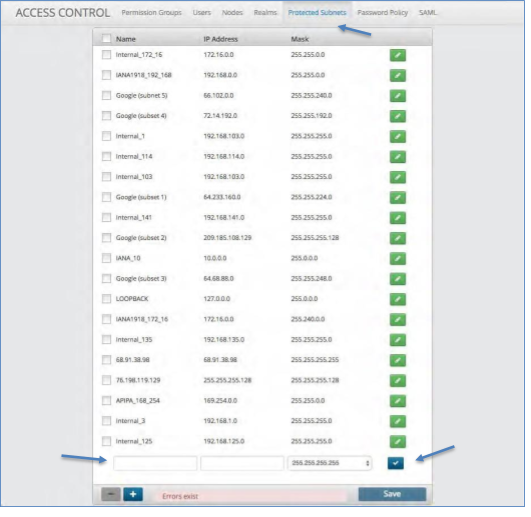
Protected Subnets
The Protected Subnets tab allows you to input the IP addresses of subnets that will be protected from a control running against them. The Control will check this list prior to running and will not run a script against a device that is within a protected subnet.
Creating a Protected Subnet
To create a Protected Subnet:
Click the Protected Subnet tab at the top of the screen next to Realms.
Click the blue plus icon at the bottom of the screen.
Fill in the Name, IP Address and Mask of the Protected Subnet.
Click the Blue check icon to set the Protected Subnet.
Click the Save button to save your changes.
Deleting a Protected Subnet
To delete a Protected Subnet:
Click the check box next to the Protected Subnet name that you wish to delete.
Click the minus icon at the bottom of the screen.
Click the Save button to save your changes.
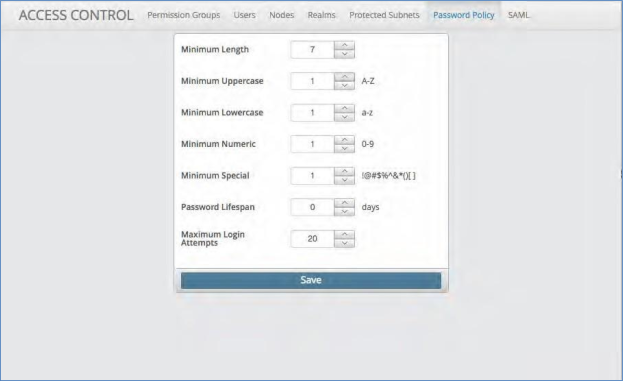
Password Policy
The Password Policy tab allows you to set and enforce password rules to access the system. Each field is optional thus the user can choose the best policy to enforce.
Creating a Password Policy
To create a Password Policy:
Click the Password Policy tab at the top of the screen next to Protected Subnets.
Within the box you have an option of Minimum Length, Minimum Uppercase, Minimum Lowercase, Minimum Numeric, Minimum Special, Password Lifespan and Maximum Login Attempts.
Fill in the desired inputs into each of these fields.
Click the Save button to save your changes.
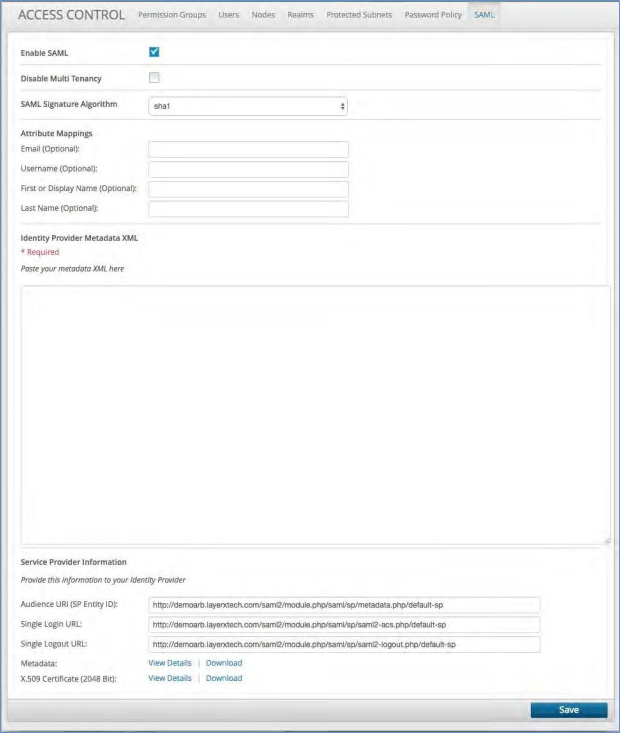
SAML
The SAML tab allows you to configure single sign-on to other user management platforms by utilizing the Security Assertion Markup Language (SAML). This is an open standard for exchanging authentication and authorization data between systems.
Creating single sign-on via SAML
To create single sign-on via SAML:
Click the SAML tab at the top of the screen next to Password Policy. The attributes on this page require you to interact with your administrator of allowed users.
Click the box next to Enable SAML.
If the system is supporting a single customer, then click the Disable Multi-Tenancy.
Fill in the optional principal attributes.
From your administrator obtain the Identity Provider Metadata XML and paste it into the box provided.
From the following boxes provide each of the following to your Identity Provider:
Audience URL (SP Entity ID)
Single Login URL
Single Logout URL
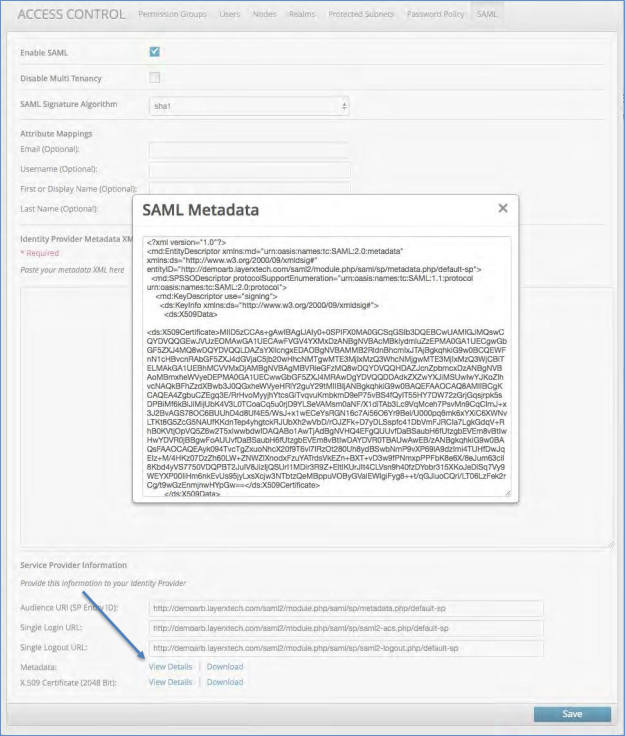
Click to view or download the platform SAML Metadata
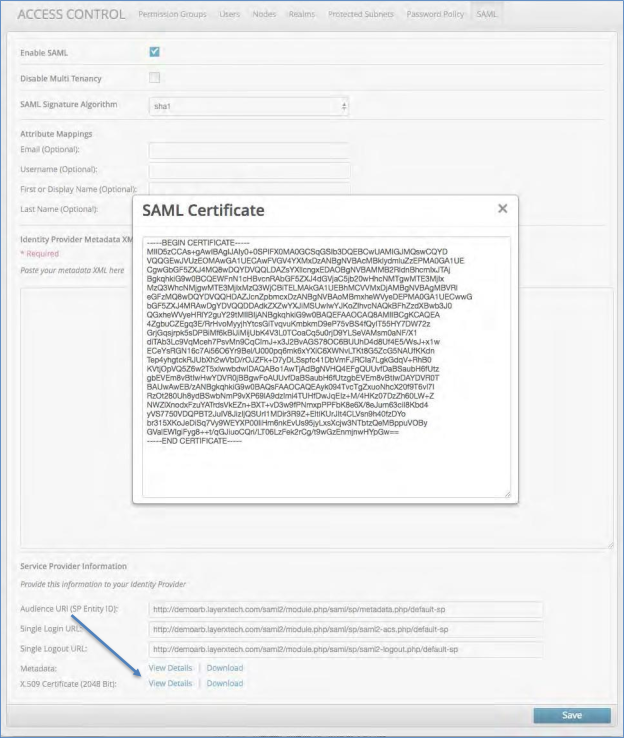
Click to view or download the platform X.509 Certificate (2048 Bit)
Click the Save button to commit the SAML configuration.
(See Figures on the next few pages.)
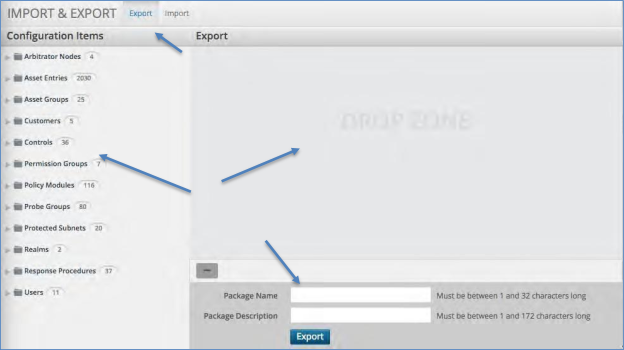
Import & Export
The Import & Export Configuration panel allows you to select all or parts of the system configuration to be exported to file or to import already exported files into the system.
Exporting
To export configuration items:
Click the Export tab at the top of the screen.
On the left-hand side will be folders containing all of the configuration items. Either drag whole folders over to the drop zone or open a folder and select a specific item to drag to the drop zone.
Once complete give the package a name in the box next to Package Name.
Then give the package a description in the box next to Package Description.
When complete click the Export button.
The package file will download to your local computer.
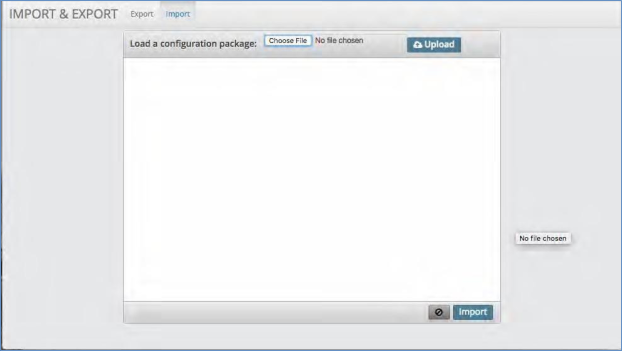
Importing
To import configuration items:
Click the Import tab at the top of the screen.
Select the file you wish to import by clicking the “choose file” button. This will open up your local file system to select the file from where you have it stored on your computer.
Double click the file or highlight it and click “Open”.
Click the Upload button. This will open up all of the configuration items you are importing.
Make any changes to the settings as required.
Click Import.
A progress screen will pop up. Once complete click OK.
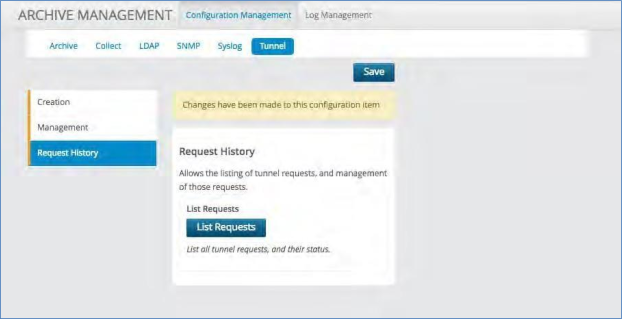
Archive Management
The Archive Management panel provides options on backing up the Arbitrator Correlation platform.
Archive
Under the Archive tab there are a few options based on the specific functions the user wants to backup.
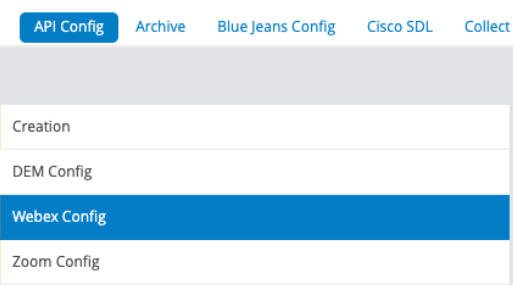
API Config
A number of API configurations to enable monitoring can be configured.
From SP25, Webex Config is available to enable the configuration of Webex monitoring. (Requires Dashboard SP66 Release for visualization)
Note
For Webex API support, your network should be configured to access: https://webexapis.com/v1, port 443.
(Admin menu > LayerX Network Configuration, DNS Settings may need to be configured to reach the external site.)
Webex API Configuration Steps
From the main landing page, select the System Configuration (wrench/spanner), which opens a new tab.
On the new tab, select Archive Management (file cabinet).
Go to Configuration Management > API Config > Webex Config to fill in the settings:
Click the Create Access Token button, enter your account credentials and copy the JSON string which performs OAuth handshake with Webex.
Set Enabled to
enabled.At CUSTOMER enter the Customer Name (if multi-tenancy is required)
At AccessToken paste the copied JSON token from step a.
Click Verify Access Token and to verify, inspect the output in View Output.
Click Save Access Token, which will create a new Customer-specific “Webex Config - <XYZ>” entry. under the API Config list. (You need to click away and return to Configuration Management to reload with the new entry.)
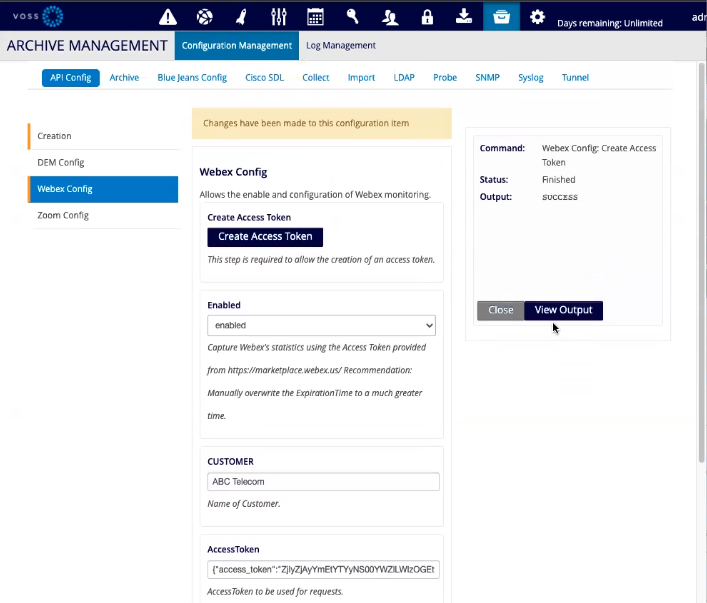
Created configurations can be deleted or modified. This will be needed for Access Tokens,
as these contain an expires_in value.
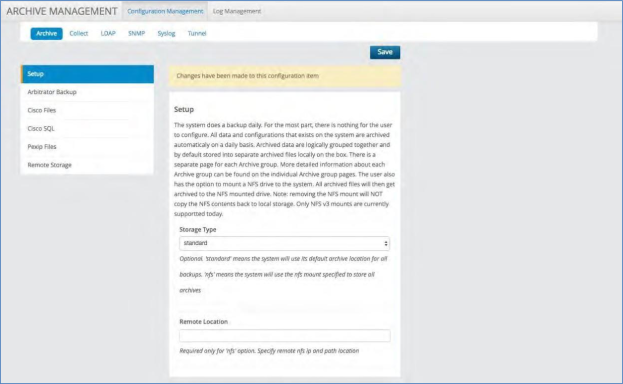
Setup
The system does a backup daily. For the most part, there is nothing for the user to configure. All data and configurations that exists on the system are archived automatically on a daily basis.
Archived data are logically grouped together and by default stored into separate archived files locally on the box. There is a separate page for each Archive group. More detailed information about each Archive group can be found on the individual Archive group pages. The user also has the option to mount an NFS drive to the system. All archived files will then get archived to the NFS mounted drive. Note: removing the NFS mount will NOT copy the NFS contents back to local storage. Only NFS v3 mounts are currently supported today.
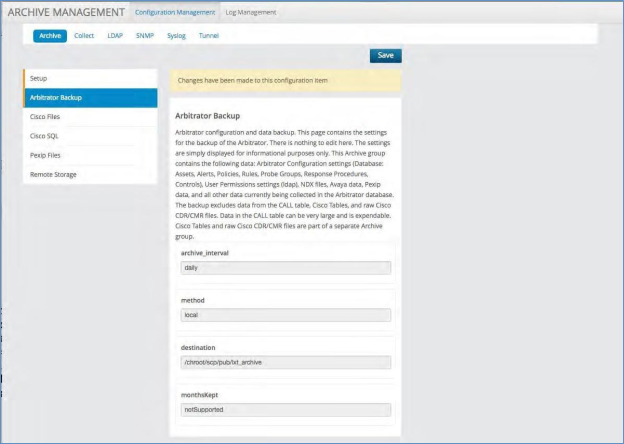
Arbitrator Backup
This page contains the settings for the backup of the Arbitrator. There is nothing to edit here. The settings are simply displayed for informational purposes only. This Archive group contains the following data: Arbitrator Configuration settings (Database: Assets, Alerts, Policies, Rules, Probe Groups, Response Procedures, Controls), User Permissions settings
(ldap), NDX files, Avaya data, Pexip data, and all other data currently being collected in the Arbitrator database.
The backup excludes data from the CALL table, Cisco Tables, and raw Cisco CDR/CMR files. Data in the CALL table can be very large and is expendable. Cisco Tables and raw Cisco CDR/CMR files are part of a separate Archive group.
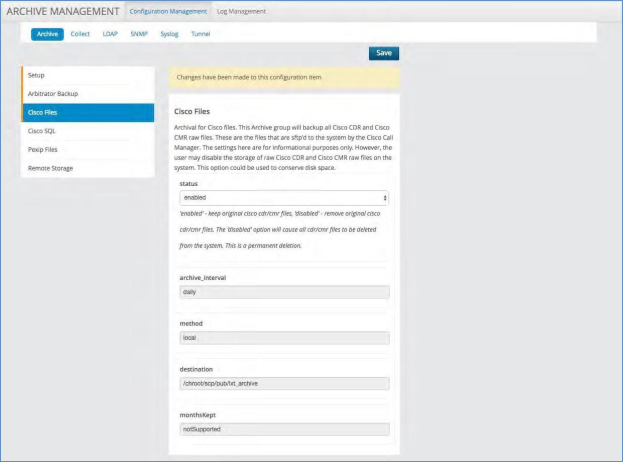
Cisco Files
Archival for Cisco files. This Archive group will back up all Cisco CDR and Cisco CMR raw files. These are the files that are SFTP’d to the system by the Cisco Call Manager. The settings here are for informational purposes only. However, the user may disable the storage of raw Cisco CDR and Cisco CMR raw files on the system. This option could be used to conserve disk space.
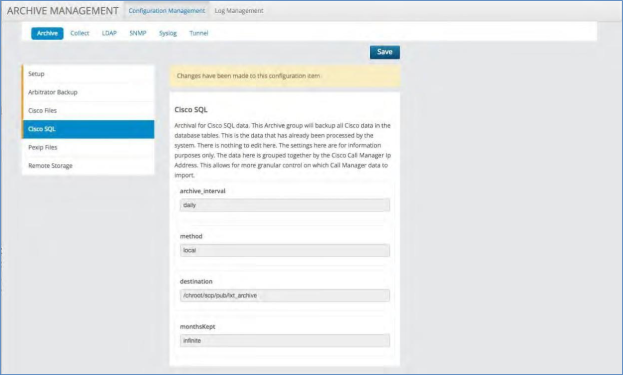
Cisco SQL
Archival for Cisco SQL data. This Archive group will back up all Cisco data in the database tables. This is the data that has already been processed by the system. There is nothing to edit here. The settings here are for information purposes only. The data here is grouped together by the Cisco Call Manager IP Address. This allows for more granular control on which Call Manager data to import.
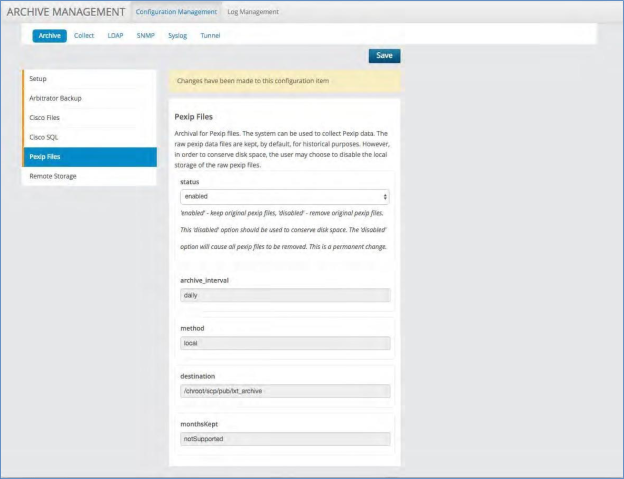
Pexip Files
Archival for Pexip files. The system can be used to collect PEXIP data. The raw PEXIP data files are kept, by default, for historical purposes. However, in order to conserve disk space, the user may choose to disable the local storage of the raw PEXIP files.
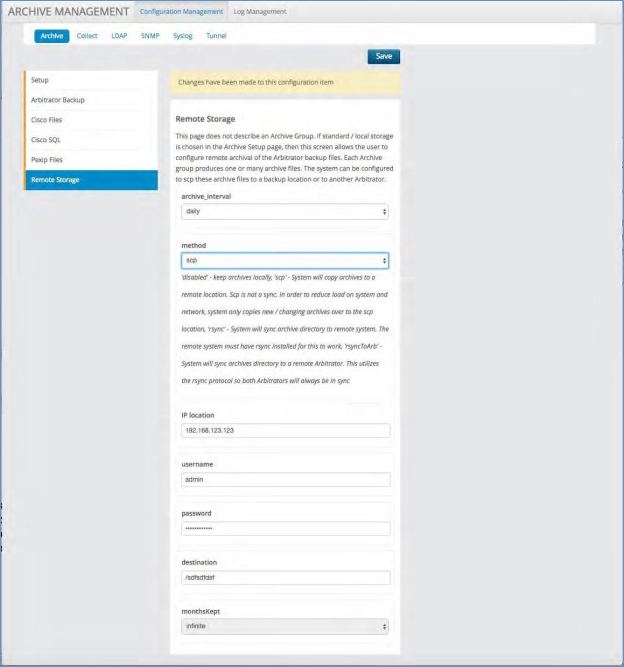
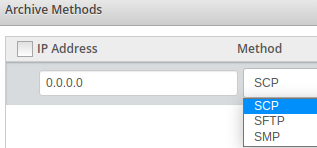
Remote Storage
This page does not describe an Archive Group. If standard / local storage is chosen in the
Archive Setup page, then this screen allows the user to configure remote archival of the Arbitrator backup files. Each Archive group produces one or many archive files. The system can be configured to SCP these archive files to a backup location or to another Arbitrator.
Collect
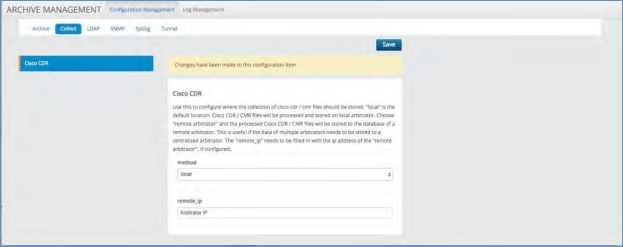
The Collect tab allows you to choose where to store Cisco CDR/CMR files. Use this section to configure where the collection of Cisco CDR/CMR files should be stored. “local” is the default location and will be the local Arbitrator Correlation platform. Choose “remote arbitrator” and the processed Cisco CDR/CMR files will be stored to the database of a remote arbitrator. This is useful if the data of multiple arbitrators needs to be stored to a centralized arbitrator. The “remote_ip” needs to be filled in with the ip address of the “remote arbitrator”, if configured.
LDAP External Config
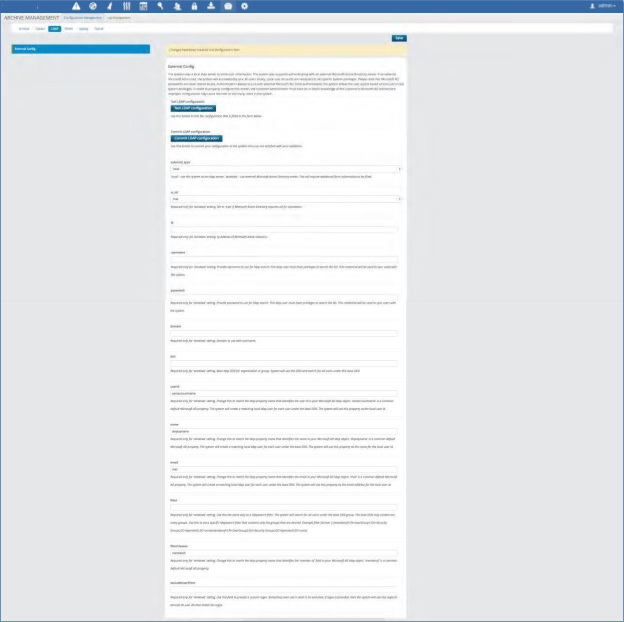
The system uses a local LDAP server to store user information. The system also supports authenticating with an external Microsoft Active Directory server. If an external Microsoft AD is used, the system will automatically sync all users locally. Local user accounts are necessary to set specific system privileges. Please note that Microsoft AD passwords are never stored locally. Authentication always occurs with external Microsoft AD. Once authenticated, the system allows the user access based on the user’s local system privileges. In order to properly configure this screen, the customer administrator must have an in-depth knowledge of the customer’s Microsoft AD architecture. Improper configuration may cause too little or too many users in the system.
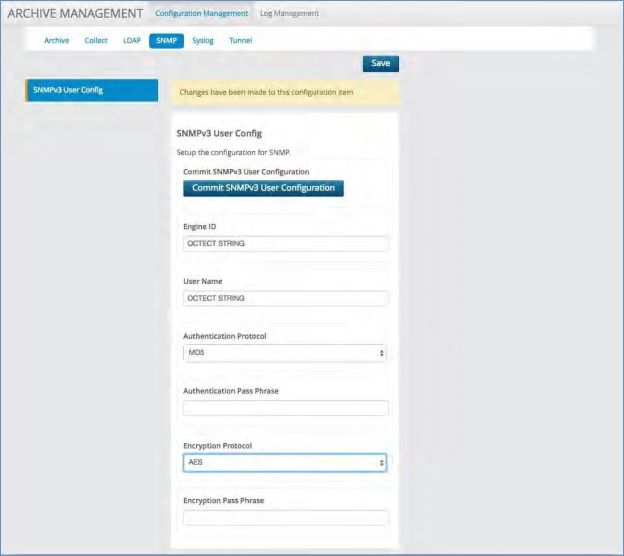
SNMP V3 User Config
This allows the system to be configured to work with SNMP v3. It allows you to select the specific authentication and encryption methods to be utilized.
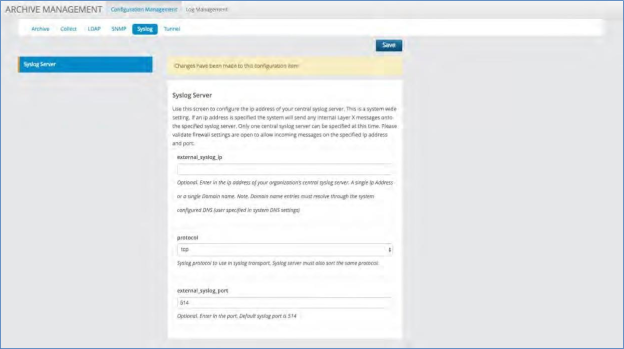
Syslog Server
The system has the ability to send out syslog messages about several of the internal functions including backup and archival success. Use this screen to configure the IP address of your central syslog server. This is a system wide setting. If an IP address is specified, the system will send any internal VOSS Insights messages onto the specified syslog server. Only one central syslog server can be specified at this time. Please validate firewall settings are open to allow incoming messages on the specified IP address and port.
Log Management
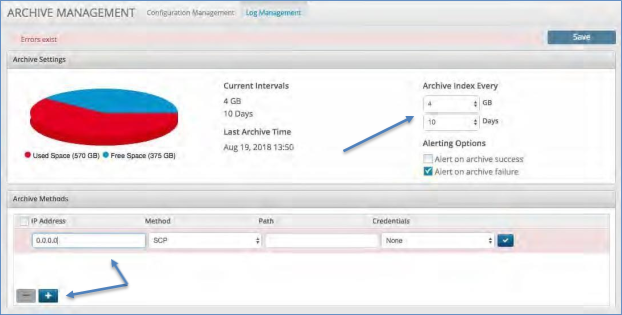
The Log Management panel allows you to customize the archival of the index data store. It can be performed based on Size, Time or a combination of both.
To set the archival process click on the Log Management tab:
Select the file size at which to start the archive.
Select the time interval at which to start the archive.
Add the location to where the archive file will be sent.
Set the IP Address, Choose the Method of transport (e.g. SFTP), give it a Path and input any Credentials required.
Tools
SNMP Tools
The SNMP Tools panel allows you to very easily load or import MIBs and then build SNMP actions/ scripts to be saved as Probes within the platform. The system comes with a library of MIBs that can be opened by selecting the Load button. If a new one is needed it can be imported by selecting the Import button.
The system comes with a library of MIBs that can be opened by selecting the Load button. Click the Tools Tab:
To load an existing MIB simply select the Load button
A window will open up with a choice of all the manufacturer MIBs available in the system.
Scroll through and select the desired MIB.
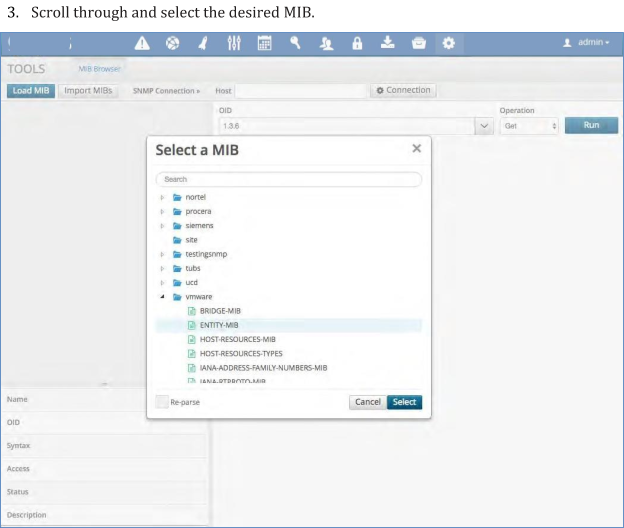
Once selected you can open up all of the branches and leaves and view each associated OID.
Choose the folder you wish to utilize and input the connection settings for that system.
Select the Connection button, input the host name or IP and choose the SNMP version. If selecting V3 then a set of different parameters will pop up and you will need to fill these in.
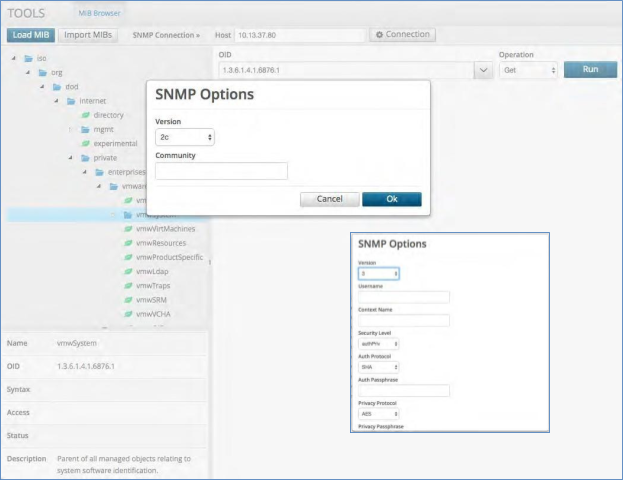
Choose the operation to perform: GET, GET NEXT or WALK
The operation will return the values of the OID you query in the field below it. Checking any of the boxes beside the field will un-gray the “Create Probe” box.
Do this for each Probe you want to create.
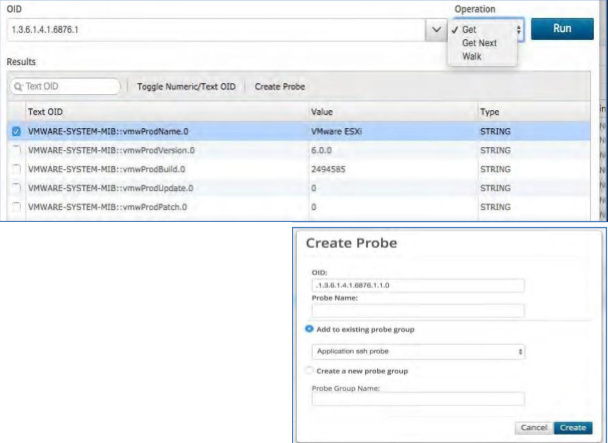
When you select “Create Probe” a new box will open that will allow you to give the Probe a name and either save it to an existing Probe Group or create a new one.
Now you have a new Probe that will run the particular SNMP command you requested.