Add Cisco Webex Service#
This procedure adds the Cisco Webex service (Webex Control Hub instance).
Prerequisites:
Note
No action is required to create a Network Device Lists (NDL). When an import from Webex Control Hub is run for the first time, the VOSS Automate workflow creates a blank NDL at the customer if no other NDL exists. When the sites are auto created based on the imported Webex Locations, the sites will use this new blank NDL.
See: Network Device Lists (NDLs).To allow VOSS Automate to connect to the Cisco Webex Control Hub, obtain the Webex Control Hub Account Organization ID from the Cisco Webex page.
Important
For users upgrading to release 21.4-PB2, existing access tokens need to be
refreshed in order to update permissions for newly added workspace_locations.
To create the Cisco Webex service:
Log in to the Admin GUI as a provider or reseller administrator.
Select the relevant customer hierarchy.
Go to (default menus) Apps Management > Webex Control Hub Access (or search for the page) to open the list view of all configured Webex Organizations.
Note
Existing accounts added before Automate 21.4-PB3 will show the internal account ID as the Organization Account Number, while accounts added from Automate 21.4-PB3 onwards, show the external account ID.
Click the Plus icon (+), then, on the new record page:
Fill out the Webex App customer name (the default is the Automate customer name).
Fill out your Webex Control Hub Account Organization ID (external account ID).
Note
You can obtain this value from the Webex Control Hub admin portal (under the Account menu).
Fill out the admin account email to specify the administrator managing the account.
Note
This field value is informational only.
At HTTP Proxy String and HTTPS Proxy String, values are mandatory only if a proxy server is required to connect to the Cisco Webex Control Hub API, for example:
http://[ip address]:portorhttps://[ip address]:port
Note
You’ll need to add the Webex organization account details to Automate before access tokens can be obtained.
Click Save.
Note
When adding a new Webex Control Hub Access entry for a customer, data syncs and schedules are automatically created. Deleting a customer’s Webex Control Hub Access automatically deletes these data syncs and schedules.
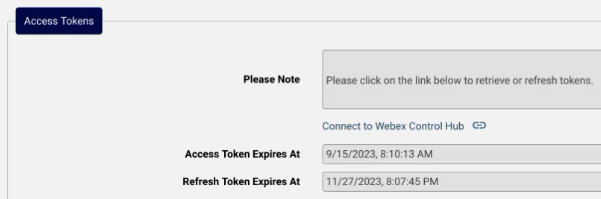
Once the new Webex organization is saved, return to the created account to view (in the Access Tokens section), the Connect to Webex Control Hub link that is used to request the tokens.
Click the Connect to Webex Control Hub link to obtain the access tokens for the Webex Control Hub account, and to be redirected to the Automate Transactions page.
Note
When first using this link, a Webex admin user (with sufficient privileges) must log in and accept the API authorization scope that Automate requires for integration.
On the Transactions page, monitor progress for retrieving the access tokens.
Note
Syncing of roles and licenses into Automate is included in this transaction.
Once the transaction completes, you can view expiry times for the access token and for the refresh token.
Automate automatically refreshes the access tokens every 7 days for 90 days, that is, until the expiry of the Refresh Token.
The Refresh Token is valid for 90 days. You can use the Connect to Webex Control Hub link to refresh it. Automate General Settings provide options for Webex App Tab to send impending expiry notifications and messages. See: Global Settings.
For more information around access token management, see https://developer.webex.com/docs/integrations
Related Topics