Create Application Registration in Microsoft Cloud Tenant Portal#
Overview#
This procedure registers VOSS Automate as an application object in Microsoft Entra, adds a client secret and/or a certificate (for authentication with the Microsoft identity platform), configures API permissions, creates, exports, and uploads a self-signed certificate, and adds VOSS Automate to the Exchange administrator role.
The application object describes VOSS Automate to Microsoft Entra, allowing the Microsoft Entra service to issue authentication tokens to the VOSS Automate service.
Note
If you’re integrating with Microsoft Exchange, you must use a certificate for authentication. You can generate the certificate within Automate (see Generate a Certificate for Application Registration), or import an existing certificate and have Automate manage it (see Upload a Certificate to use for App Registration).
The diagram describes the tasks involved in the app registration:
Important
When performing this task, take note of the following values, which you’ll need to set up the tenant connection in VOSS Automate:
Directory (tenant) ID (Tenant ID field in VOSS Automate)
Application (client) ID (Client ID field in VOSS Automate)
Client secret (Secret field in VOSS Automate)
You can retrieve your Tenant and Client IDs from Microsoft Entra at any time. But you’ll need to save your client secret in a secure location because it will be exposed only once. From a security perspective, treat these values as if they were administrative login credentials.
Step 1: Register VOSS Automate as an application with Microsoft Entra#
This step registers your application (VOSS Automate in this case) as an application in Microsoft Entra to all Microsoft Graph to access Microsoft Entra.
Use your Global Administrator credentials to sign into the Microsoft Entra admin center .
Choose the tenant where you want to register the VOSS Automate application.
Note
If you have access to multiple tenants, use the Directory + Subscription filter in the toolbar to choose the relevant tenant.
Select Microsoft Entra service.
Note
Locate the service via Favorites > Microsoft Entra, or locate it in All services.
Expand Microsoft Entra, then go to Applications > App registrations, and select New registration.
Enter a name for your application, for example “VOSS Automate”.
Note
Your application users may see this name. You can change it later.
Select Accounts in this organization only.
Note
You can ignore the Redirect URI section.
Click Register.
Next steps
Step 2: Configure Microsoft Graph Authentication#
This step configures Microsoft Graph authentication.
There are two authentication methods available for Microsoft Graph. You can add either of these authentication methods, or use both:
Client secret (See Add Client Secret Authentication)
Certificate (See Add Certificate Authentication)
Note
Microsoft’s recommendation is to use certificate authentication for Microsoft Graph. A client secret takes precedence, if used; else, the certificate authentication is used (if available). Only the certificate authentication can be used if you’re integrating with Microsoft Exchange.
Add Client Secret Authentication#
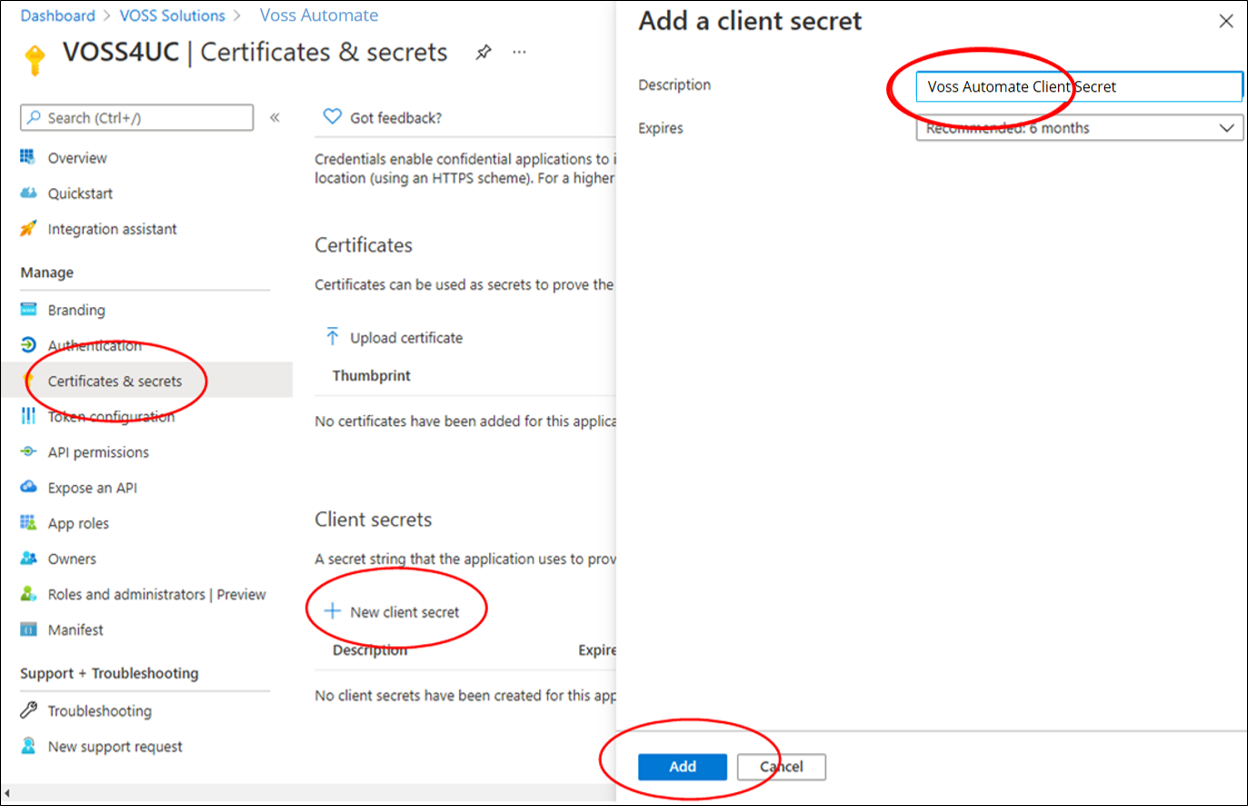
In the Microsoft Entra admin center , at App Registrations, choose the VOSS Automate application created in step 1, then go to Manage > Certificates & secrets and on the Client secrets tab, select New client secret.
On the Add a client secret form, add a description, and choose an expiry option.
Click Add.
Important
Make a note of the client secret and keep it in a safe location. You won’t be able to retrieve it if you lose it, and you need this value to set up VOSS Automate.
If you lose the client secret you’ll have to delete it and repeat the steps for creating a new one.

Next steps
Add a second authentication method (optional), or go to Step 3: Add Microsoft Graph API Permissions
Add Certificate Authentication#
This procedure adds and exports a self-signed certificate public key in VOSS Automate, and uploads the certificate to Microsoft Entra. See also Generate a Certificate for Application Registration
As a customer admin or higher, log in to the VOSS Automate Admin Portal.
Go to (default menus) Administration Tools > Certificate Management.
Click Add; then, fill out certificate details.
On the Base tab:
Fill out a name and a description for the certificate.
Clear (unset) the Generate Certificate Signing Request checkbox to ensure no certificate signing request is generated. Disabling this option will ensure that the certificate will be self-signed.
In Valid To specify a value, in seconds, to define the validity period of the certificate from the time from generation. The default value is
315360000seconds (10 years).In Serial Number, choose a value or leave the default.
In Key Length, input a value of
2048or greater for Microsoft Entra to accept the certificate for authentication.
On the Certificate Information tab, fill out details for the certificate, including the name of the host being authenticated by the certificate, country code, state, city, organization, and organization unit.
Note
All fields are mandatory.
Save the certificate.
Click Action > Export Public Key to export a file containing the public key.
Log in to the Microsoft Entra admin center , then go to Certificates & secrets.
On the Certificates tab, click Upload certificate, then browse to the certificate you exported from the VOSS Automate Admin Portal.
Note
When configuring the tenant parameters in Automate and you select the certificate,
You will need the tenant ID and client ID from Microsoft Entra to configure the Microsoft tenant connection parameters. The thumbprint is auto-populated in the tenant settings once you select the certificate.
Related Topics
Next steps
Add a second authentication method (optional), or go to Step 3: Add Microsoft Graph API Permissions
Step 3: Add Microsoft Graph API Permissions#
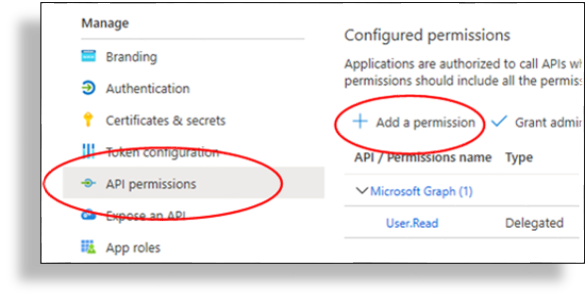
In the Microsoft Entra admin center , go to Manage > API permissions > Add a permission.
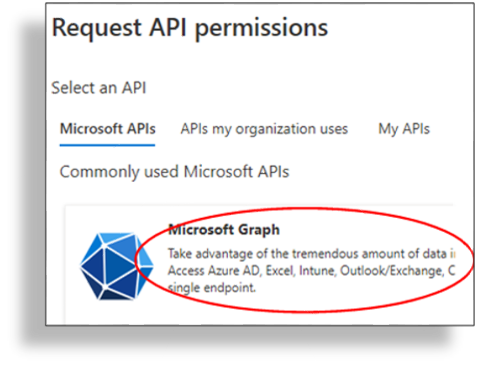
Select Microsoft Graph.
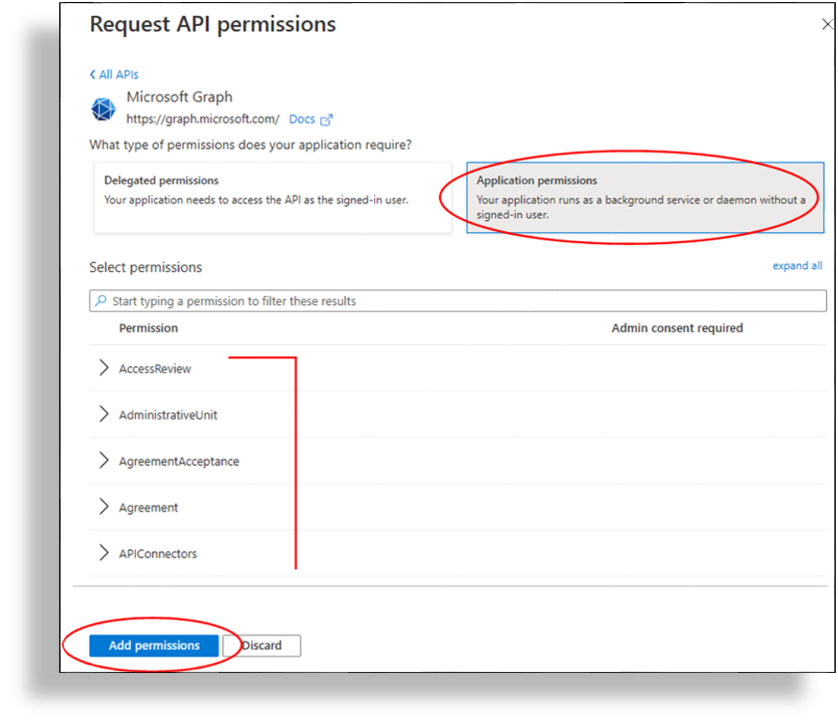
(Mandatory) Select Application permissions, then select all of the following permissions:
Why required?
Permission and description
Allows Automate to manage Microsoft Entra objects (functionality required by a user).
User.Read.All
List MS Entra users, retrieve user properties (such as Usage Location), and license details.
Organization.Read.All
List Microsoft subscribed SKUs (used and available licenses), and retrieve details (such as service plans).
For adding, viewing, and managing MS Teams (teams and team members), including assigning users to groups.
Team.Create
Create teams
TeamMember.ReadWrite.All
Create and edit team members.
Group.Read.All
Read all groups.
Group.ReadWrite.All
Required for Automate to be able to delete (remove) Teams.
GroupMember.ReadWrite.All
Add, update, or delete groups and manage memberships.
For managing Microsoft Teams channels in VOSS Automate.
Channel.ReadBasic.All
Read channel names and descriptions.
Channel.Create
Create channels in any team.
Channel.Delete.All
Delete channels in any team.
Domain permissions
Domain.Read.All
Read all domain properties.
Licensing permissions
LicenseAssignment.ReadWrite.All
Assign and manage licenses.
Click Add permissions.
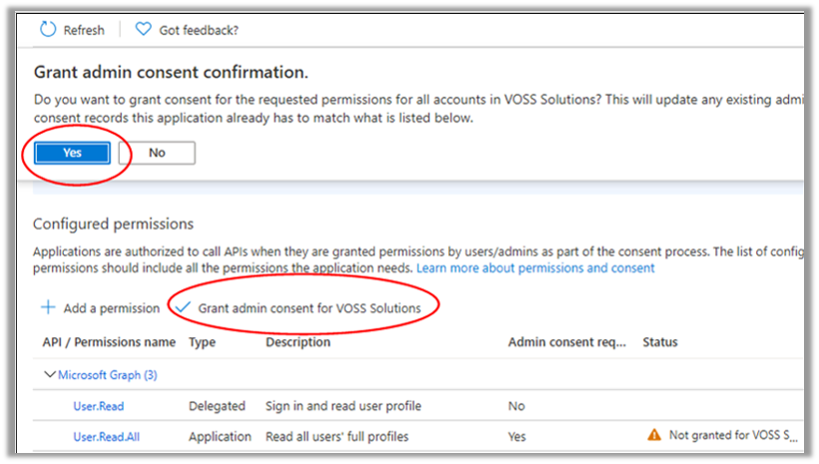
To grant admin consent for the selected permissions, go to Configured permissions > Grant admin consent for <your tenant>, and click Yes to confirm.
The status of selected permissions changes from Not granted to Granted.
Next steps
Step 4: Add Roles#
This procedure assigns the Teams Administrator role and the Exchange Administrator role to the application.
Note
You’ll need to assign the Exchange Administrator role only if you’re using Microsoft Exchange.
Pre-requisites:
Authorize the app in the relevant Microsoft tenant to add Central App to your tenant:
https://login.microsoftonline.com/common/adminconsent?client_id={client_ID}
Note
From Automate 24.1, only Microsoft 365 Global Admins or User Admins will be able to create and manage resource accounts. The following roles will no longer have “user create” permissions on resource accounts:
Teams Administrator
Teams Communications Administrator
Teams Telephony Administrator
Organizations using these Teams roles will require administrators with the “user create” permission, such as Microsoft 365 Global Admin or User Admin, in order to create and manage resource accounts.
Assign the Teams Administrator Role to the App
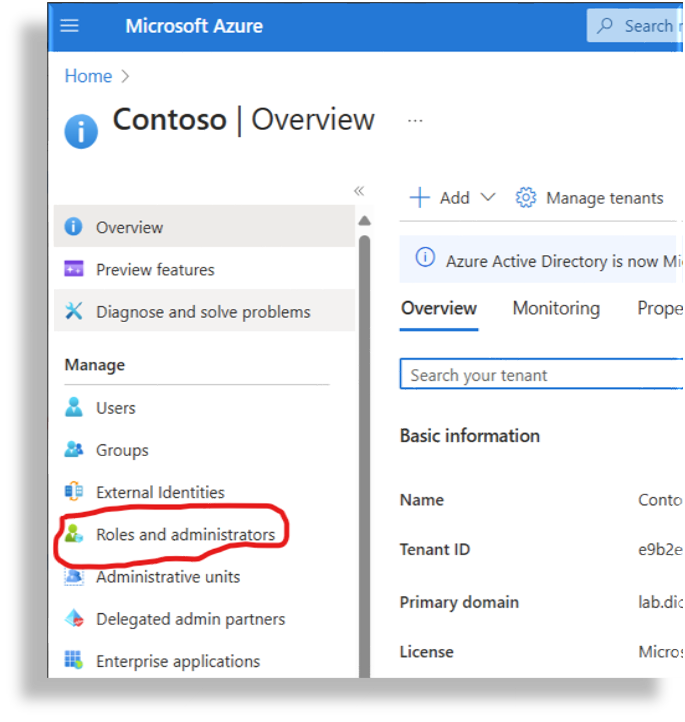
Go to the Entra ID section of the Microsoft Azure Portal:
https://portal.azure.com/#view/Microsoft_AAD_IAM/ActiveDirectoryMenuBlade/~/OverviewNavigate to Roles & Administrators.
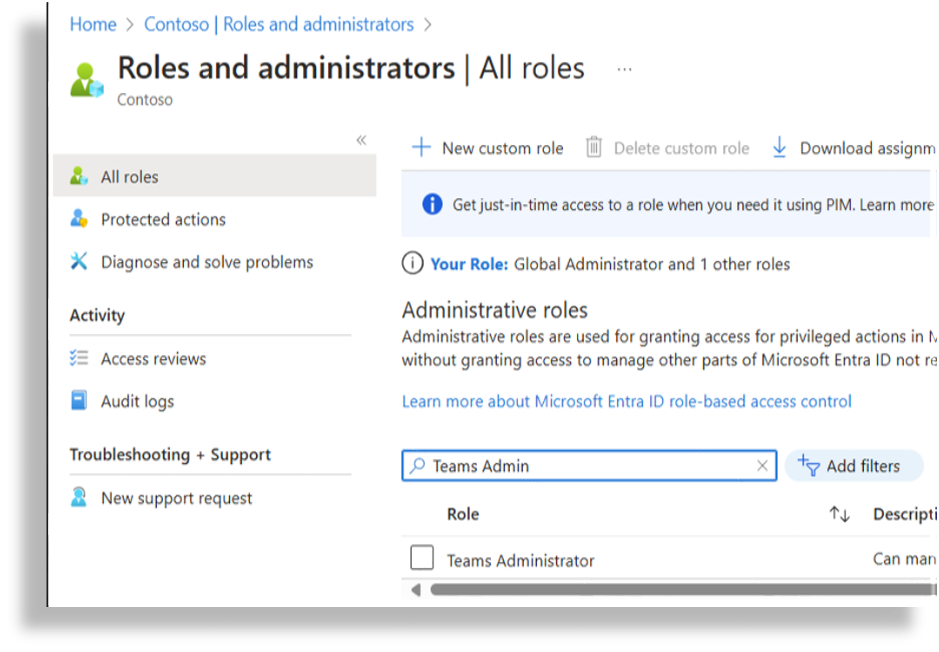
Search for Teams Administrator.
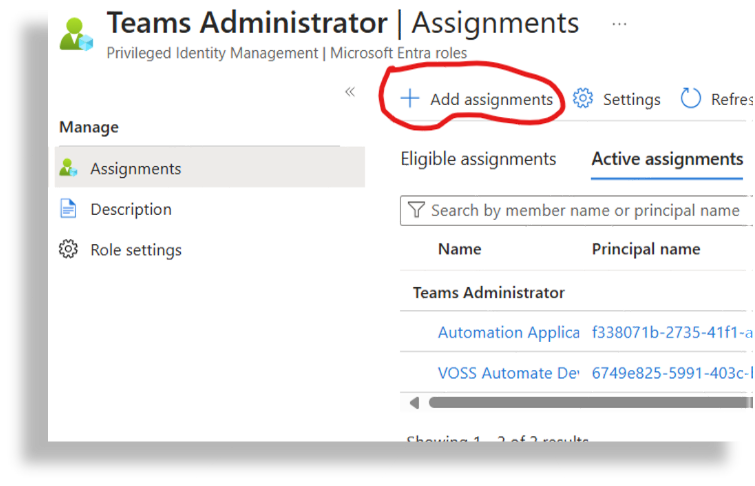
Open Teams Administrator, then click Add Assignments.
Select No member selected.
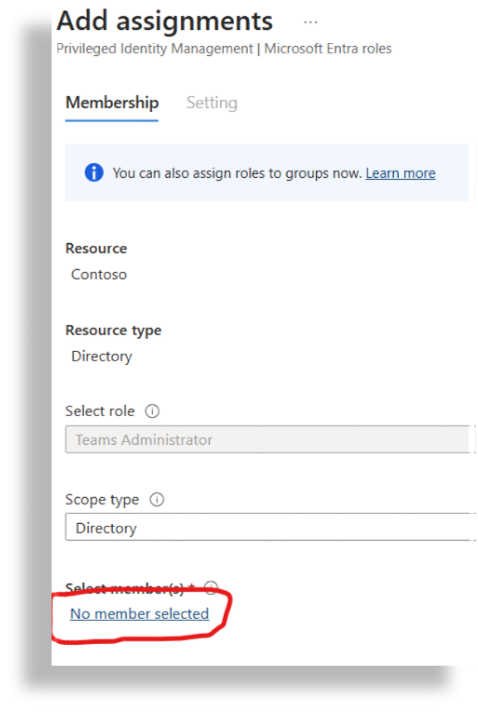
Search for VOSS, then select the checkbox for VOSS Automate App.

Click Next; then, at Enter justification, fill out a reason for the assignment in the text field.
Note
You can add any description in this field.
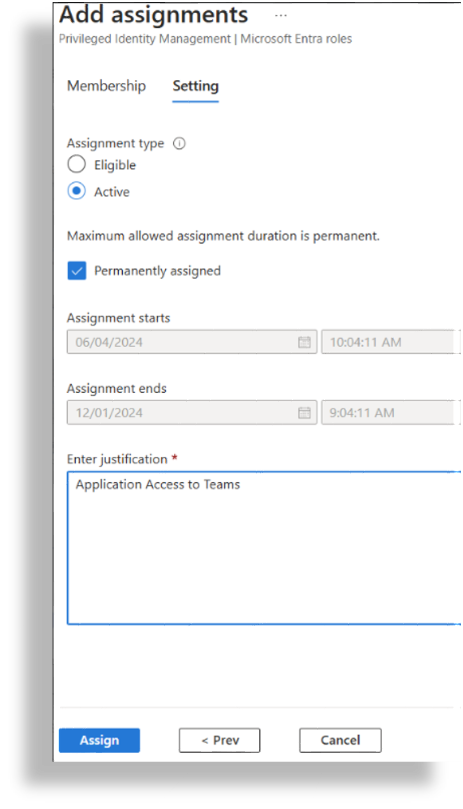
Click Assign.
The new role assignment may take a few minutes to complete before it appears in the assignment list (Teams Administrator | Assignments).
Assign the Exchange Administrator Role to the App
Note
You’ll need to assign the Exchange Administrator role only if you’re using Microsoft Exchange.
Go to the Entra ID section of the Microsoft Azure Portal:
https://portal.azure.com/#view/Microsoft_AAD_IAM/ActiveDirectoryMenuBlade/~/OverviewNavigate to Roles & Administrators.

Search for Exchange Administrator.
Open Exchange Administrator, then click Add Assignments.
Select No member selected.
Search for VOSS, then select the checkbox for VOSS Automate App.
Click Next.
At Enter justification, fill out a reason for the assignment in the text field.
Note
You can add any description in this field.
Click Assign.
The new role assignment may take a few minutes to complete before it appears in the assignment list.