Configure Application Registration#
Introduction#
This topic describes how to set up the application registration (app registration) authentication for Microsoft Graph, Microsoft Teams PowerShell, and Microsoft Exchange PowerShell, for a new Microsoft tenant. This task includes assigning permissions and roles.
Pre-requisites:
Note
Starting with Automate 24.1, Microsoft requires that you use application registration (app registration) for authentication. If you wish to use basic authentication with service account credentials, please contact VOSS support for assistance. Until Microsoft implements changes to their resource account infrastructure, basic auth is required to create, update, and delete resource accounts. List (import/sync) of resource accounts is supported with app registration authentication in Automate 24.1.
You can set up new Microsoft tenants using either of the following app registration methods:
Note
Your authentication methods and permissions come from the central app registration (if you’re using this option). The same roles are assigned to the app registration (central app registration and tenant-specific app registration).
When using tenant-specific app registration you’ll assign permissions manually, and then assign the roles.
When adding a new tenant and you wish to use Microsoft Exchange, you must either generate a certificate or import an existing certificate and have Automate manage it. Automate pushes the certificate to the PowerShell proxy.
To generate a certificate in Automate, see Generate a Certificate for Application Registration
To use an existing certificate, see Upload a Certificate to use for App Registration
Shared Central App Registration#
In central app registration, either VOSS (for hosted and general customers) or a Service Provider Partner (in a reseller environment), builds and maintains the app registration in their Microsoft Entra ID tenant, and performs organizational and application validation with Microsoft.
The API permissions are the same as for a tenant-specific app registration. The only configuration difference here is that users from multiple tenants/Entra ID organizations are allowed to leverage the application.
VOSS or the Service Provider Partner (SPP) provides the customer with an admin grant link, for example, https://login.microsoftonline.com/global/adminconsent?client_id={client-id}.
The customer clicks on the link and agrees, using their Global Admin user. Then they need to assign the Teams and Exchange Administrator roles to the application, like any other user in Entra ID.
VOSS or the SPP maintains the certificate and/or secrets securely, and ensures that they’re added to VOSS when renewal is required.
Once updated, PowerShell proxies automatically receive the updated certificates from VOSS Automate. These settings are maintained at a global or reseller level in VOSS Automate, with customer/tenant-level overrides, if required.
Configure Shared Central App Registration#
This procedure configures Central App Auth and assigns the Teams Administrator role and the Exchange Administrator role (if you’re using MS Exchange) to the app.
This task involves:
Clicking the link to authorize the application.
Assigning the Teams and Exchange roles to the new app registration.
Authorize the app in the relevant Microsoft tenant to add Central App to your tenant:
https://login.microsoftonline.com/common/adminconsent?client_id={client_ID}Assign the Teams Administrator role and the Exchange Administrator role to the app:
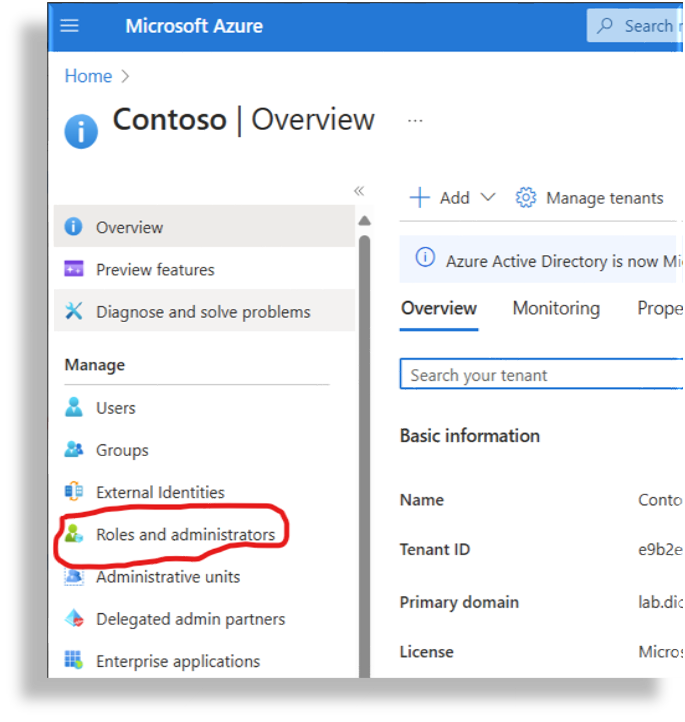
Go to the Entra ID section of the Microsoft Azure Portal:
https://portal.azure.com/#view/Microsoft_AAD_IAM/ActiveDirectoryMenuBlade/~/OverviewNavigate to Roles & Administrators.
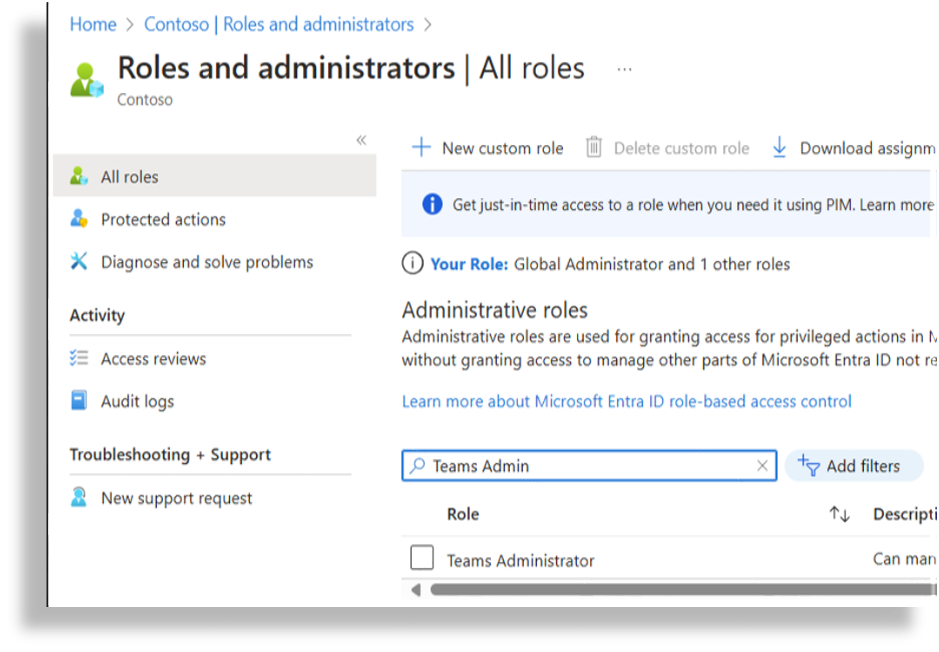
Search for Teams Administrator.
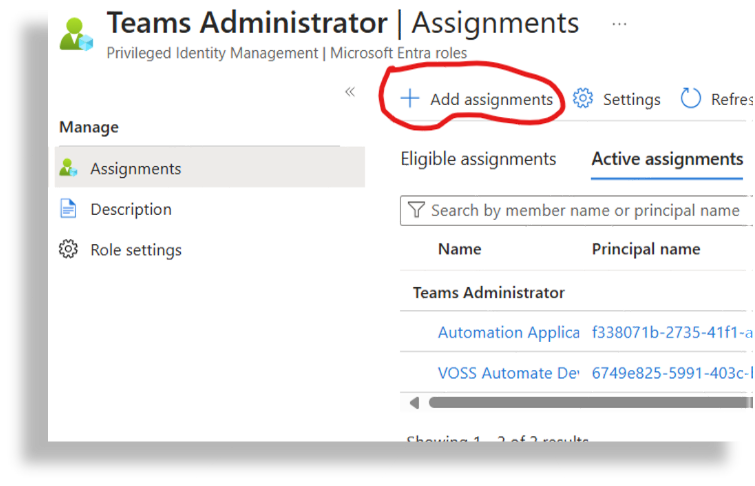
Open Teams Administrator, then click Add Assignments.
Select No member selected.
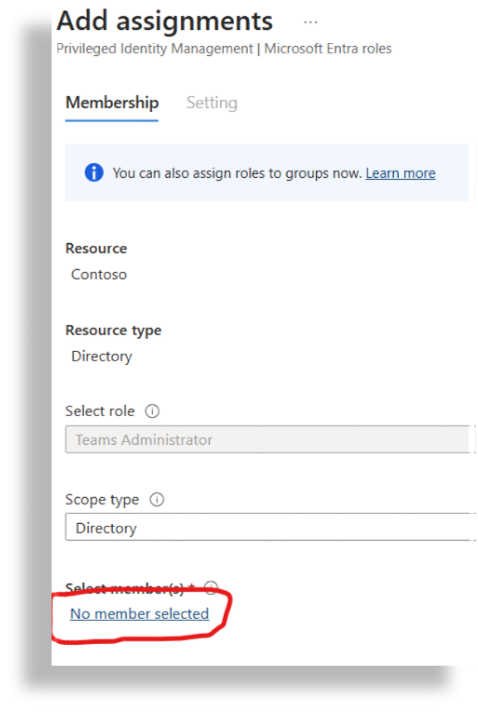
Search for VOSS, then select the checkbox for VOSS Automate App.
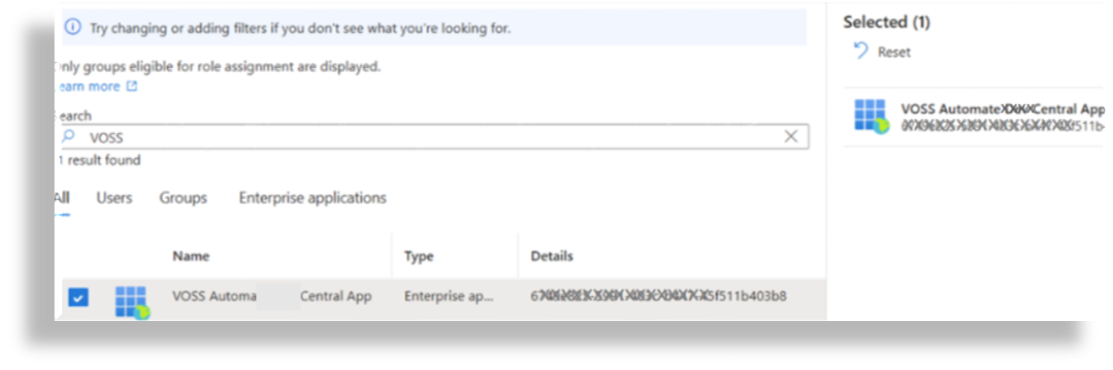
Click Next.
At Enter justification, fill out a reason for the assignment in the text field.
Note
You can add any description in this field.
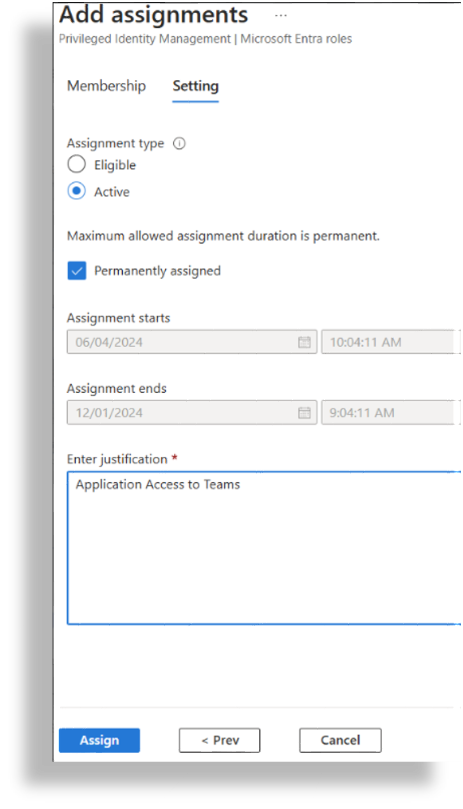
Click Assign.
The new assignment may take a few minutes to complete before it appears in the assignment list (Teams Administrator | Assignments).
Repeat step 2 from the Teams Administrator | Assignments page, but this time, on Teams Administrator | Assignments, search for the Exchange Administrator role.
Install the certificate on the VOSS Automate server.
Note
If you’re using VOSS Central App, the certificate is already installed.
Configure the VOSS Automate Microsoft tenant to use the “customer” Tenant ID you approved for earlier, along with the App ID (Client ID) and certificate as necessary.
For example, for VOSS Central App customers:
App Name: VOSS Automate Central App
Client Id: 6749e825-5991-403c-b447-xxxxxxxxxxxx
App Created Date Time: 6/4/2024 3:24:31 PM
CertificateThumbprint : 2BF36F11BE9317C9217BE6847BEDXXXXXXXXXXXX
Tenant-specific App Registration#
In Tenant-specific app registration, each customer builds the app registration in their own tenant.
VOSS can provide a PowerShell script that builds the application with all required API permissions, and triggers the Admin Grant process and role assignments, based on the customer’s Global Admin user executing the script.
When the script is executed from the PowerShell proxy it can also configure the WinRM setup, certificate loading, and updates.
If customers wish to opt out of the script-assisted setup, they can be provided with documentation for manually building the app registration.
Each customer is responsible for maintaining the certificates and for updating the certificates before they expire.
Configure Tenant-specific App Registration#
This procedure configures Tenant-specific App Auth and assigns the Teams Administrator role and the Exchange Administrator role (if you’re using MS Exchange) to the app.
This task involves:
Assigning new permissions to the app registration
Assigning the Teams and Exchange roles to the app registration
Add API permissions:
Access your existing Application Registration in MS Entra ID or the Azure AD Portal.
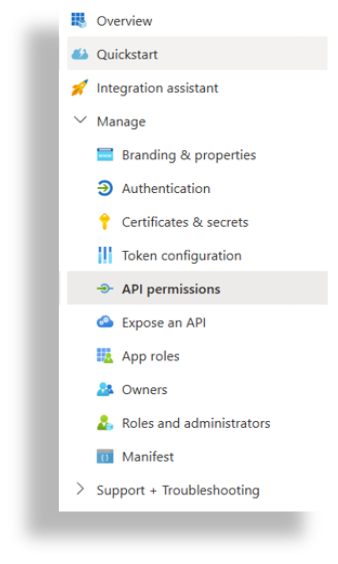
Go to API Permissions.
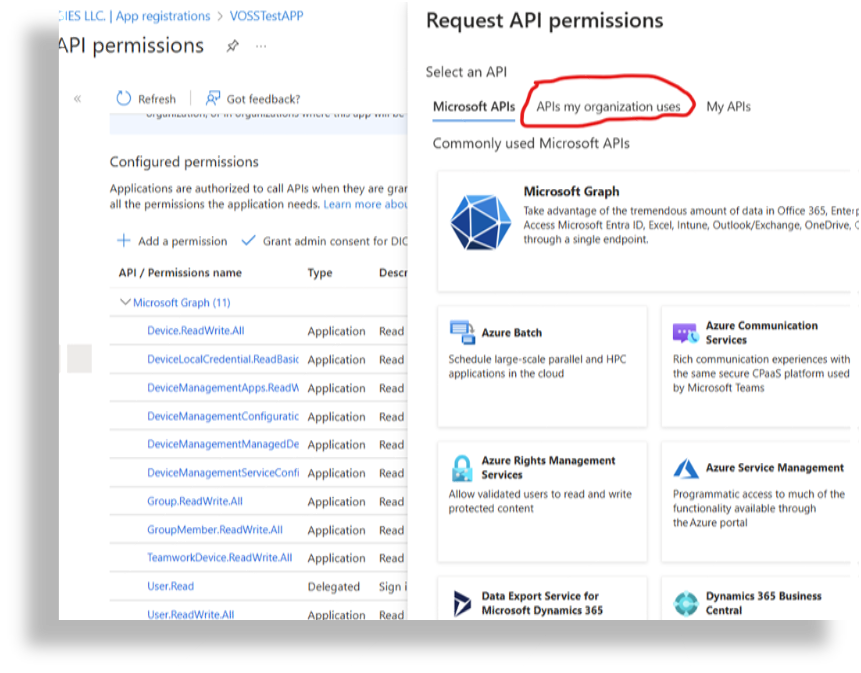
In API Permissions, select Add a Permission to open the Request API permissions window.
In the Request API permissions window, select APIs my organization uses.
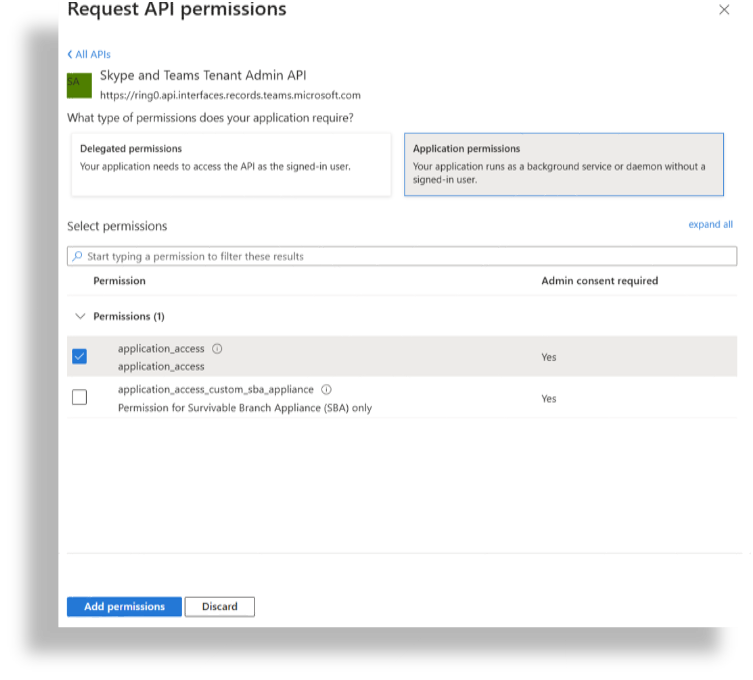
Add Skype and Teams Tenant Admin API permission:
In the Search bar, type Skype, then select Skype and Teams Tenant Admin API.

Select Application Permissions.
Select the checkbox for application_access.
Click Add permissions.
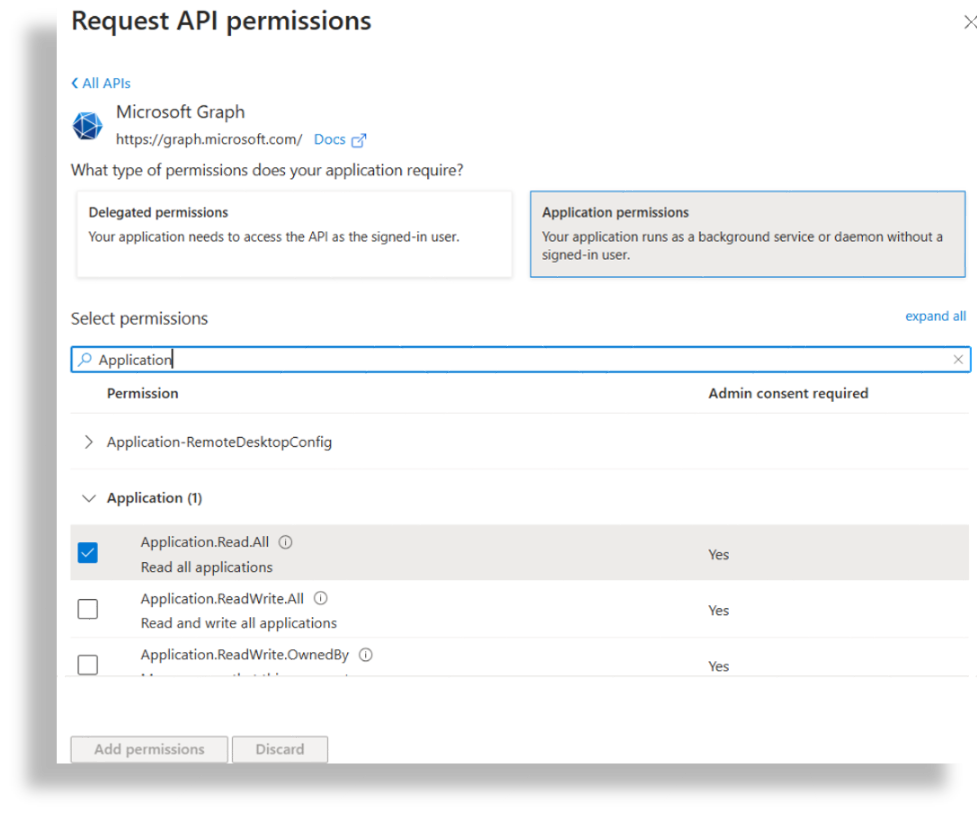
Add Microsoft Graph permission:
Click Add a Permission again, then select Microsoft Graph.
Select Application Permissions.
In the Search bar, type Application.
Expand the Application, then select Application.Read.All.
Click Add Permissions.
Approve permissions:
View the permissions that now display in the API Permissions list, although permission is not yet granted (status is Not granted for).
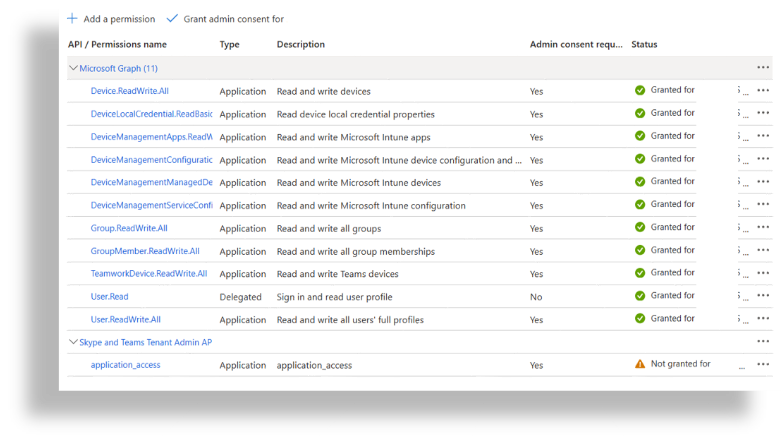
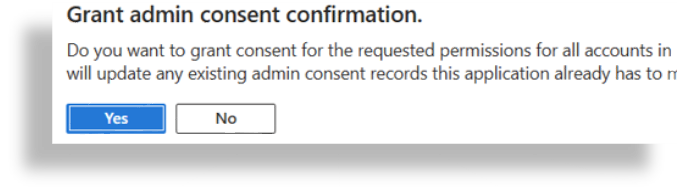
Click Grant admin consent and approve the permission.
Grant the Application the Teams Administrator role:
Go to the Entra ID section of the Microsoft Azure Portal:
https://portal.azure.com/#view/Microsoft_AAD_IAM/ActiveDirectoryMenuBlade/~/OverviewGo to Roles & Administrators.
Search for Teams Administrator.
Open Teams Administrator, then click Add Assignments.
Select No member selected.
Search for VOSS (or your app name), then select the checkbox for (in this example) VOSS Automate App.
Click Next.
At Enter justification, fill out a reason for the assignment in the text field.
Note
You can add any description in this field.
Click Assign.
The new assignment may take a few minutes to complete before it appears in the assignment list (Teams Administrator | Assignments).
Repeat step 2 from the Teams Administrator | Assignments page, but this time, on Teams Administrator | Assignments, search for the Exchange Administrator role.
Ensure your client/secret and/or certificate are up to date in the application and the correct information is in your Microsoft tenant configuration in VOSS Automate.