Call Handler (Auto Attendant) Schedule#
Overview#
Note
You can only manage schedules at the same hierarchy level (or lower) as your log in level. For example, if you login as a customer administrator, you can view schedules at your own customer hierarchy level, and add new schedules at (or below) your hierarchy level.
During initial installation, VOSS Automate imports two predefined schedules from Cisco Unity Connection. These are accessed via Apps Management > CUC > Schedule:
All Hours
Weekdays
By default, the All Hours schedule is configured to be “active” 24 hours a day, 7 days a week, with no holidays. Routing rules that follow this schedule will always be active, and call handlers that use this schedule ‘as is’, will never use off hour transfer settings or play closed greetings.
The Weekdays schedule is configured to be active from 8 a.m. to 5 p.m. (in the time zone of the Cisco Unity Connection server) from Monday through Friday. It is also configured to observe any days and times that are set in the default Holidays schedule.
Note
By default the Holidays schedule is not configured for any days or times. — at a minimum you may want to add days and times to this holiday schedule when your organization will be closed.
Holidays
When a Holiday setting is in effect, holiday greetings are played (if enabled), and off hours transfer rules are observed. You can set up several years of holidays at a time. Because many holidays occur on different dates each year, confirm that the holiday schedule remains accurate annually.
Related Topics
Add a Call Handler (Auto Attendant) Schedule#
You may want to create a new schedule for your organization.
On the Schedule form (modify or add), take note of the following field:
Uses Holiday Schedule - If you want your schedule to recognize days that are included as holidays in a holiday schedule, then choose a holiday schedule from the Uses Holiday Schedule drop-down list. Any day included in the selected holiday schedule will be recognized as a holiday.
If you want to create a new holiday schedule:
Select the Is Holiday check box.
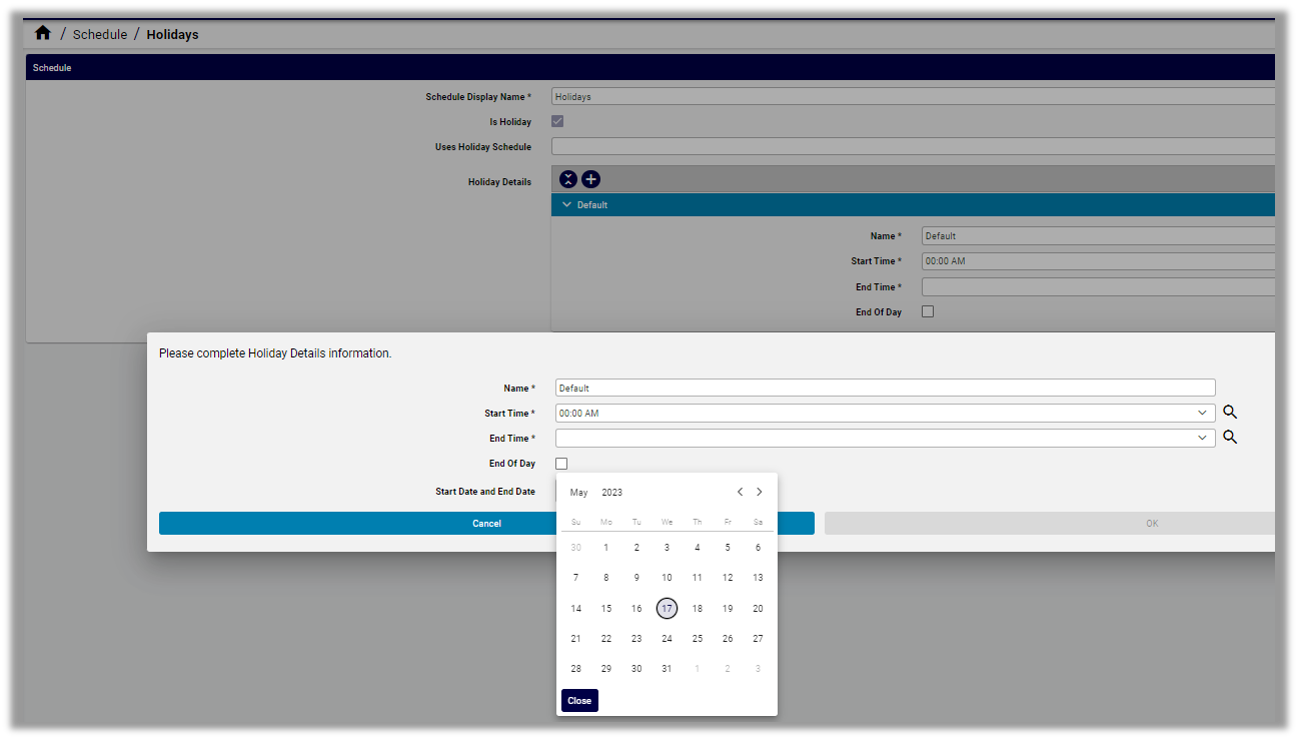
Click Holiday Details + enter the following fields:
Name
Holiday Start Date
Holiday End Date
Start Time
End Time.
Add more days to the holiday as required by clicking + next to the entered holiday, and entering new details in the fields.
Click Save when complete.
Note
Another method to create a new schedule is to:
Select an existing schedule from the Schedule list view.
Clone it (Action > Clone) to the desired hierarchy level.
Edit as required.
Click Save.
Update a Call Handler Schedule#
In the Admin Portal, go to (default menu) Apps Management > CUC > Schedule.
In the Schedule list view, click on the schedule you wish to edit.
Update the relevant fields. See Add a Call Handler (Auto Attendant) Schedule
Note
If you’re updating a Holidays schedule, click the Plus icon at Holiday Details, then fill out details for the holiday, including Name, Start Time, End Time, and select End of Day to define whether the schedule becomes inactive at midnight on the day of the holiday. Finally, click in the Start Date and End Date field to select a date for the holiday from the calendar date picker.
Save your changes.
Delete a Call Handler Schedule#
In the Admin Portal, go to (default menu) Apps Management > CUC > Schedule.
In the Schedule list view, select the checkbox adjacent to the schedule you want to delete. If you want to delete more than one schedule, select multiple checkboxes.
Click the toolbar Delete icon.
In the dialog asking you to confirm the deletion, click Yes.