Manage Dashboards#
Overview#
When logging in, users can view available dashboards via the Main Menu icon ![]() .
.
Admin users can manage the tree and the list of dashboards via the Admin menu. To access the Manage Dashboards page, select Admin > Manage Dashboards
Note
You cannot edit, move, or delete the standard, default, read-only VOSS reference dashboards that ship with the system. You can only clone these dashboards to create new custom dashboards.
You can select the following tabs on this page:
Management
Data Source
Arrangement
Dashboard Synchronization
Report Synchronization
Report Management

Management Tab#
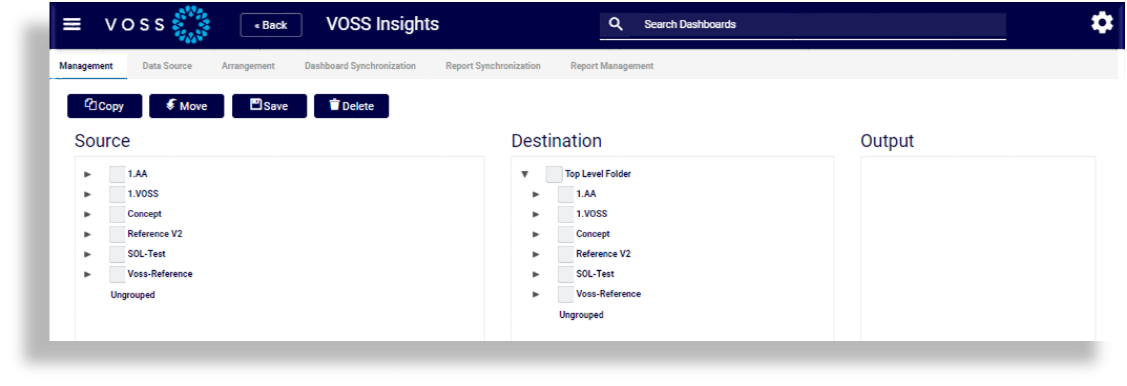
This tab provides the following dashboard management options:
Source: a tree of all the dashboards defined in the system along with all the user accounts defined in the system. This column shows available dashboard screens.
Destination: the top level and sub folders the dashboards will be copied or moved to.
Output: shows the output of the command used, for example, if Copy was used, the heading
Copyingwill be shown, followed by the list of copied items.
Select items from Source and use Copy, Move or Delete to carry out tasks on the selection. When copying, duplicate dashboards will be cloned: the text “(clone)” will be appended to the dashboard name.
Click Save to save the dashboards after you’ve made any changes.

Data Source Tab#
This tab provides the following dashboard management options:
Drop-downs: Data source types, Data sources
Columns:
Dashboard: select elements from the tree to carry out the bulk update of data sources.
Widget: displays the current data sources of the selection
Changes: according to the selected values in the Data source types, Data sources, shows updates to be made to the data sources of the selected elements.
Click Save to save the dashboards after you’ve made any changes.

Arrangement Tab#
This tab provides the following dashboard management options:
Source: a tree of all the dashboards defined in the system along with all the user accounts defined in the system. This column shows available dashboard screens.
To arrange, select dashboard folder. It will then show up in the List column.
List: this column will allow you to arrange the order of items, using drag-and-drop.
Changes: shows the output of the arrangement.
Click Save to save the arrangement.

Dashboard Synchronization Tab#
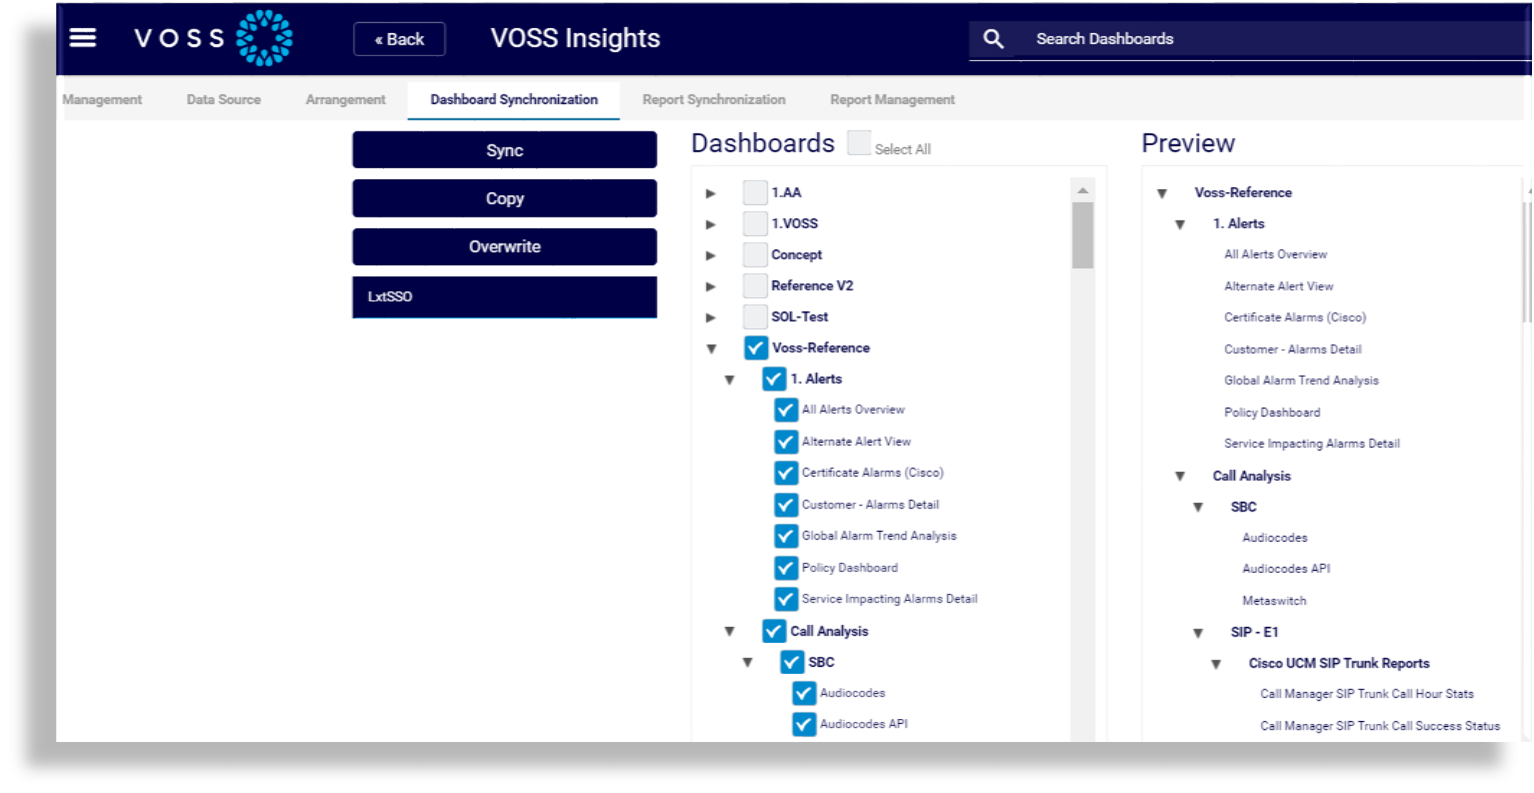
This tab provides the following dashboard management options:
Actions: Sync, Copy and Overwrite
Columns:
Choose the relevant user to which you want to to sync selected dashboards
Dashboards: user associated dashboards are selected. Select or un-select manually.
Preview: output of selection

Report Synchronization Tab#
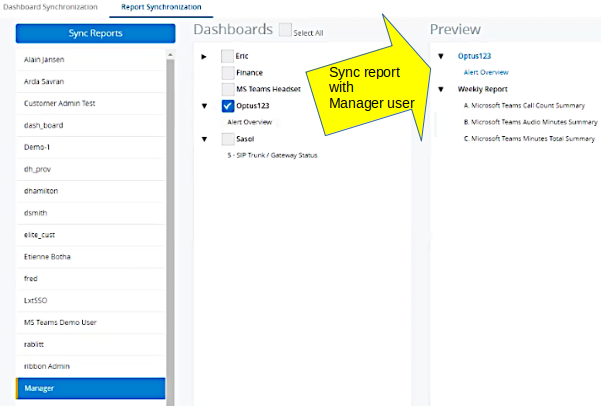
This tab allows you to sync reports (via the Sync Reports button), and to view available reports that can be synced (via the Dashboards column).
Logged in users can create and share reports with other users.
Target users won’t need to recreate synced scheduled reports, and they will be able to delete synced reports, if necessary.
The Preview column displays the target user’s reports and any synced reports.

Report Management Tab#
This tab, which is only available to admin users, allows an admin user to delete scheduled reports belonging to other (non-admin) users.
The tab lists all non-admin users that have scheduled reports associated with their usernames. You can click on a user to view their scheduled reports, and select any reports you wish to remove. You can do this for one or more users, then click Delete to remove the reports.
Once processed, the page refreshes with the updated list of non-admin users and their remaining scheduled reports.

