Policy Configuration#
Overview#
Polices are a modular groupings of correlation rules, actions and response procedures that define how to respond to certain situations that happen on the monitored systems. Policies are usually system and manufacturer specific but can contain custom scripts for actions and response procedures. Each policy will also contain several correlation rules that are designed to create Alerts based on the best practices of that particular system manufacturer. These alerts can apply to:
Business Processes
Infrastructure
Security
Applications
Unified Communications
Network behavior
Metrics and Threshold Violations
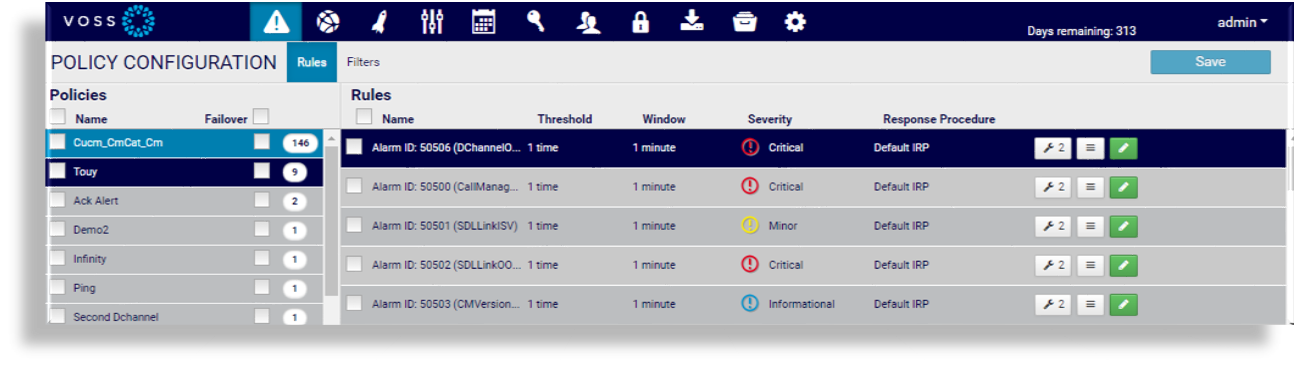
Correlation Rules#
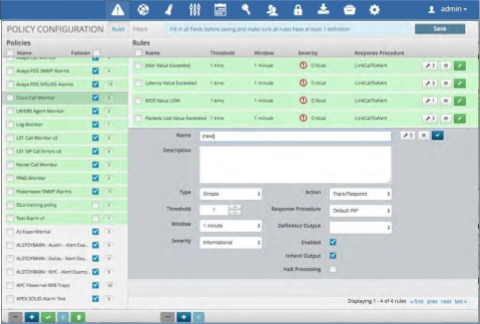
A Correlation rule extracts data from the various sources and then defines the parameters for Alert creation within a Policy. It may contain 1 or more Correlation Definitions along with specific actions and Response Procedures. Each correlation rule consists of the following parameters:
Parameter |
Description |
|---|---|
Name |
Descriptive name for the correlation rule which will be displayed within an Alert and viewed in Alert Analyzer. |
Description |
Enter a complete description of the problem that created the alert along with any specific remediation steps that should be taken to resolve the problem. |
Type |
Simple: Select if the rule is to analyze a single log and as a result of the rule, you want to execute an action. Compound: Select if the rule is to correlate more than one log, the results of another correlated event or multi-tiered rules. A compound rule can be one or more simple rules that feed into one primary rule, or it can come directly from the source. Unique: Same as Simple but as a definition will be the only one. |
Threshold |
Selects how many times this rule is to match before an action occurs. |
Window |
Select the time window for the rule to match before an action occurs. |
Parameter |
Description |
|---|---|
Severity |
Indicates what is to appear in the Status field on the Alert Viewer monitor. Select the severity for this rule:
|
Action |
Choose the action that is to occur for this rule, based on the selection in the Severity field
Engine so that the event can be analyzed and re-correlated. Then set a marker and send an alert. |
Response Procedure |
For any rule that is satisfied, an Incident Response Procedure occurs and an event is posted to the Alert Analyzer. Select the Response Procedure from the drop-down menu to execute when conditions have been met. |
Definition Output |
Selects a single Correlation Definition’s extracted value to be displayed with the Alert. |
Enabled |
Toggle to enable/disable the rule |
Inherit Output |
Toggle to enable/disable whether the rule will include the results of the filter attached to the policy module. |
Halt Processing |
Toggle to halt processing of logs to any other rules within the policy if the rule matches. This will highlight the Policy in Green to indicate that this function is in use. |
Correlation Definitions |
Click the wrench icon where you can define one or more definitions match and or extract the required data from a log or event. See Correlation Definitions. |
Output Order |
Sets the preferred order to output the extracted data from the Correlation Definitions. |
Done |
Click the Done box when the rule is complete |
Save |
Be sure to click the Save button so your rule (or changes) are saved and committed. |

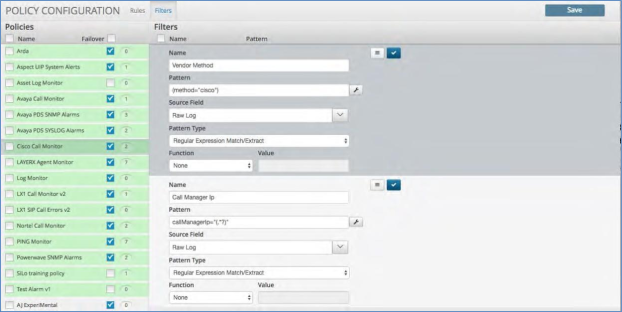
Correlation Filters provide a simple way of ensuring that all of the correlation rules within the policy are firing on the correct set of data. The engine first looks at the filter criteria, then it selects only the data that matches the criteria, and then it applies the correlation rule. You can add as many of these as required.
Each filter has the following options:
Filter Option |
Description |
|---|---|
Name |
Provide a name as close as possible to the data elements you wish to filter. This allows the output to match the name once viewed in the alert text. |
Pattern |
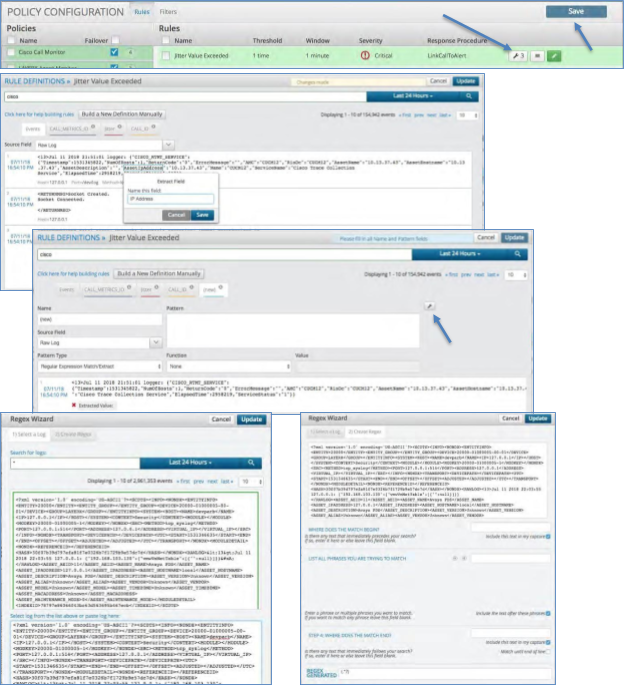
The extraction method used to pull a particular data point out. Click the Wrench icon adjacent to the box to launch the Regex Wizard, which helps you to find and extract the data. The Regex Wizard has two sections:
|
Source Field |
From the drop-down, choose the source from which data is extracted. |
Pattern Type |
From the drop-down, choose the type of expression you want to use:
|
Function |
If the extracted data is integer-based, you can apply the following functions for comparing data:
|
Value |
This field is available only if the data extracted is an integer. |
Example - Policies and Alerts#
Let’s say you have a Ping policy that you’ve set to alert after 10 failures in 20 minutes.
Depending on how you’ve set up your rules, the following may occur:
The policy may run against all your assets and trigger an alarm if the cumulative Ping failure (across all assets) hits 10
The policy may trigger an alarm for each asset that fails a ping 10 times in 20 minutes
Thus if it sees 10 failures (across all assets) in 20 minutes, an alert is triggered. However, if you want 10 failures per asset, you need a definition for the IP address, and set the filter function to Same, which defines that when you see 10 failures for the same IP address, trigger an alert.
You can configure this definition in two ways:
As a filter on the policy
As a specific rule definition.
Correlation Definitions#
A Correlation Definition defines what criteria to match within the data. Each definition will consist of the following parameters:
Parameter |
Description |
|---|---|
Name |
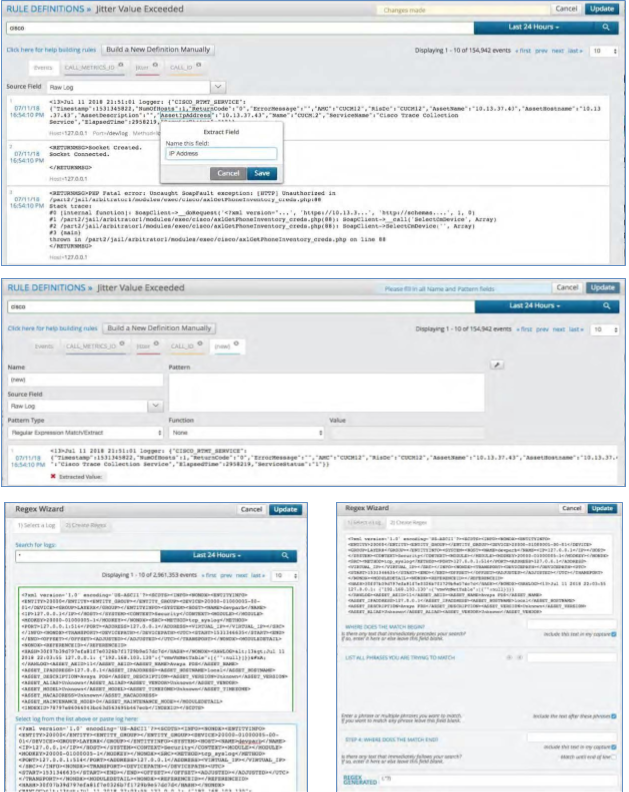
Name this as close as possible to the data elements being extracted. That way the output matches the name once viewed in the alert text. It is also utilized in the key value pair within the alert text. This is the extraction methodology utilized to pull the particular data point(s) out. Simply find the log containing the data by utilizing the search bar above. Within that log you can highlight the text you want to extract. Once highlighted a box will pop up allowing you to name the field and extract it. This will automatically create the Regex to extract the data. The highlight method is about 95% accurate. If you have trouble with this method due to special characters in the data set, then you can utilize the “wrench” icon beside the Pattern box and it will bring up the “Regex Wizard” to assist in finding and extracting the data. |
Pattern |
Within the Regex Wizard there are 2 sections:
|
Parameter |
Description |
|---|---|
Source Field |
In the drop-down box select the source from which the data is being extracted. |
Pattern Type |
Select from the drop-down box the type of expression you want to utilize:
Note The “Extract” pattern types above will cause the correlation engine to include the definition name and the matched value in the Alert Message. |
Function |
The functions below may be used to change what the correlation engine counts as a “match” in the log. Alerts are only triggered if the specific number of matches are found.
|
Value |
This field will only be available if the Function selected is either “Greater Than” or “Less Than”. |
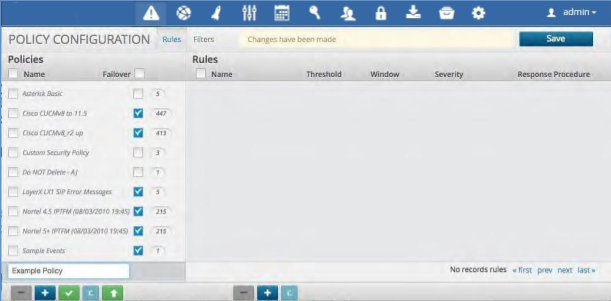
Add a Policy#
To add a policy:
Click the Policy View from the Configuration Menu Bar at the top of the page.
Click the Plus Icon at the bottom left of the Policies panel
Fill in the Policy name and press enter.
Add a Correlation Rule#
To add a new correlation rule:
Click the Policy to which you wish to add the rule.
Click the Plus icon at the bottom of the Rules panel.
Fill in the rule name and the parameters.
Add a Definition#
To add a new definition:
Click the wrench icon within any rule to bring up the search engine.
Enter a search term that is relevant or is in the log that you would like to match and press Enter. This will return the last 10 logs with this term in them.
Utilize the highlight and extract procedure or the Regex Wizard as described in the in “Correlation Definitions” section above.
Once finished click Update in the top right of the screen and be sure to save your Definition on the next page.
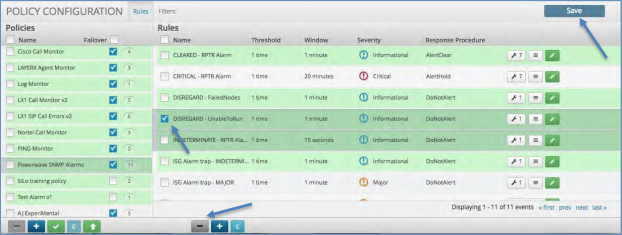
Delete a Correlation Rule#
To delete a correlation rule:
Click the policy name on the left side of the screen.
Click the check box on the Correlation rule you wish to delete.
Click the minus icon at the bottom of the correlation panel.
Click the Save icon in the upper right to save your change.
Delete a Policy#
To delete a policy:
Click the check box next to the name of the Policy you wish to delete.
Click the minus icon in the bottom left of the policy panel.
Click the Save icon in the upper right to save your change.
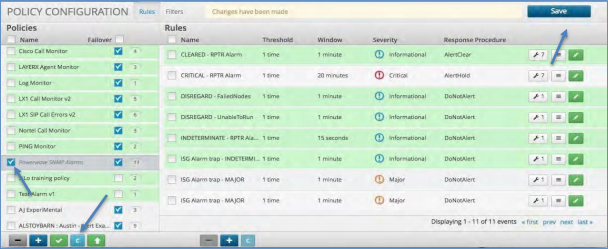
Disable or Enable a Policy#
To Disable and Enable a Policy:
Select the Policy by clicking the check box next to the name of the policy.
Click the Green Check Box at the bottom of the Policies listing column.
The Name of the Policy will become italicized indicating that the Policy is Disabled
To Enable the Policy: Click the Green Check Box again. The name will turn back to a normal font indicating it is enabled.
Clone a Policy#
Cloning a policy allows the quick replication of all of the Correlation Policy rules and definitions. The user then can simply change only the required elements for the new policy.
To clone a policy:
Select the Policy by clicking the check box next to the name of the policy.
Click the Blue “C” Box at the bottom of the Policies listing column.
Rename the Policy and make your modifications.
Be sure to click Save to save the new policy.
Export or Import a Policy#
The Arbitrator platform allows for full export / import of all of its configuration. Within the Policy Configuration section, you can export and import the policy that you exported from another system.
A new system log table insights_system_log has also been added
to log user actions and a user can create a dashboard to view these actions.
See the:
Log Search Section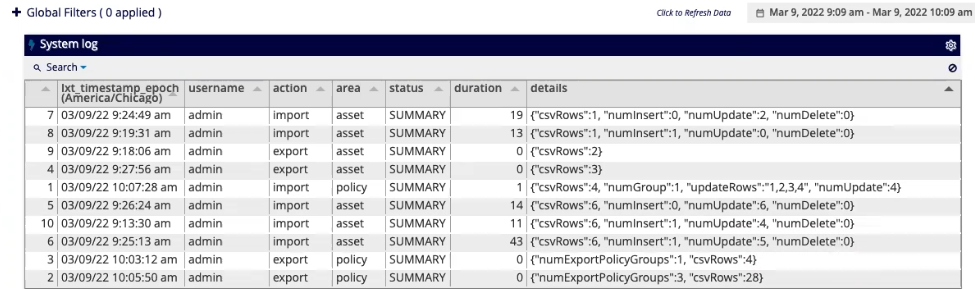
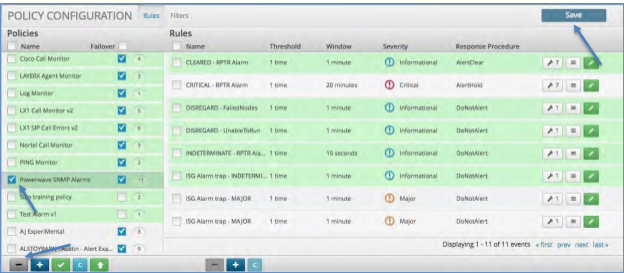
Export a Policy#
Select the check boxes of the policies to export, or select the Name check box at the top of he Policies list to select all policies.
Click the green Down arrow button at the bottom of the POLICY CONFIGURATION panel.
The Export CSV dialog opens. Enter a CSV file name (You do not have to add the
.csvfile extension) and click Export.The Export finished dialog shows when the export file has been created. Click Download to save the CSV file to your selected download location.
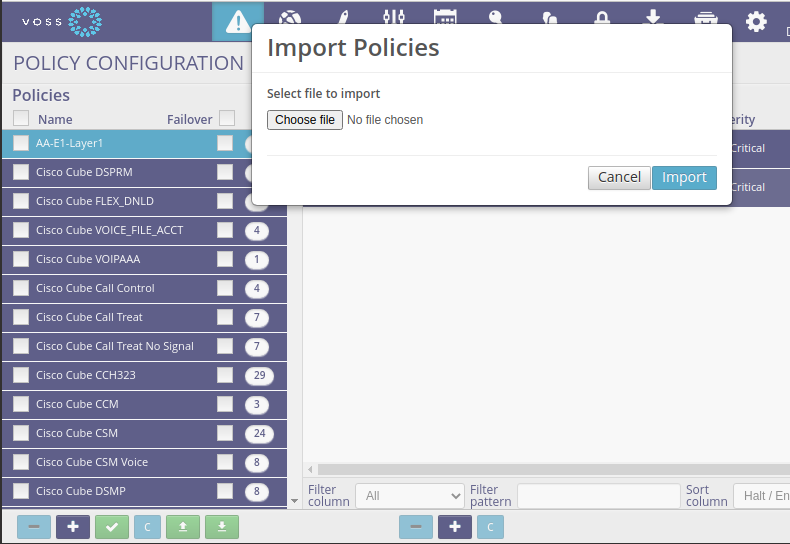
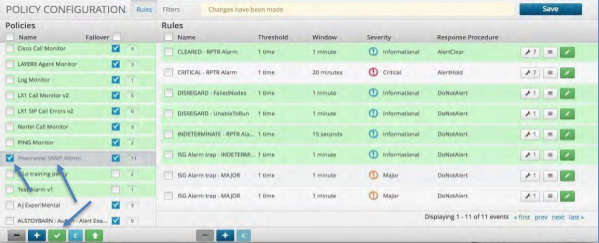
Import a Policy#
Click the green Up arrow button at the bottom of the POLICY CONFIGURATION panel.
A pop-up box will appear asking you choose your file.
Click the Choose file button and select the exported CSV file that you have saved to your computer.
Click the Import button.
Policy CSV Format#
The following columns are in an exported CSV file:
"row action","policy group name",name,description,type,action,severity,
"respond procedure","SubCategory (definition: regular expression match)",
"Message (definition: regular expression match/extract)"
Note
The
"row action"column is used when importing and if it contains “delete”, then the row will be deleted upon import.The
"respond procedure"column can be used when importing and should then contain the Response Procedure name exactly as it exists on the system. If a procedure is found, then it will be assigned to the associated rule. If a new value is entered, a new Response Procedure is created. The default Response Procedure is used if no value is entered.The combination: “policy group name”, “name”, “respond procedure” should be unique in CSV row. If a policy found, its data will be updated. If not found, new policy will be inserted. The “name” has to be unique. If a rule is found, its data will be updated. If not found, new rule will be inserted to the policy indicated in “policy group name”.