
Phones#
Overview#
This topic describes how to manage Cisco Phones in the VOSS Automate Admin portal.
View Phones#
This procedure displays existing phones.
Log in to the Admin Portal as a Provider, Customer, or Site admin.
Note
Only a subset of fields are available to Site admins.
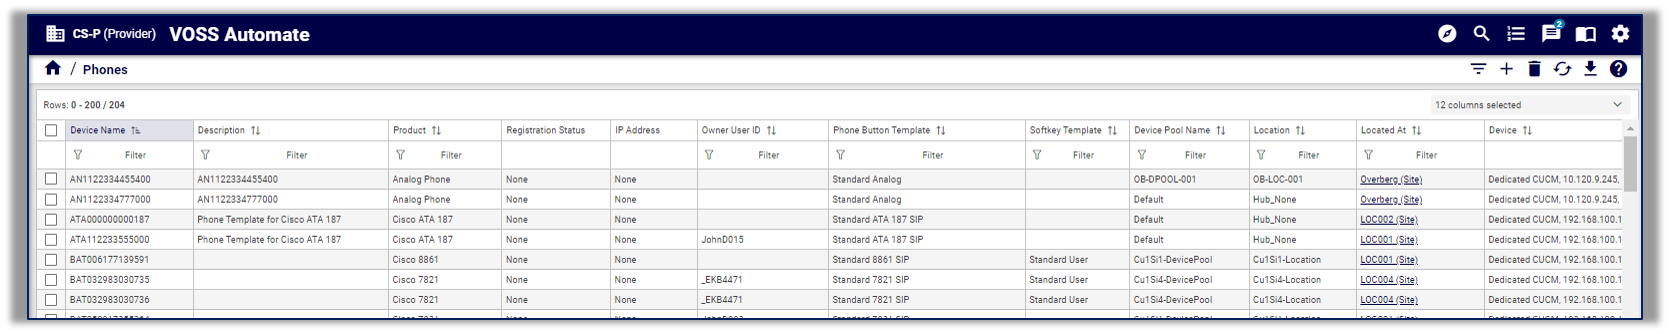
Go to (default menus) Subscriber Management > Phones to open the Phones page summary list view.
View the list of existing phones.
Note
An administrator with the required access profile can click Fetch real-time phone status on the toolbar to fetch the CUCM phone IP address and status directly from the CUCM. Data is fetched in real-time and displays read-only values in the following columns:
Registration Status column (for example, “None”, “UnRegistered with CUCM-11-5-IP2”, “Registered with CUCM-11-5-IP2”)
IP Address column
Fetched data is not cached or stored in the database, and cannot be exported or filtered. Real-time data displays the latest data for the current list of phones on the Admin Portal. Prior to fetching real-time status updates, existing column values display cached values from the RIS data collector (if enabled).
The Activate Phone Status Service setting is enabled by default and can be managed by system level administrators. See the Advanced Configuration Guide for details.
If the Registration Status and IP Address columns are not visible at a hierarchy level, run the following command from the CLI:
voss migrate_summary_attributes device/cucm/Phone
Add a Phone#
This procedure adds a new Cisco phone via the Phones page.
Note
It is recommended that you use Smart Add phone to add standalone phones (not associated to any subscriber) and use Quick Add Subscriber to add phones to subscribers. See Smart Add Phone and Quick Add Subscriber.
Before you start
Before adding phones in VOSS Automate, you will need to add and configure the following items on CUCM, and then import these items into VOSS Automate:
Softkey templates (Softkey templates can be set up on CUCM or in VOSS Automate)
Phone button templates
Service parameters and enterprise parameters for subscriber services
Custom SIP profiles
Service profiles for Jabber
Phone services
To add a phone (CUCM users):
Log in to the Admin Portal as a Provider, Customer, or Site admin.
Note
Only a subset of fields are available to Site admins.
Go to (default menus) Subscriber Management > Phones to open the Phones list view.
Click the toolbar Plus (+) icon, then choose the hierarchy where you want to add the phone.
On the Phones > New Record page, fill out details for the phone you’re adding:
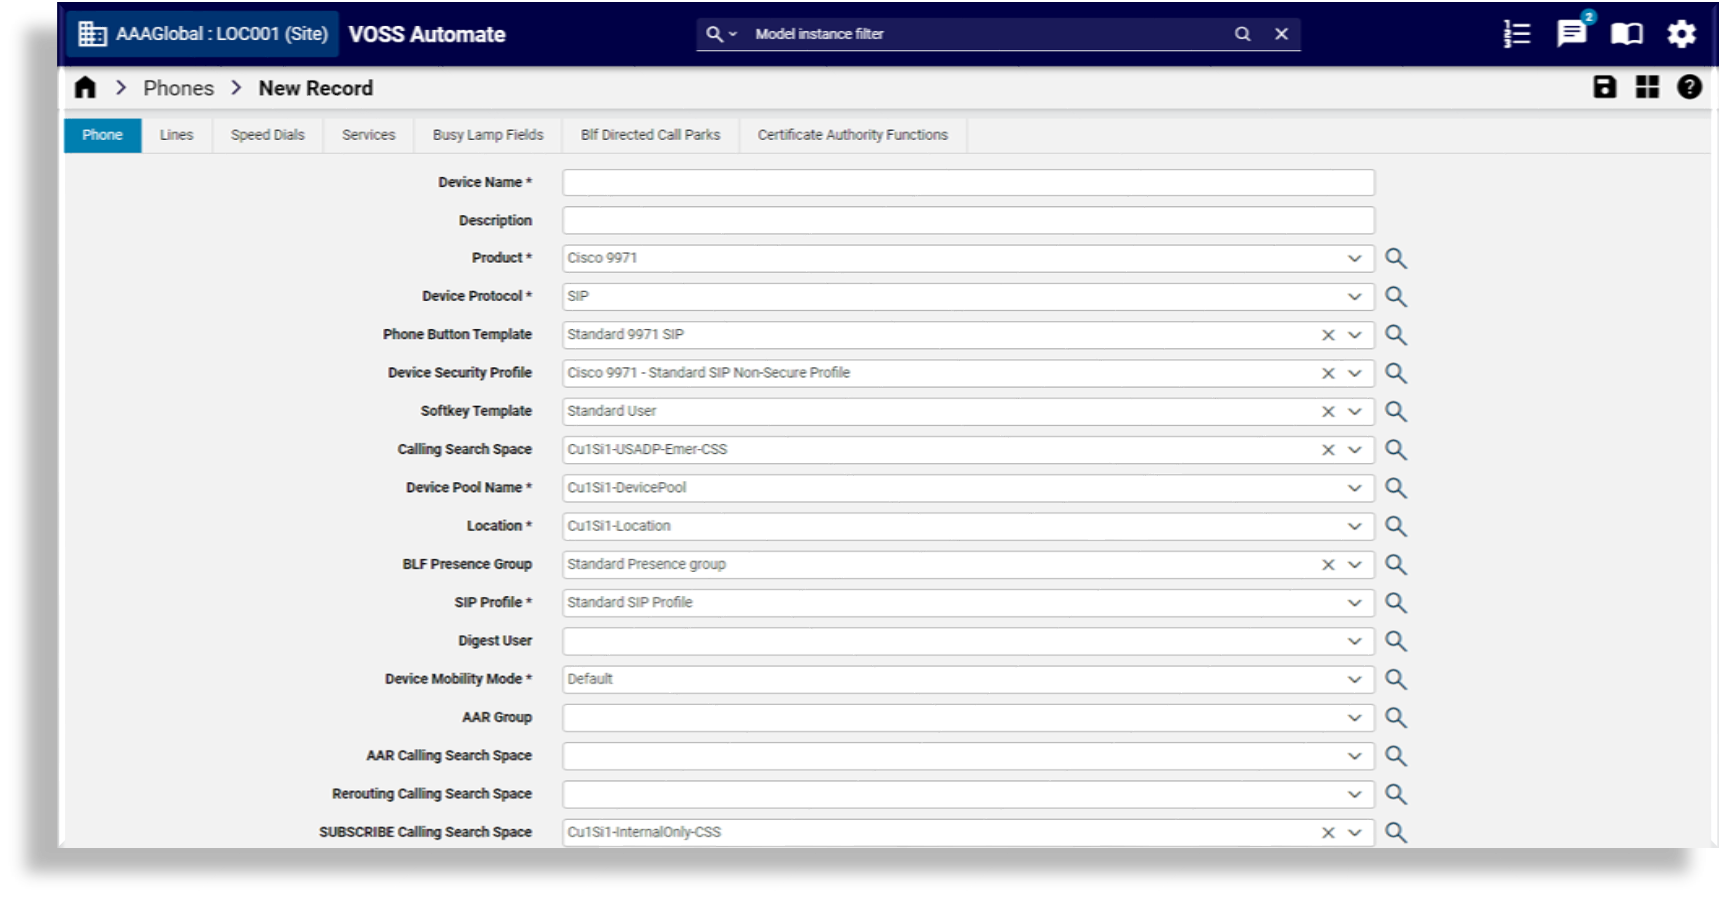
In the Phone panel/tab:
Fill out the device name, including a prefix, for example, SEP0C0011010003, choose the product, for example, Cisco 8865, and (optionally), fill out a description.
Note
If you don’t see the phone or endpoint you want, you’ll need to install a COP file for the endpoint you want, in CUCM. Install the COP file only once for the CUCM instance where the endpoint is added. In VOSS Automate you will need to import the phone button template from CUCM.
When adding a device name, add a prefix, such as SEP, before the mac address. For example, if the mac address is 000000000AB1, the device name must be SEP000000000AB1.
Choose a device protocol.
Note
The phone type you’re adding must support the protocol you wish to use. A default protocol can be defined in the site defaults (Device Defaults tab). Some phone types support multiple protocols (for example, Cisco 7960 with SCCP and SIP), and some phone types support only one protocol (for example, Cisco 9971 with only SIP). If the phone type you’re adding does not support a selected protocol, the protocol defaults to the one set up in the site defaults. You can choose or update the protocol (if allowed by the phone type), when adding a phone, when adding a subscriber, or when adding a phone to an existing subscriber.
Choose a phone button template for automatic configuration of settings, and a device pool name.
If this is a standalone phone, leave Owner User ID blank, else, choose a subscriber to associate with this phone.
Note
If you’re adding the phone at a site, the subscriber (Owner User ID) may exist at a higher level in the hierarchy, such as customer level.
In the Lines panel, click the Plus (+) icon to add a line, then configure line settings:
Choose a line template.
Choose an inventory filter.
Choose a directory number (mandatory).
Specify a label for the line.
Specify a display.
Click Save to add the phone.
Update a Phone#
This procedure updates an existing phone.
Log in to the Admin Portal as a Provider, Customer, or Site admin.
Note
Only a subset of fields are available to Site admins.
Go to (default menus) Subscriber Management > Phones to open the Phones page summary list view.
Click on the phone you wish to update to open its settings.
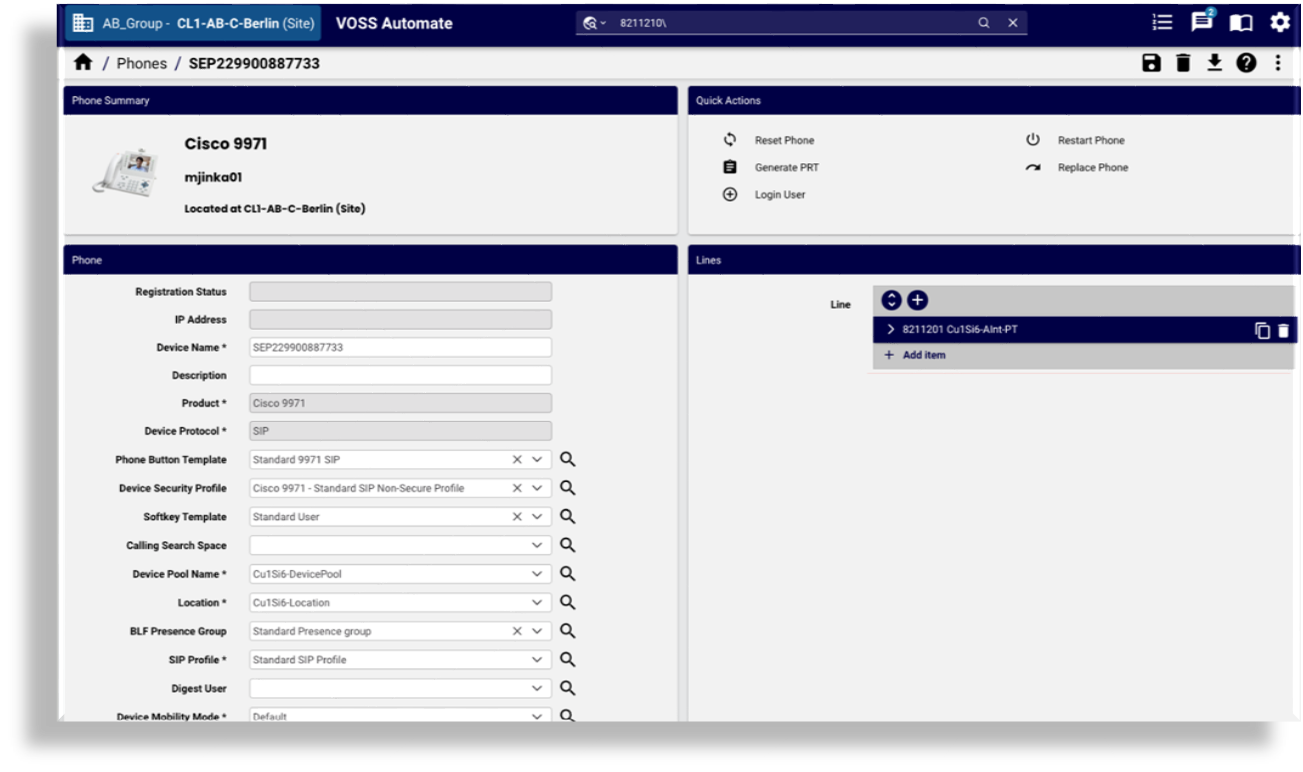
View existing settings, and update as required. Note the following:
Note
Displayed fields are based on the device type and device protocol (for example, SIP or SCCP).
The supported features available for each phone type are retrieved from the related CUCM.
Setting
Description
Quick Actions
Provides quick access to one or more predefined actions, such as restart, reset, or replace phone, or generate PRT.
You can add also access some of these actions via the overflow toolbar menu (vertical ellipsis).
Phone
Default values are applied for some fields (such as Device Protocol, BAT Phone Template, and Device Security Profile), based on the device (product) type.
Vendor Config settings are related to the phone type.
To override the default Phone Button Template, either choose another template, or enter a custom value. The new value is applied on the CUCM if it allows that phone type. If you don’t see a template that you’re looking for in the drop-down (for example, for Phone Button Template, Device Security Profile or SIP Profile), edit the template on CUCM, and then sync the template into VOSS Automate to have it appear in the drop-down.
It is possible to choose an Owner User ID at a higher hierarchy, for example, if the phone is at the site, you can choose an Owner User ID at the customer level and save your changes.
Lines
This panel displays all lines associated with the device and allows you to associate additional lines.
When adding a line, the system checks that a line exists, and if it doesn’t exist, the line is added.
If Number Inventory is enabled, you can select a number from the list of available numbers.
Choose a directory number from the Pattern drop-down
At Monitoring CSS Name, set the Monitoring Calling Search Space as the CSS that is configured in the Calling Search Space field on the Lines page.
At the Busy Trigger field, enter a busy trigger value, for example, 1.
At the Max Num Calls field, enter the maximum number of calls value, for example, 2.
Speed Dials
On this panel you can configure speed dials for the device. Available speed dials depend on the device’s Phone Button Template. The order in which Speed Dial entries are added matches the slots that are available on CUCM.
Services
On this panel you can set up IP Phone services. Once you choose the IP phone service, the system retrieves the URL and a custom parameter (if any, for example, ext1 and ext2) from device/cucm/IpPhoneService, and populates the URL field.
Busy Lamp Fields
In this panel you can configure busy lamps for the device. Available busy lamp fields depend on the device’s Phone Button Template.
Setting
Description
Blf Directed Call Parks
This panel allows you to configure Busy Lamp Field directed call parks for the device. Available BLF-directed call parks depend on the device’s Phone Button Template. Create BLF-directed call parks in Call Routing > Directed Call Parks on CUCM before configuring them in this panel. The available BLF-directed call parks match those created for each specific Route Partition Name.
Dual Mode Settings
These settings display only for phones that support Dual Mode, and allow you to configure mobile identity and remote destinations.
Certificate Authority Functions
The settings on this panel are only relevant to a Dual Mode Phone, Spark Remote Device, or CTI Remote Device, and allows you to enter enter the relevant Mobile Identity and Remote Destination (or CTI Remote Destination) parameters for the device. These parameters include Name, Destination Number, Owner User ID, Dual Mode Device Name (or CTI Remote Device), and Answer Too Soon and Too Late Timers.
The date-time value must be added manually as:
CCYY:MM:DD:HH:MMNote
For more information about Certificate Authority Functions, see Certificate Authority Functions.
When updating the phone, the phone and user remote destination are updated.
Where a phone activation code has expired and needs to be generated, the user’s dummy phone must be deleted and a new dummy phone re-added, following activation steps: Phone Onboarding with Cisco Activation Codes.
For phones supporting the activation codes and the MRA feature will have the
allowMraModeandmraServiceDomainfields available provided a sync has been run that updates the phone types in VOSS with the supported feature set.If you need to enable Extend and Connect in VOSS Automate, perform these steps while creating a CTI Remote Device:
Fill out the Device Name. For example, CTIRD<USERID>.
Choose the product as CTI Remote Device.
Choose the Owner User ID from the drop-down.
Choose the SUBSCRIBE Calling Search Space name from the drop-down.
Choose the Rerouting Calling Search Space name from the drop-down.
Delete a Phone#
This procedure deletes one or more phones or phone settings.
Log in as a Customer or Site administrator.
Note
If you’re logged in as the Customer admin for a specific site, all fields described in this procedure are available to you. If you’re logged in as the Site admin, only a subset of fields are available to you.
Choose a site.
Go to (default menus) Subscriber Management > Phones.
Choose one of the following methods to delete phones or phone settings:
Choose an individual phone to be deleted by selecting its check box in the far left column, then clicking Delete. From the popup window, click Yes to confirm the deleted phone.
Delete multiple phones at once by selecting the relevant check boxes, then clicking Delete. From the popup window, click Yes to confirm the deleted phones.
Remove phone settings as required by removing them from the relevant tab of a selected phone. Click Save.
Note
Deleting a phone removes the remote destination first so that the VOSS Automate cache remains in sync with CUCM.
Lines are not affected when a phone is deleted.
View and Update Phone Vendor Config Settings#
The Vendor Config settings will display if the Field Display Policy (FDP) allows it.
You can access the vendor configuration settings for a phone as follows:
In the Admin Portal, go to (default menus) Subscriber Management > Phones.
On the Phones list view, click on a phone to open its settings.
On the Phones page, locate and then click on Vendor Config to open the configuration screen:
Enable or disable settings, as required. Ensure you’re setting values correctly for Bulk Loaders, the API, or in custom Configuration Templates, where values must be defined as key-value pairs:
On CUCM, in some cases the value
0is “Enabled” and in other cases0is “Disabled”.It is recommended that settings on CUCM are configured manually on a sample phone to the value you want, before exporting the phone. Then use the example settings as the basis for your Bulk Loaders, API, or custom Configuration Templates.
The required value may change depending on the setting being applied, for example:
To enable the “Web Access” for a phone, configure the following:
Key:
webAccessValue:
0
To disable “Web Access” for a phone, configure the following:
Key:
webAccessValue:
1
To enable “Settings Access”, configure the following:
Key:
settingsAccessValue:
1
To disable “Settings Access”, configure the following:
Key:
settingsAccessValue:
0
Generate Problem Reporting Tool (PRT)#
Individual phones can have the Problem Reporting Tool (PRT) triggered to generate PRT log collection on the phone and upload it to the log server configured on the Unified CM in the “Customer support upload URL” parameter at the Enterprise, Profile, or Device level.
Select the phone from the Phones list view (default menu Subscriber Management > Phones):
Click the Generate Prt Phone action to generate PRT log collection.
Sync in Phone Updates from CUCM#
After you make changes to any phone model specific data in CUCM, for example by loading a new BAT file, editing phone button templates, security profiles, and so on, then in order to utilize that data in VOSS Automate, you need to do a sync of the CUCM.
Include the following models in the data sync (depending on what you changed):
Models |
Notes |
|---|---|
|
Should always be included. This includes the expansion models as well as the phone types. |
|
Include if button templates were changed. |
|
Include if phone security profiles were modified |
Perform a full sync or full import to make the changes available in VOSS Automate. However, between full syncs, it is best practice to create a sync setup with a model type list that includes the above model types. This allows you to run an ad-hoc sync with a very limited scope as needed - if changes are made in the CUCM that require a sync.
If adding new phone types to the system, you may also need to edit your device groups and entitlement profiles (if used) to have them show as options to the correct users.
Phone Onboarding with Cisco Activation Codes#
VOSS Automate supports the Cisco Unified CM (CUCM) capability for device onboarding using Activation Codes. This provides a simplified method to register a new phone in the system. This is supported from CUCM version 12.5 and later.
This feature allows administrators to create phones without MAC addresses and then share automatically generated activation codes with end users via Self Service or email. The end user can then enter the activation code into the physical device to initiate auto registration.
Once the phone has been activated and registered, the correct phone association takes place in VOSS Automate.
For more information on the detailed functionality of the Cisco Activation Code Device Onboarding capability, including supported devices, refer to the Cisco documentation.
The setup of the feature has been incorporated into our various Subscriber/Phone Management capabilities:
Phones
Subscribers
Quick Add Subscriber
Smart Add Phone
Note
The selected phone type must also be included in the Subscriber’s entitlement profile.
When a device is added which supports Activation Codes and the option is chosen, CUCM may be slow to respond with relevant Activation Code. In this instance, VOSS Automate will retry fetching the activation code 3 times with a 2 second wait in between. Once the activation code has been received, the retries will stop.
Phone Setup and Onboarding Workflow#
The high-level setup steps in VOSS Automate for phone onboarding with Cisco Activation Codes are as follows:
Initial setup - enabling Phone types for activation code.
Per Subscriber/Device - setup of the phone details and generation of the activation code.
Provide the activation code to the user for use to onboard the device.
Complete the initial setup and enable the phone type(s) for activation code use
Login as Customer administrator or higher.
Navigate to the hierarchy level of the cluster(s) you want to enable.
Enable activation code based registration for a target phone type:
Go to (default menus) Apps Management > CUCM > Device Defaults.
Click the Model, e.g. Cisco 7821 on which you want to enable the phone registration activation code feature. Note the device column in the list view to ensure it is the device type on the right UCM cluster.
Select the Prefer Act Code Over Auto Reg check box.
Click Save.
Complete the per Subscriber/Device setup to prepare the phone for onboarding:
Once enabled, you can add the phone, using any of the prescribed Subscriber Management methods (see above), making sure to select the Use Activation Code Onboarding check box. This will remove the device name as a BATXXXXXXXXXXXX device name will be generated when adding the phone.
Once the phone is successfully added, an activation code is generated and displayed along with the code expiry time on the relevant Phones form (Subscriber Management > Phones).
Note
The phone activation code must be used to register the phone before the specified expiry date.
The activation code is available in the end user’s self service if the device was associated to a user. Alternatively email the activation code to the end user.
The end user registers the phone by entering the activation code into the physical device.
To see the list of phones that have been setup for activation codes but not yet activated, you can filter the phones list view for device names starting with, BAT, as once they register they have the appropriate device name prefix (e.g. SEP).