
Manage Sites#
Overview#
Sites are a node on the hierarchy (organization) structure of VOSS Automate.
Related Topics
Create a Site#
This procedure creates a site.
Note
References to HCM-F and Shared Data Repository (SDR) are only relevant if installed.
In VOSS Automate, if the site name matches an HCM-F customer location, you can migrate the customer location as a site.
The following additional fields are available and shown as summary fields:
City
Postal Code
State
Extended Name
External ID
SiteId
InternalSiteID(Disabled)
Log in as Provider, Reseller, or Customer administrator.
Set the hierarchy to the Customer for whom you are creating the site.
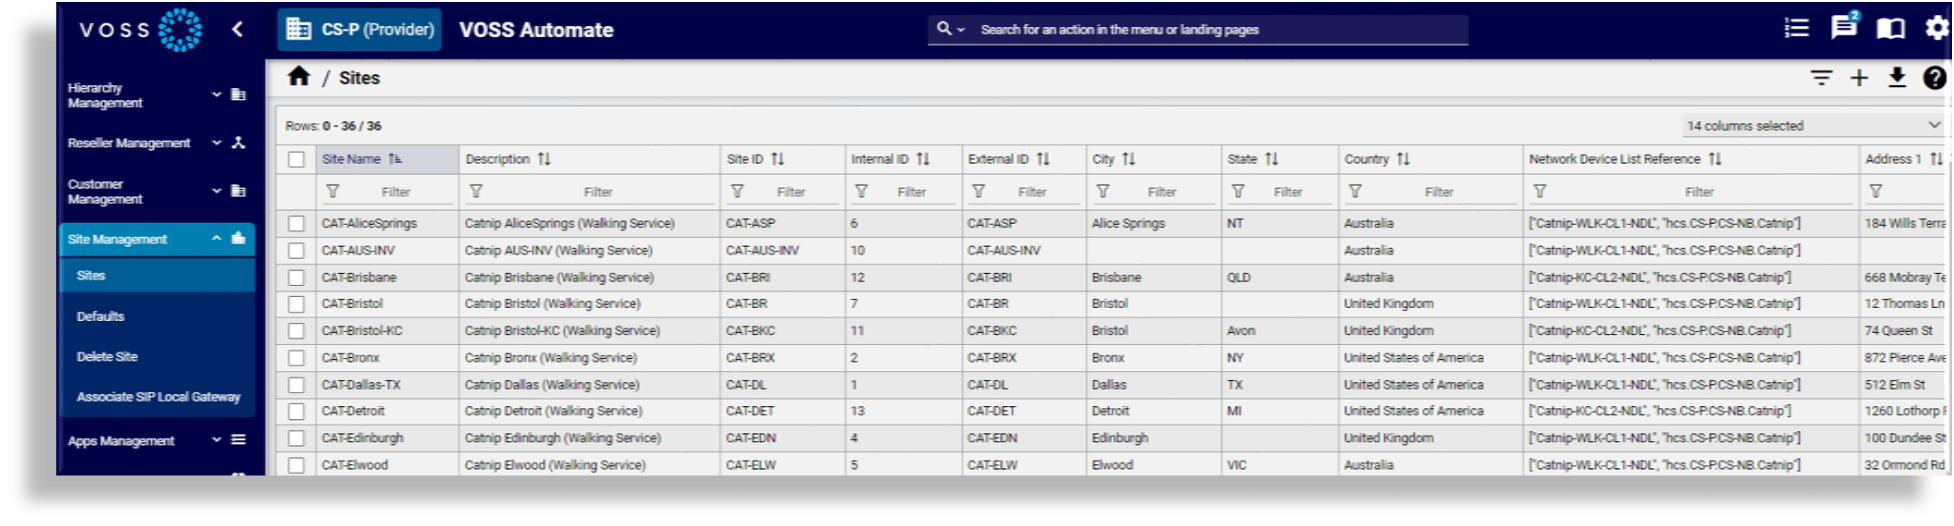
Go to (default menus) Site Management > Sites to open the Sites page.
Click Add, then fill out the following fields:
Option |
Description |
|---|---|
Site Name |
The name of the site. This field is mandatory. Note: Any spaces in the site name are converted to underscores in the site local administrator name and email, if the Create Local Admin check box is selected. You cannot migrate a customer location to a site if the customer for the site is different than the customer associated with the customer location. When migrating a customer location to a site, an NDL is not selected for the site. You can set the NDL for the site later. Note (Provider deployments): A customer location that has been configured in HCM-F and synced into VOSS Automate may exist at the sys.hcs hierarchy. If the Site Name you enter matches this customer location, the Migrate from HCM-F to VOSS Automate check box is displayed. Click Save to migrate this customer location to a site at the current hierarchy level. The fields are populated with the values that were configured in HCM-F. If you do not want to migrate the customer location, enter a different Site Name. |
Description |
A description for the site |
Extended Name |
Provider deployments. External clients can use the Extended Name of the site if needed. This field is not used by other components within Cisco HCS. Note: This field exists in the Customer Location record in SDR. When the customer is managed by Cisco Unified Communications Domain Manager 8.1(x), the Extended Name is synced from Cisco Unified Communications Domain Manager 8.1(x) to the Customer Location record in SDR. When the customer is managed by VOSS Automate, the Extended Name is synced from VOSS Automate to the Customer Location record in SDR. |
External ID |
Provider deployments. External clients can use the External ID of the site if needed. This field is not used by other components within Cisco HCS. |
Create Local Admin |
Controls whether a default local administrator is created for the site. |
Option |
Description |
|---|---|
Cloned Admin Role |
The customer role used to create a new role prefixed with the site name. The created site role, shown in the Default Admin Role field, is assigned to the default local administrator user. This field appears only if the Create Local Admin check box is selected. |
Default Admin Role |
The created site role that is assigned to the default local administrator. This field is read-only and appears only if the Create Local Admin check box is selected. |
Default Admin Password |
The password to assign to the default local administrator. This field appears only if the Create Local Admin check box is selected. |
Repeat Default Admin Password |
Confirm the default local administrator password. This field appears only if the Create Local Admin check box is selected. |
Country |
The country is used to determine which dial plan to download to the site when the dial plan is configured on the site. This field is mandatory. |
Network Device List |
Choose the NDL containing the UC applications and WebEx to be used by the site. Once an NDL has been set for the site, it cannot be removed from the site, nor can the NDL be changed to another NDL. |
Auto Push Users to CUCM |
Disabled by default. When enabled, users are automatically pushed to the CUCM associated with the NDL at the site. You can also edit the site after it’s been created:
|
Click Save.
A Site hierarchy node is created.
A location is created.
(Provider deployment) A customer location in the SDR is created.
Optionally, a default site administrator is created.
If Auto Push Users to CUCM is selected:
All users associated with the NDL, provided they are user type End User, are pushed to the CUCM associated with the NDL.
A user’s surname is required by the CUCM and must be set for that user to be successfully pushed to the CUCM.
A Cisco user is created when onboarding Cisco users but not when onboarding Microsoft or Webex users (for sites with this setting enabled).
Add Custom Fields to Site Configuration Screens#
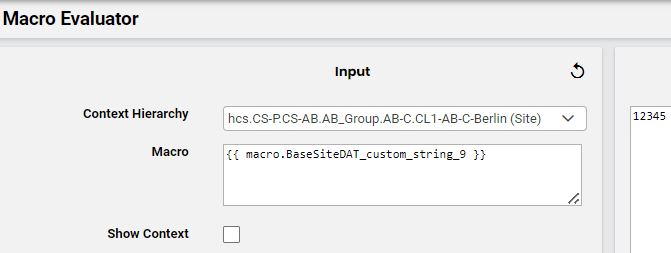
VOSS Automate allows you to add up to ten custom string fields and up to 10 custom boolean fields to the field display policy you apply to the Site model (relation/HcsSiteREL). This provides flexibility to add additional details for a site, if required.
The summary attributes in the Sites list view always display three Boolean fields and three String fields, regardless whether they’ve been included in the FDP. If you wish to change the title of these fields in the summary attributes you can add a field override entry in the FDP.
When configuring a site (add or update), you may specify field values or use named macros to populate values for these fields.
Macros for custom string fields for relation/HcsSiteREL:
macro.BaseSiteDAT_custom_string_1
macro.BaseSiteDAT_custom_string_2
macro.BaseSiteDAT_custom_string_3
macro.BaseSiteDAT_custom_string_4
macro.BaseSiteDAT_custom_string_5
macro.BaseSiteDAT_custom_string_6
macro.BaseSiteDAT_custom_string_7
macro.BaseSiteDAT_custom_string_8
macro.BaseSiteDAT_custom_string_9
macro.BaseSiteDAT_custom_string_10
Macros for custom boolean fields for relation/HcsSiteREL:
macro.BaseSiteDAT_custom_boolean_1
macro.BaseSiteDAT_custom_boolean_2
macro.BaseSiteDAT_custom_boolean_3
macro.BaseSiteDAT_custom_boolean_4
macro.BaseSiteDAT_custom_boolean_5
macro.BaseSiteDAT_custom_boolean_6
macro.BaseSiteDAT_custom_boolean_7
macro.BaseSiteDAT_custom_boolean_8
macro.BaseSiteDAT_custom_boolean_9
macro.BaseSiteDAT_custom_boolean_10
The macros can be applied in workflows and configuration templates to reference the custom field values. For example, executing macro.BaseSiteDAT_custom_string_9 will return the value in the field where the macro is used.
To expose custom fields for relation/HcsSiteREL
Log in to VOSS Automate as Provider admin or higher.
Create or update the Customers data model field display policy:
Go to (default menus) Customization > Field Display Policies, and locate the entry for target model type relation/HcsSiteREL.
Click on the default field display policy (FDP) for the model (the FDP named default).
Clone (copy) the default FDP for the model, and give the clone a new name.
Note
You cannot modify default FDPs that ship with the system. This allows you to refer to or revert to a system default at any time, if required.
Modify the new FDP (the clone).
Note
You can add a new group of fields containing only the new custom fields, or add fields to existing field groups.
You can also create field overrides, which allow you to define that a custom field value will be referenced in place of an existing field.
Save your changes.
Update the menu layout to apply the field display policy:
Go to (default menus) Role Management > Menu Layouts, and locate the Provider admin menu layout (HcsProviderMenu).
Click on HcsProviderMenu, and create a clone with a new name.
Note
You cannot modify default menu layouts that ship with the system. This allows you to refer to or revert to a system default menu layout at any time, if required.
Modify the clone (copy) of HcsProviderMenu:
Expand the Site Management menu.
At Sites, click in the Field Display Policy cell, and choose the FDP you configured to add the custom fields.
Save your changes.
Log out, then log in again as Provider admin.
This allows the role-based access profile changes to refresh so that you can view the updated menu layouts and field display policies you applied, including new custom fields.