
Add or update certificates#
Users can now update SSL certificates and SSL keys from the Admin console menu.
Note
If vulnerability testing yields “Weak hashing Algorithm” and “Self-Signed Certificate” issues, these can can be fixed by installing your own SSL certificate.
Add certificates#
To add your own certificate, you will need both the certificate and private key.
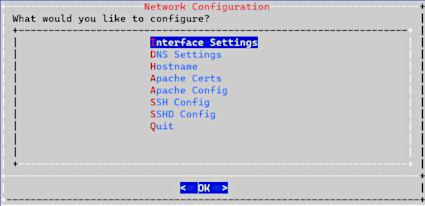
SSH to the system using admin account
Select Network Configuration
Select Apache Certs
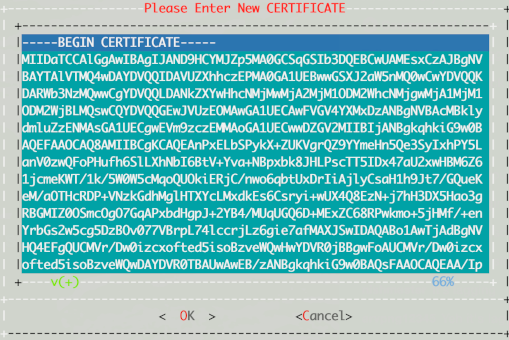
Select Insert Cert
Paste in customer certificate
A certificate has the following headers and footers:
EXAMPLE:
-----BEGIN CERTIFICATE-----
MAIN SERVER CERTIFICATE
-----END CERTIFICATE-----
-----BEGIN CERTIFICATE-----
INTERMEDIATE CERTIFICATE
-----END CERTIFICATE-----
-----BEGIN CERTIFICATE-----
ROOT CERTIFICATE
-----END CERTIFICATE-----
Error checking and solutions:
Error 20 at 0 depth lookup: unable to get local issuer certificateThe server certificate needs an intermediate certificate to validate. Add the intermediate certificate after the server certificate.
Error 2 at 1 depth lookup: unable to get issuer certificateThe server certificate needs the root certificate to validate. Add the root certificate after the intermediate and or server certificate.
Error loading file /etc/apache2/server.crt.tmp
error:05800088:x509 certificate routines unknown function):
no certificate or crl found:crypto/x509
No certificate; invalid format; or blank.
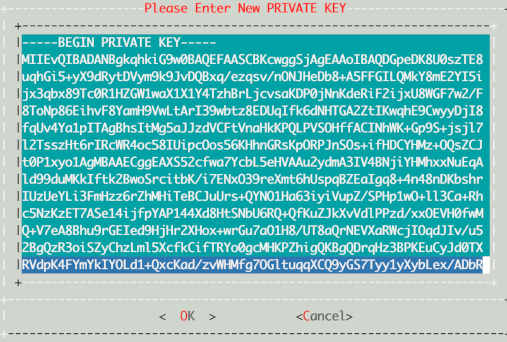
Select Insert Private Key.
Paste in customer private key.
A private key has the following header and footer
--BEGIN PRIVATE KEY--
--END PRIVATE KEY--
Select Display Cert Details to view certificate details.
Select Back, then exit the menu.
Refresh the browser. The system should be using the new certificate.
Generate a CSR from an existing certificate#
If you want to generate a CSR for the current certificate:
SSH to the system using admin account.
Select Network Configuration.
Select Apache Certs.
Select Generate Cert.
Press Enter. The CSR displays on the screen.
Copy and save it.
Select Back, then exit the menu.
Refresh the browser. The system should be using the updated unsigned certificate.
Create new certificates#
If you want to generate a new unsigned certificate or to reset a certificate and private key:
SSH to the system using admin account
Select Network Configuration
Select Apache Certs
Select Generate New Unsigned Cert
When prompted, fill in the information requested.
For
the number of days the certificate should be valid. (default 365):, the value should be a positive number from 1 to 3650.Publicly Trusted Certificates: For certificates that need to be trusted by web browsers like Chrome, Firefox, or Safari, the maximum validity period is currently 398 days. This is a policy set by the CA/Browser Forum to enhance security by encouraging more frequent certificate renewals and updates.
Self-Signed Certificates: When you are using OpenSSL to create a certificate for a private network or for testing purposes, you can set a much longer validity period. The tool itself does not prevent you from setting a very high number of days, but you may run into issues with the system’s date and time representations (e.g., the Year 2038 problem on 32-bit systems).
The default RSA Encryption Key Size is 4096.
If the check:
Info: Checking modulus of the Certificate and Private Key.returns with an error:Error: Certificate and Private Key DO NOT MATCH, the possible reasons could be:Either wrong certificate uploaded.
Private key not uploaded.
Then generate new unsigned certificate, which will generate a new key and certificate. |
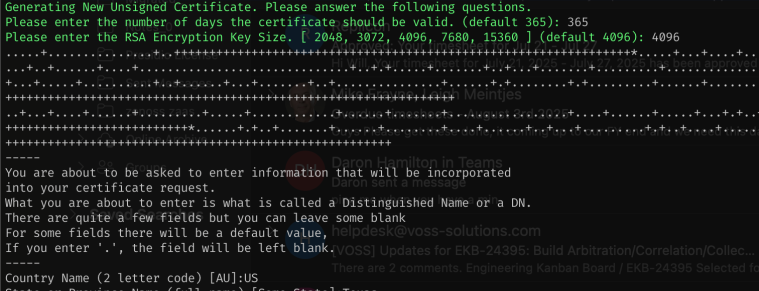
Country Name (2 letter code) [AU]:
State or Province Name (full name) [Some-State]: Locality Name (eg, city) []:
Organization Name (eg, company) [Internet Widgits Pty Ltd]:
Organizational Unit Name (eg, section) []:
Common Name (e.g. server FQDN or YOUR name) []:
Email Address []:
Select Back and exit the menu.
Refresh browser. The system should be using the new unsigned certificate.