
License Auditing#
Overview#
Insights integrates with the VOSS Cloud Licensing service to provide license auditing capabilities that allows you to view and inform VOSS of your license usage counts across various services and devices, including Cisco Unified Communications Manager (CUCM), Webex, Zoom, and Microsoft Teams.
A backend service on the Arbitrator detects probes already configured for CUCM, UCCE, UNITY, Webex, and MS Teams devices, and automatically retrieves the user accounts for the respective services.
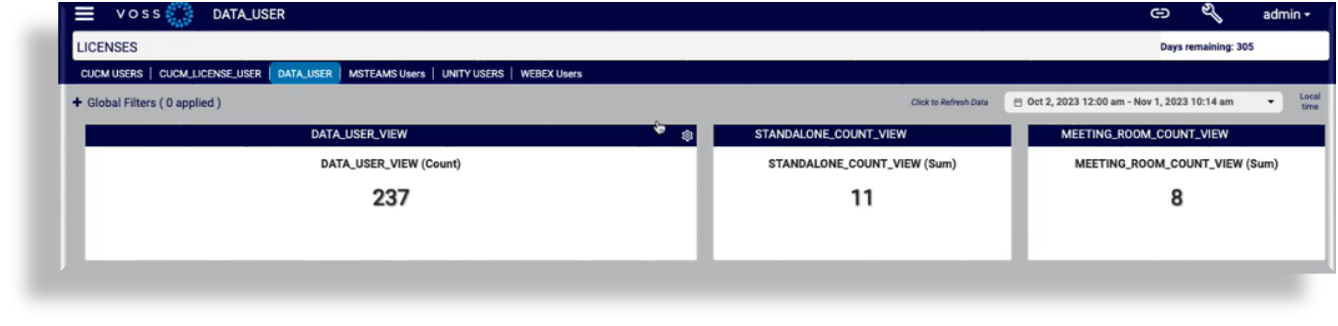
Insights ships with resource files for the following views, which allow you to create dashboards that display user license counts for your system:
data_user_view
standalone_count_view
meeting_room_count_view
The license auditing service generates a file that can be automatically sent to the VOSS Cloud Licensing service for processing.
Note
If you prefer to opt out of the automated license delivery mechanism, you will need to manually upload the license user count details to VOSS. See Alternative to registering with the VOSS Cloud Licensing Service
Related topics
Register with the VOSS Cloud Licensing Service and Upload License File#
This procedure registers your organization for syncing with the VOSS Cloud Licensing service, and optionally, allows for the license file to be automatically uploaded to the VOSS Customer Portal. Alternatively, once you’ve registered, you can manually upload the license file.
Registering allows licensed user counts to be added to a file that is generated on Insights Arbitrator. These files are generated daily.
Before you start
Open the following ports to communicate with the VOSS Customer Portal at voss.portalshape.com/
Default HTTP: port 80
Default HTTPS: port 443
Add the host name to an allowlist for trusted servers: platform.voss-solutions.com
Note
If your system is unable to reach external sites on the internet, you can use a proxy server that you set up on the Arbitrator (via Configuration > Archive Management > Configuration Management > Proxy tab)
Register and upload license file
Log in to Arbitrator as administrator, then click the toolbar Wrench icon (System Configuration) to open the Configuration GUI.
Click Archive Management, then on the Archive Management page, select the License tab.
Fill out your organization ID, your environment type (for example, staging, trial, or lab), and optionally, a device description.
Note
You can obtain your organization ID from the VOSS Customer Portal. Registration and file upload fails if the organization ID is incorrect.
To allow automatic upload of generated license file to the VOSS Customer Portal, set the value of the enabled drop-down to
true.Note
If you wish to opt out of automatic file uploads, set the value to
false(default).Click Save to generate the license file for the organization ID you provided.
(Optional) On the License tab, click Fetch License File.
Note
Clicking Fetch License File before saving triggers an error as the license file won’t have been generated yet.
To view the content of the license file you can click View Output.

Alternative to registering with the VOSS Cloud Licensing Service#
If you’re unable to register with the VOSS Cloud Licensing service for usage reporting, you’ll need to provide the license audit files to VOSS.
This procedure allows you to retrieve the required files, which you can then provide regularly as agreed with your VOSS account team and commercial agreement.
Note
The registration method is preferred since it automates this process.
Download the file and submit it to VOSS:
Copy the last part of the path that appears below the Fetch License File button (
license/latest.csv). See Register with the VOSS Cloud Licensing Service and Upload License FileAppend the copied text to your system IP address in a URL (in a new tab).
The license file downloads as a .csv file.
Provide the file to the destination provided by your VOSS account team (typically email alias).
Related Topics