Introduction to Microsoft Teams policies#
Overview#
Microsoft Teams policies are synced between Microsoft Teams and Automate, to the customer level.
Automate provides an interface for managing Microsoft Teams policies at customer or site level. Updates in Automate are synced back to Microsoft Teams, and external changes are synced back to Automate.
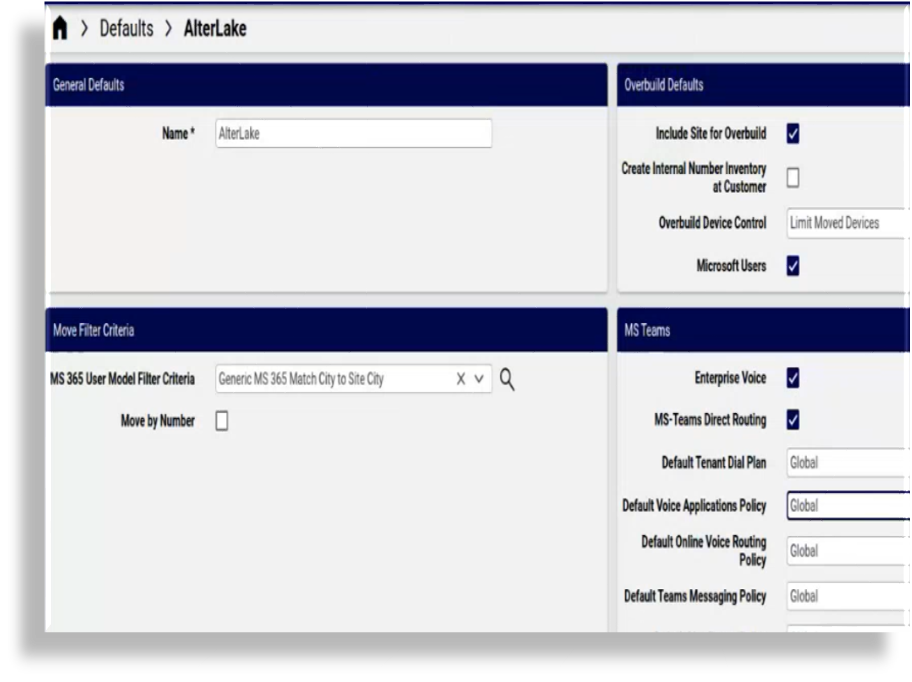
You can view and choose default policies for sites in the site defaults via the Defaults page, on the MS Teams tab.
Microsoft Teams policies are assigned automatically to users via their user roles and profiles, and via quick add groups (QAG), as part of the initial sync and provisioning workflow.
Choosing a default policy for a site in the Site Defaults (SDD) automatically assigns the policy to users at the site. When creating a user via Quick User, the SDD is used, but you can also edit the configuration template for the Quick Add Group (QAG) to use a policy different to the SDD, or you can edit a user directly to choose a different policy for that user.
Policies are then also shown on for example the Teams User (CSOL) page.
To manage Microsoft Teams policies, go to the page for the relevant policy, for example:
Calling policy
Meeting policy
Messaging policy
Live Events policy
Call park policy
App permission policy
App setup policy
Teams policy
Update policy
Emergency calling policy
Enhanced encryption policy
Voice routing policy
Voicemail policy
Audio conferencing policy
Note
Some policies support full CRUD (create, update, delete) operations within Automate.
Related topics
Call hold policy (Microsoft Music on Hold)#
To create or update a call hold policy for Microsoft Teams, an audio file (MP3, WAV, and WMA and file size less than 5 MB) upload is required. Go to the File Management page for this task.
Thereafter, the Audio file drop-down list will show the file and can be selected to create or manage the policy.
Note
The Call Hold policy name can’t be changed upon policy updates.
The audio file names of imported call hold policies are initially undetermined and are represented by a hash value. Subsequent syncs of the policy will resolve existing hash values to filenames.
Survivable branch appliance policy#
If the Microsoft Teams client is in offline mode, the Teams Phone operations can be made available by a Survivable Branch Appliance (SBA) Policy. This allows for the placement and reception of Public Switched Telephone Network (PSTN) calls during service disruptions.
Survivable Branch Appliance Policy (SBA Policy) management is available from the MS Teams Policies menu. The policy can then be assigned to users, Quick Add Groups and set in Site Defaults.
The following policy fields can be managed at a hierarchy:
Identity: The identity of the SBA
Fqdn The FQDN of the SBA
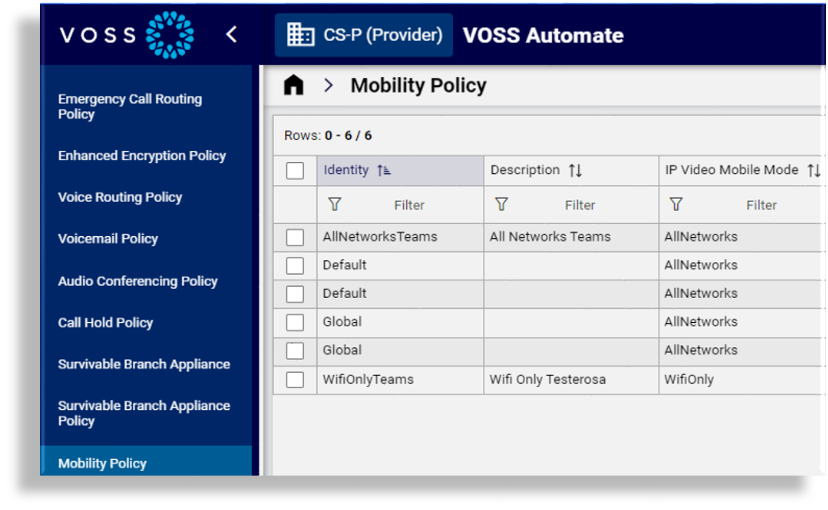
Mobility policy#
Microsoft’s Teams Phone Mobility policy is assigned to a user that is given a Teams Phone Mobile number via Quick User, or you can assign the policy to an existing user via User Management. This policy tells the system where to route incoming calls, for example, to your mobile phone or to your Teams application.
Full CRUD is supported for this policy from within Automate. Changes are synced between Automate and the Microsoft Cloud portal. The Mobility policy is added to Automate via the site defaults, where you can assign a different mobility policy per site, or assign the policy at the customer level.
Automate admins onboard and provision Teams Phone Mobile users via Quick User, where the user can be assigned their Teams Phone Mobile license via a license group in a Quick Add Group. The license group can be removed for that user when they’re offboarded. The policy is also assigned when updating an existing Microsoft user and choosing a Teams Phone Mobile number to the user.
Teams Phone Mobile users are assigned numbers reserved for this functionality in the Automate number inventory. These numbers won’t be available to anyone else even if a user with a Teams Phone Mobile number is offboarded.
Add a mobility policy
Mobility policies can be added on the MS Teams Cloud portal and synced in to Automate, or you can add a mobility policy from within Automate and sync the policy into the MS Teams Cloud portal. This procedure adds a mobility policy in Automate.
In the Automate Admin Portal, go to Mobility Policy. Existing mobility policies display in the list view.
Click the Plus icon (+) to add a new mobility policy.
Fill out an identifying name (Identity) and optionally, a description.
Optionally, select a mode for IP video and/or IP audio mobile, either WiFi only, or all networks.
Optionally, select a mobile dialer preference, either Teams, native, or user override.
Save your changes.
Apply the mobility policy to a site or customer
Go to Defaults (for a site or at the customer level).
On the MS Teams tab/panel, at Default Mobility Policy, select the mobility policy to apply at the site or customer.
Save your changes.
Assign a policy to a user
Mobility policies can be assigned automatically when onboarding a Microsoft user via Quick User, or you can modify a user and apply a mobility policy. To assign a policy to an existing user, see Manage a user’s MS Teams policies
Related topics
Voice application policy#
Microsoft Voice Application policies define the configuration changes an authorized user can make to the call queues and auto attendants they’re authorized for. Automate allows full CRUD (create, update, delete) for the voice application policy from within Automate, and any changes made in either Automate or the Microsoft Teams portal are synced between these two platforms.
The voice applications policy can be assigned to a user in Quick User (from the site defaults), or a different voice applications policy can be assigned, via Automate’s user management functionality.
MS Teams voice policies, including the voice application policy, is available, by default, on the MVS-MSDialPlan dashboard.
Related topics
Set up Automate for voice application policies#
To set up Automate for managing Microsoft’s Voice Application policies:
Add and configure voice applications policies, one or more.
In the site defaults at the customer level, choose the default voice applications policy to apply.
Assign the voice applications policy to a user via Quick User or via Automate’s user management functionality.
Manage voice application policies in Automate#
In the Automate Admin Portal, go to the Voice Applications Policy page.
View existing voice application policies in the list view.
Choose an option:
Delete a voice application policy? Select the policy in the list, then click the toolbar Delete icon.
Update a voice application policy? Click on a policy in the list to view its details. Update the policy, then save.
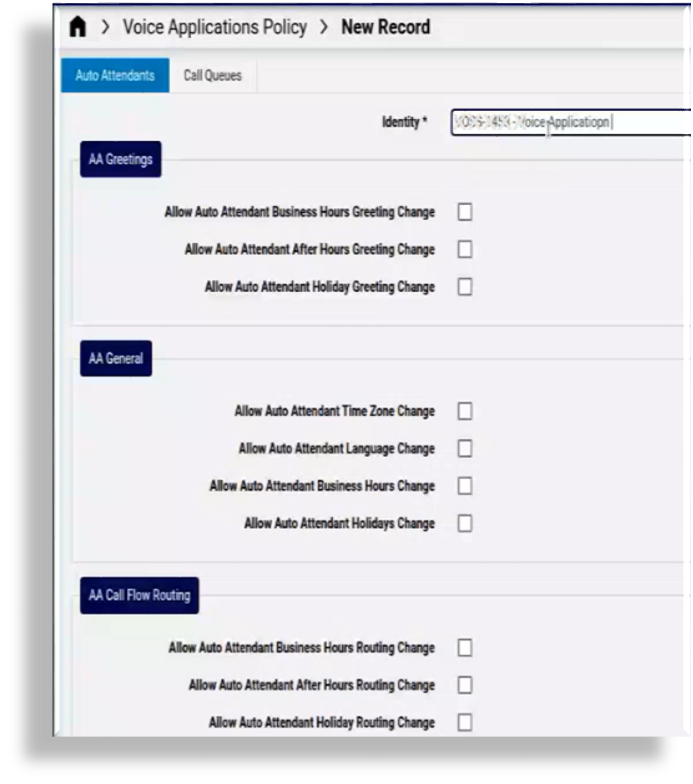
Add a new voice application policy? Click the Plus icon (+) to add a new record. Configure the voice applications policy settings for auto attendants and call queues, then save your changes.
Auto attendant settings for the voice application policy include settings for greetings, time zone, language, holiday and business hours, routing changes, and reporting permissions
Call queue settings for the voice application policy includes settings for greetings, general settings such as whether to allow call queue language, membership, or conference mode changes, as well as settings for exception handling, agent monitoring, and reporting permissions
