
Microsoft users#
Overview#
You will need to onboard Microsoft users in Automate.
Onboarding a Microsoft user involves importing users and related data to the customer level from the Microsoft Cloud service, and then moving users to the correct sites as fully provisioned users.
Automated workflows configure imported objects once changes are synced in, and apply the required configuration, policies, and licenses. This means administrators won’t need to continually monitor the sync, or to perform additional steps to complete the process.
Once synced in (at the customer or site level), administrators can manage Microsoft users via a single interface and login, from within the Automate Admin Portal. To maintain data integrity, to manage licenses, and to automate number auditing for synced in users, regular, targeted backend syncs poll for changes made at the device model layer.
Note
If Enable Microsoft User License Enforcement is set to Yes in the Global Settings, a user can only be added if the license allocation limit for the user’s hierarchy is not exceeded. For details, see: Microsoft License Management and Alerting.
Related topics
Onboarding Microsoft users#
Automate provides two onboarding options for Microsoft users:
Sync users to customer level, and then to sites |
Configure Automate for Microsoft Services This option starts with an initial import of dial plans, policies, licenses, and Microsoft users, to the customer level (sync all to the tenant). Then you will need to set up the configuration and user move criteria before moving users to the sites (set up model filter criteria, site defaults, quick add groups, user profiles, and number inventory). Finally, you have two options to move users to the sites as fully provisioned users:
When moving users to site, the Automate automated workflow applies the required configuration, services, lines, policies, and licenses. |
Sync users directly to sites |
Sync to site with flow through provisioning In this option, you run the initial sync together with flow through provisioning. In this case, you start by setting up the configuration and user move criteria before running the initial sync. That is, to set up the model filter criteria, site defaults, quick add groups, and user profiles. In addition, you will need to:
Once changes are synced in from the Microsoft Cloud, Automate automated workflows move the tenant dial plan, policies, and licenses to the customer level, and moves users directly to the appropriate sites as fully provisioned users. |
Note
Automate v21.2 introduced sync with flow through provisioning for Microsoft users. In 21.3, this feature extends the functionality to users synced in from LDAP and Cisco UCM.
Only Add is supported for syncs with flow through provisioning. Update and delete are not supported since the requirements may differ depending on the customer scenario.
For details on the generic flow through provisioning feature (which includes Microsoft, LDAP, or Cisco UCM users), see Configure flow through provisioning
View and edit Microsoft users#
View a summary list of all Microsoft users#
This procedure displays a summary list of Microsoft users.
Log in to the Automate Admin Portal.
Choose the hierarchy.
Go to the Microsoft User Details page.
View a summary of Microsoft users at the current hierarchy.
The list view for Microsoft users provides details for the following, for each user in the list:
User principal name, first name, and last name
Licenses
Department
City, country, phone number, location
Associated device
View and update a Microsoft user#
This procedure displays and edits the details of a single Microsoft user.
Note
This workflow is intended for Microsoft-only users. When choosing a hybrid user with Cisco-Microsoft services, you’ll need to work with this user via the Hybrid multi vendor actions. The Hybrid Status Message field displays the user’s hybrid status. See Hybrid Cisco-Microsoft management
Log in to the Automate Admin Portal.
Choose the hierarchy.
Go to the Microsoft User Details page.
View a summary of Microsoft users at the current hierarchy.
Click on a user in the list to open their settings.
Select a tab (or scroll to the relevant panel) to view and update settings:
Note
Automate allows you to toggle between a panel or tab layout via a toolbar button. The tabs/panels that display depend on enabled functionality.
Tab/Panel
Description
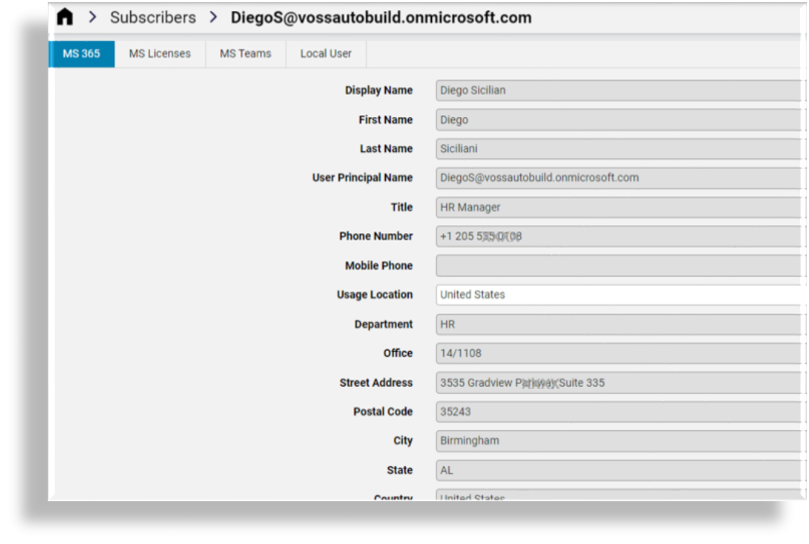
MS 365
Microsoft user details, such as their display name, first and last name, User Principal Name (UPN), title, contact details, usage location, department, employee ID, employee type, and groups.
Exchange Custom Attributes
Read-only. Displays on the user’s form only when Microsoft Exchange is installed and enabled for the user (the user has a Microsoft Exchange license), and provided values are filled out for these fields on the user’s Microsoft Exchange settings in Automate.
These are fifteen additional fields that can be used for filtering from Microsoft Entra ID using model filter criteria, and to have the values available for flow through provisioning. The same fields are also available in the Microsoft Exchange settings (when installed) in Automate.
The fields allow more flexibility when filtering users to be imported and then moved and, optionally, processed with flow through provisioning in Automate.
MS Licenses
View and update the user’s Microsoft license details, including their type (Group or Direct), and their licenses.
Note
When the license type is “Group”, all license details (SKU and service plans) read-only.
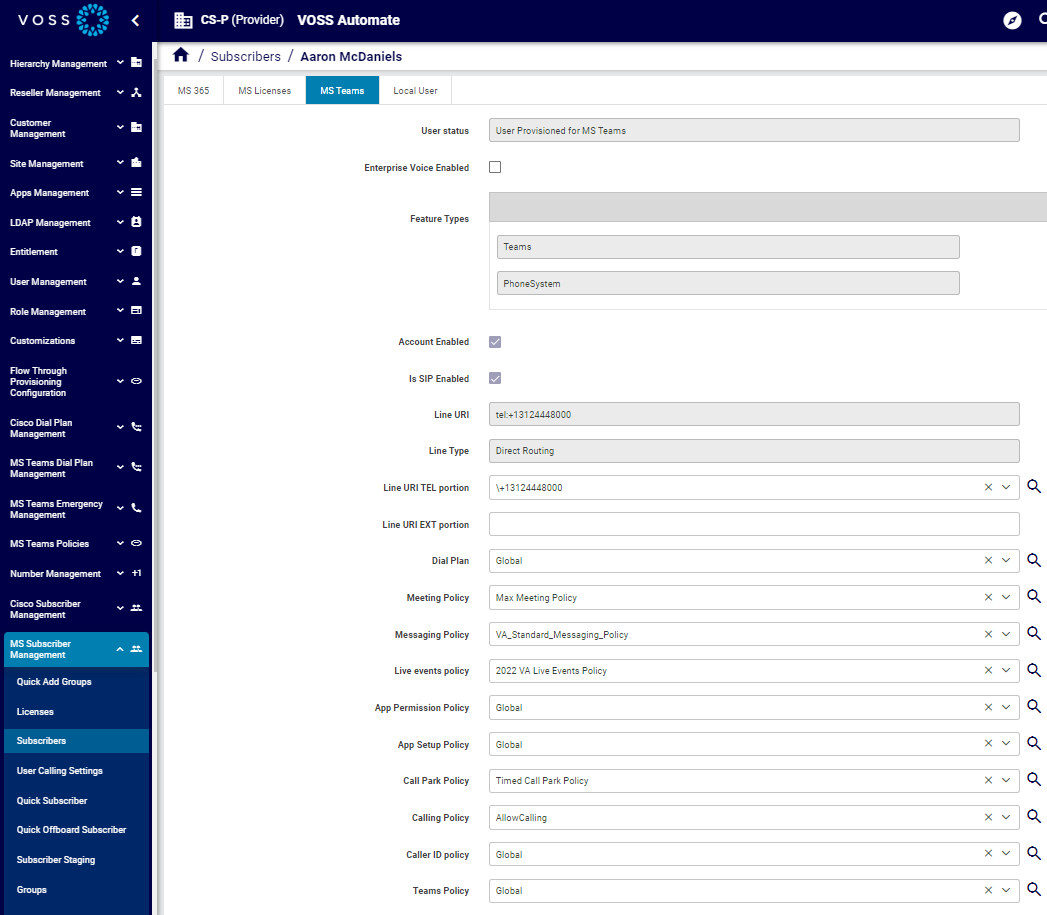
MS Teams
The Microsoft user’s MS Teams details. The fields below are read-only:
User status
Interpreted User Type
Country or Region
Feature Types
Line URI
Line Type
On this tab you can also enable or disable Enterprise Voice for this user.
You can only enable Enterprise Voice for a user that has a PhoneSystem license.
You can only assign a number to a user that has a PhoneSystem license.
Local User
The user corresponding with this user.
Save your changes.
Related Topics
Manage a user’s MS Teams policies#
This procedure displays and updates the policies of individual users via the user edit functionality:
Note
Some policies support full CRUD (create, update, delete) operations within Automate.
Note
This workflow is intended for Microsoft-only users. When choosing a hybrid user with Cisco-Microsoft services, you’ll need to work with this user via the Hybrid multi vendor actions. The Hybrid Status Message field displays the user’s hybrid status. See Hybrid Cisco-Microsoft management
Go to the Microsoft User Details page.
Click on a user to open their settings.
Select the MS Teams tab.
View currently applied policies for the user.
To choose different policies, click the down-arrow at the relevant policy, and select an alternative from the drop-down.
Save your changes. Policy changes are synced back to the Microsoft cloud when performing an overbuild or a sync.
Related topics