
Menu layouts#
Overview#
Menu layouts define the content and structure of menus in the Admin Portal, based on your user role at the hierarchy where you log in.
Automate allows an administrator (with appropriate permissions) to customize menu layouts for different user roles and hierarchy levels. For example, the menu layouts at Provider level of the hierarchy can be different to menu layouts at Customer or Site level. Customizing menu layouts for different user roles at each hierarchy allows you to hide or show resources appropriate for different roles.
Related topics
- Navigation - Menu and Dashboards
- Advanced Configuration Guide
- Fixed and configurable filters in menus
- HCS Dial Plan Macros in Automate
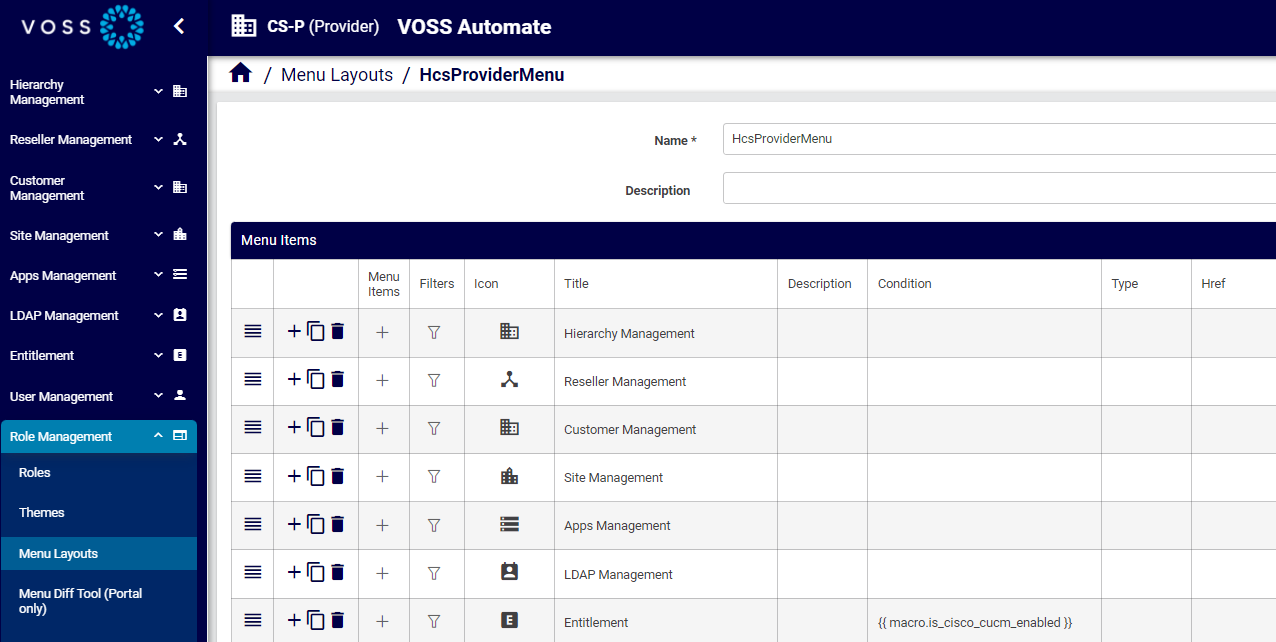
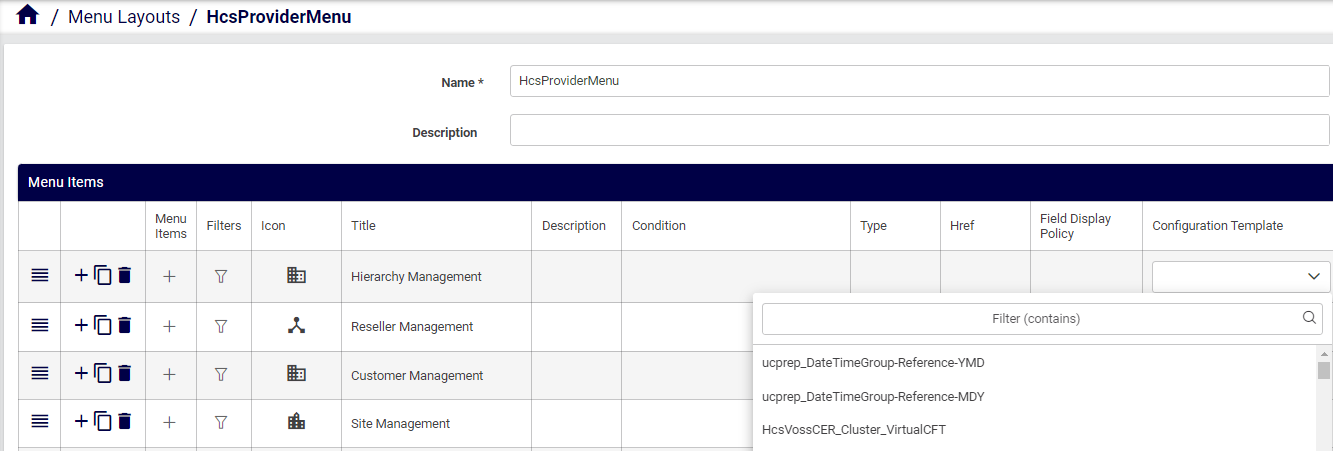
Menu layouts, FDPs, and CFTs#
When creating or editing a menu layout, you can (optionally) apply a field display policy (FDP) and configuration template (CFT) to refine the view of model entities for the user role. In this way, the FDP and CFT for a specific model is applied as part of the menu layout (in the menu structure); the FDP and CFT are attributes of the specific model entry for that menu layout. This means:
Different FDPs and CFTs for a specific model can define menu layout variations for that model.
The required FDP and CFT should be available before you create new menus.
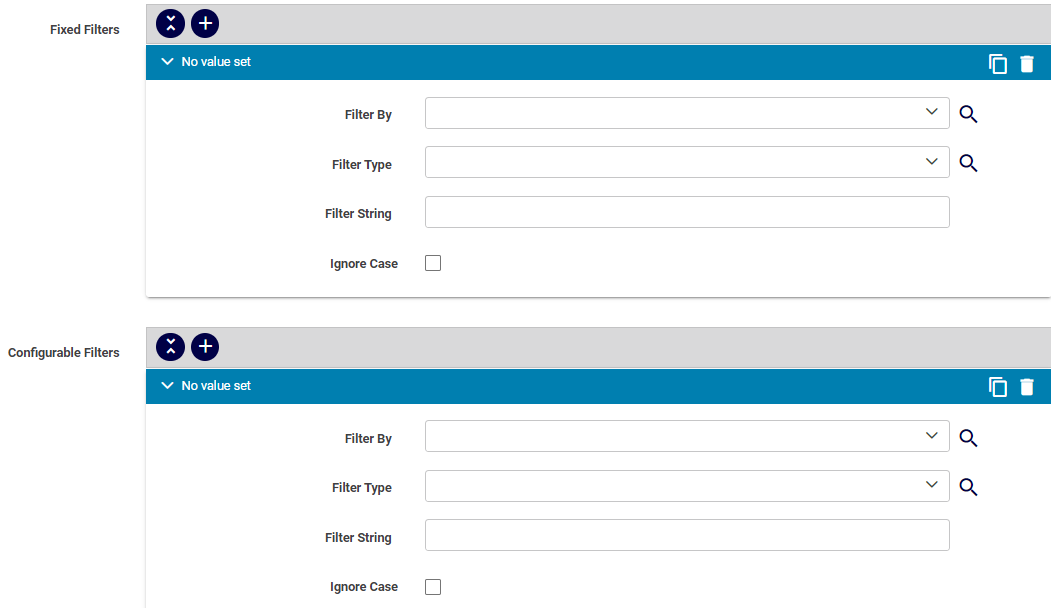
Fixed and configurable filters#
If a menu layout applies to the list view of a model, this list can be filtered by means of a number of filter options that apply to the displayed list. Only instances where the values of a model attribute that match the filter, are then shown. For details, see Fixed and Configurable Filters in Menus
Menu layouts for a Business Admin role#
Automate provides two sample menu layouts for use or further customization as a Business Administration Portal menu layout. These sample menu layouts display in the Menu Layouts list view:
MenuCustomerAdmin
MenuSiteAdmin
Administrators can clone these samples to a hierarchy, customize them as needed, and assign them to a specific user role that requires a Business Administration Portal interface.
The sample menus also use sample dashboards to complete this Business Administration Portal interface. For details on the sample dashboards, see: Introduction to Automate Dashboards.
Note
The sample menus include conditions on the inclusion of dashboards in accordance with enabled features, services, and devices as in the Global Settings. The conditions are in the form of system macros, for example:
{{ macro.is_microsoft_enabled }}
or
{{ macro.is_cisco_cucm_enabled }}
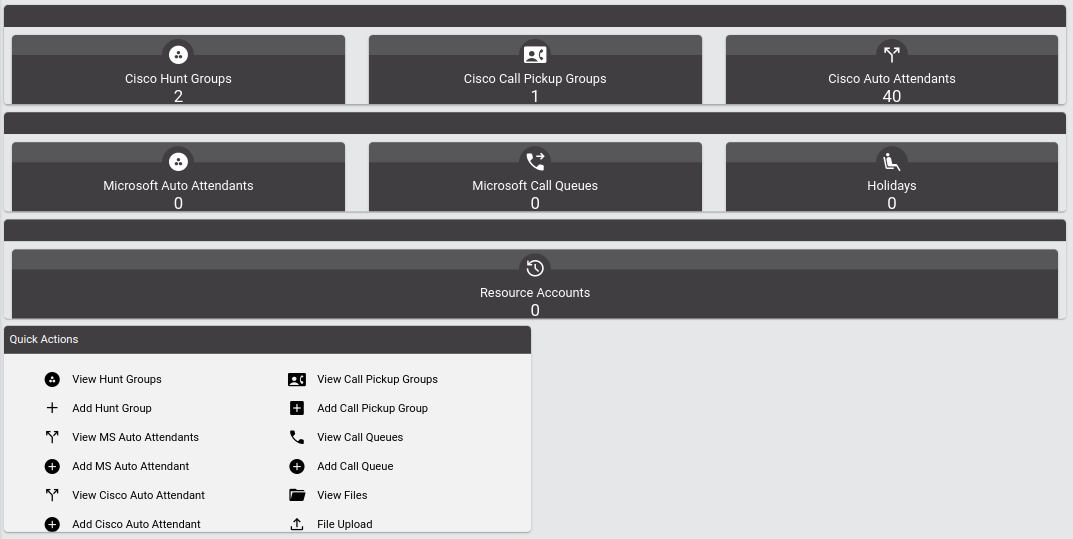
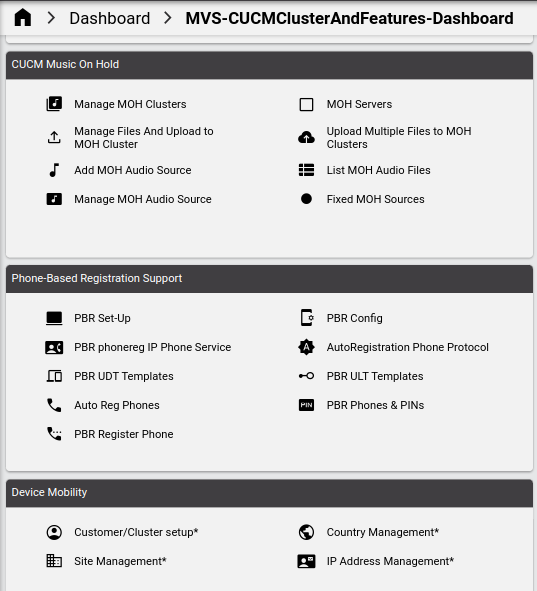
The image shows an example of a sample menu displaying the sample Call Groups dashboard:
Enhanced menu layouts and dashboards for multi vendor environments#
Automate provides two sets of menus, dashboards, and access profiles for use or cloning and further customization for multi vendors scenarios. These sets offer best-practice reference role-sets that can be used by service providers.
The set of best practice menus and dashboards is comprehensive and includes some add-on
options which are not currently included in the core solution. If you want to use a specific
option and get a permission error when trying it using the MVS- set, please reach out to
the Automate account team to discuss.
Note
Multi vendor user (mvs) dashboards and menu layouts that contain links referencing an adaptation (add-on), have an asterisk (*) postfix in the link text.
Microsoft-only deployment items contain MS-Only in the name, and menu names have the MVS prefix:
MVS-EnhancedProviderMenuMVS-OperationsCustomerMenu
These menu layouts offer a number of benefits, for example:
A compact main menu list
Menu items directing users to dashboards consisting of items that can be selected to carry out a task - grouped into cards and all visible on one page
The comprehensive set of sample dashboards is provided and used in these
menu layouts. They are identified by the dashboard name with prefix, MVS-, and suffix, -Dashboard.
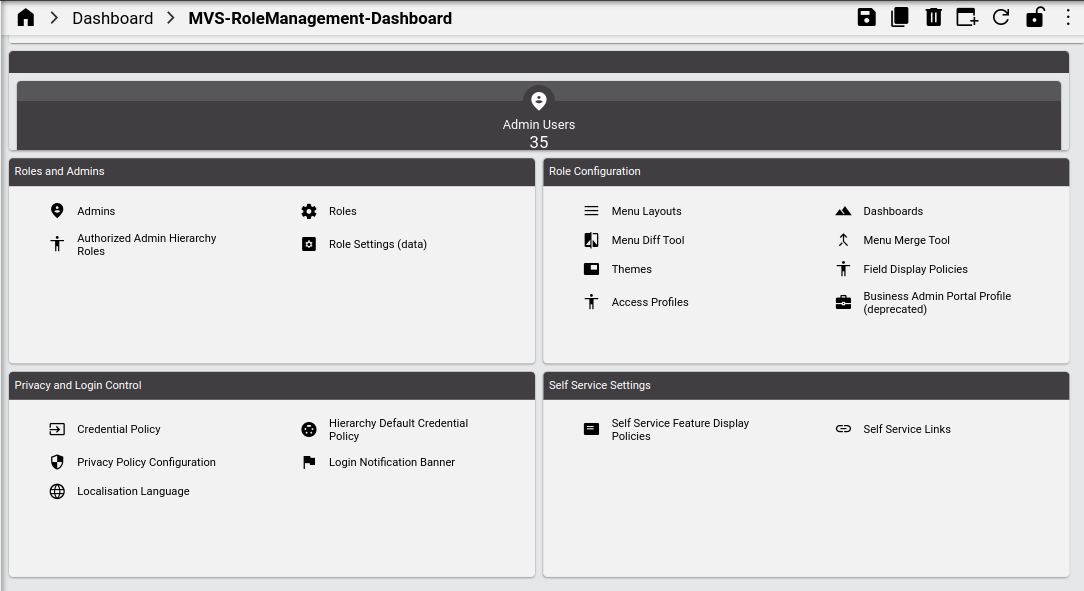
For example, the Role Management dashboard is MVS-RoleManagement-Dashboard.
Note
In release 21.4-PB3, the landing page
MVS-GroupingServices-LPhas been updated with a filter to exclude the listing of “user” Call Handlers. If this landing page is in use or previously customized, an updated customization ofMVS-GroupingServices-Dashboardis required to enable this change in release 24.1.
This also includes home dashboards:
MVS-EnhancedProviderAdmin-HomeDashboardMVS-Operations-CustomerAdmin-Home-Dashboard
These dashboards can therefore also be cloned and customized as required.
Access profiles associated with these menu layouts and dashboards can also be cloned and configured according to the customized menu layouts and dashboards. They contain the prefix:
MVS-EnhancedProviderAdminAPMVS-OperationsCustomerAdminAP
The Condition field in menu layouts and dashboard widgets can be configured for multi vendors by using the macros as conditional values - as per enabled features in Global Settings:
{{ macro.is_microsoft_enabled }}{{ macro.is_cisco_cucm_enabled }}
Sample administrator roles are provided that combine all these elements:
MVS-EnhancedProviderAdministratorMVS-EnhancedCustomerAdministrator
Add or edit a menu layout#
This procedure adds new menus and modifies existing menus. You can create a new layout for your system or update the default menu layout.
Log in to the Admin Portal as a Provider or Reseller administrator (or higher).
Choose the hierarchy for the new menu layout, for example, Customer.
Go to Menu Layouts.
Choose an option:
Create a new menu layout, based on settings in an existing menu layout
Recommended method.
Click on the menu layout you wish to copy. On the menu layout editing screen, click the toolbar Clone icon. A new record is created with pre-populated settings.
Go to the next step to edit settings for the clone to create a new, custom menu layout.
Create a new menu layout as a new record (without existing settings)
Click the toolbar Plus icon (+) to open the Menu Layouts/New Record page. Go to the next step to set up the new menu layout.
Edit an existing menu layout
Click on the menu layout you wish to edit, update its settings, then save your changes. Log out, then log in again to see your changes.
Note
You can click in a row to edit a value (either type in the field or select an option from a drop-down)
Rows with nested menu items or links contain a chevron (>) instead of a Plus icon (+) so that you can see which items have child lists.
An asterisk indicates required values.
For further details around menu configuration, see Menu layout settings.
At Menu Items, configure the main menus and sub-menus, as required
To re-order menus, click on the hamburger icon and drag items to the required position.
To add, clone, or delete rows for main menus and nested sub-menus, click the Plus icon, Clone icon, or Delete icon in the relevant row.
Note
Clicking the Delete icon in a row triggers a system message asking you to confirm that you want to remove the row. This allows you to review the change in case you clicked the Delete icon by mistake. Clicking the toolbar Save icon saves all changes to the menu layout you’re configuring.

Add, clone, or delete sub-menus (click the Plus icon in the Menu Items column to display nested sub-menus).
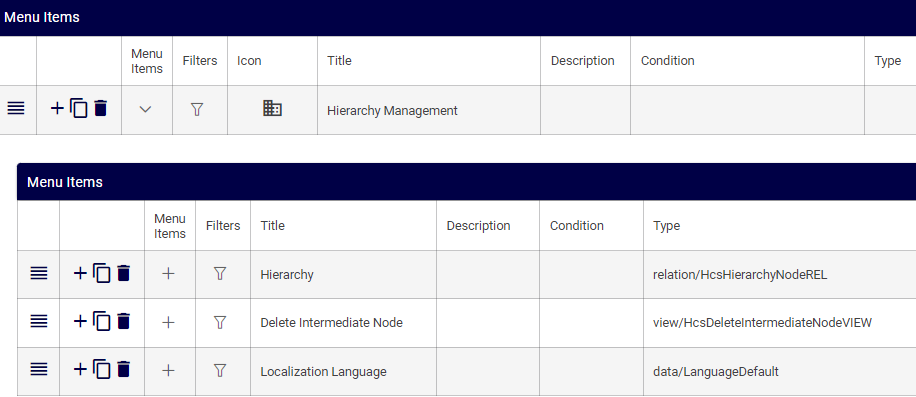
At Filters, configure fixed and configurable filters.
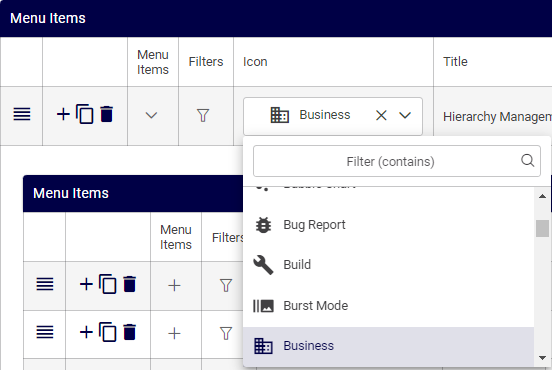
At Icon, choose a menu icon (main menus only). See: Custom icon names reference.
At Title, add or edit the menu title, and (optionally), provide a description.
At Condition (optionally), fill out a condition to define when the menu will display.
At Display As, choose an option to define how the menu or sub-menu will display. Options are: Form, List, External Link, or Dashboard.
Note
The value for Display As must be Form when the value at Model Type is
view.The value for Display As must be Dashboard if you’re choosing a dashboard.
At Type, choose the model type.
Note
When type is
view(view/ModelType), the value in the Display As column must be Form.At Href, create internal or external links.
Note
If Display As is set to External Link, the Href value should start with
http.If Display As is set to List, the internal Href value should start with
/api/.If you wish to provide a sorted list view of a model in a menu item, the Href internal href value can be entered with additional parameters to specify attribute and sort order. In this case, Display As should be selected as List, with the
directionparameter to sort.For example, if Href is:
/api/data/Countries/?order_by=iso_country_code;direction=desc
the list view from the menu item of
data/Countrieswill be sorted in descending order, byiso_country_code:ZIM, ZAF, VNM, USA, UKR,...and so on.
At Field Display Policy, choose a field display policy, if required.
At Configuration Template, choose a configuration template, if required.
Select Set as default Model Type to define that when a user navigates to a form for that model from a location where any of the FDP, CFT, and title is not available, then the form will contain these elements configured as the default.
Note
If no default is set, or multiple defaults are set for FDP and CFT selection, the selection is random. Multiple defaults will also yield an error message in the browser console if the Browser Console Log Level is set to Debug (see: Guide to the Admin Portal user interface) The format of the message is:
Multiple defaults configured for ... <model-type>
It is therefore advisable to explicitly set the default and ensure that only one default is set.
At Dashboard, you can instead choose an existing dashboard to associate with the menu item.
Note
You can choose a dashboard for a main menu, sub-menu, or sub-sub-menu.
When setting a dashboard, the value in the Display As column must be Dashboard.
Click Save. Updated or new menu layouts are saved.
Assign the menu layout to the appropriate roles.
Custom icon names reference#
This reference refers to the icons associated with the Icon name drop-downs in the interface.
For details, see: https://fonts.google.com/icons
To associate the icon of the in the drop-down, inspect the icon titles on the website, remove the title hyphens and capitalize the first letter of each word.
Related Topics