Configure flow through provisioning#
Overview#
Automate’s flow through provisioning feature allows auto-provisioning of users and services during user sync from devices.
Note
Automate v21.4-PB4 introduced sync with flow through provisioning for Cisco Webex.
Automate v21.2 introduced sync with flow through provisioning for Microsoft.
Automate v21.3 extends this functionality to several additional scenarios, including LDAP top down and LDAP/CUCM bottom up. While the legacy sync, move, and provisioning functionality remains available for compatibility purposes, the enhanced functionality introduced in this version is recommended.
Only Add is supported for syncs with flow through provisioning.
This topic describes the steps for setting up your system to enable a seamless sync in of users to Automate from the hierarchy where the sync source device is set up (typically, Customer level), and the flow through provisioning of services to users at your sites.
To move users to sites, the flow through provisioning references move filter criteria, and attributes set up as Model Filter Criteria (such as a user’s department, division or city address).
Note
The flow through provisioning uses the move filter criteria in the site defaults (SDD) to determine whether to move users to site. FTP will not run if the user is not moved to the site.
To create a user and provision resources and services, the flow through provisioning references user profiles. See User profiles.
Note
Flow through provisioning (FTP) uses user profiles for provisioning, so you will need a user profile and Quick Add Group (QAG) with device configuration templates (CFTs) set up before using FTP.
Each flow through provisioning criteria (one per customer) consists of one or more pairs of model filter criteria and a user profile combinations.
Related Topics
Flow through provisioning workflow#
Before you start: Add a server as sync source#
Users are imported from the server sync source to the Customer level in Automate. The flow through provisioning is generic functionality and supports a number of scenarios, including Microsoft, LDAP, CUCM, Cisco Webex and other models (depending on predefined model criteria).
Note
See the Core Feature Guide for details around adding and setting up a server for your flow through provisioning scenario. For example, see Microsoft Quick Start Guide for Automate, LDAP Server, Cisco UCM servers
Step 1: Add model filter criteria#
Flow through provisioning references model filter criteria set up for each user type (for example, Microsoft, LDAP, or CUCM).
When setting up the Model Filter Criteria, you will specify usage, either flow through provisioning, or move user:
To move a user to the site on import, configure model filter criteria with Move User selected as the value for the Usage field.
To provision a user once they’re at the site, configure model filter criteria with Flow Through Provisioning selected as the value for the Usage field.
Note
The flow through provisioning process runs only if the user is at the site.

Related topics
Step 2: Add user profiles#
Flow through provisioning uses the user profile to determine the services to be assigned to a user once they’re moved to the site.
Related topics
Step 3: Add flow through provisioning criteria#
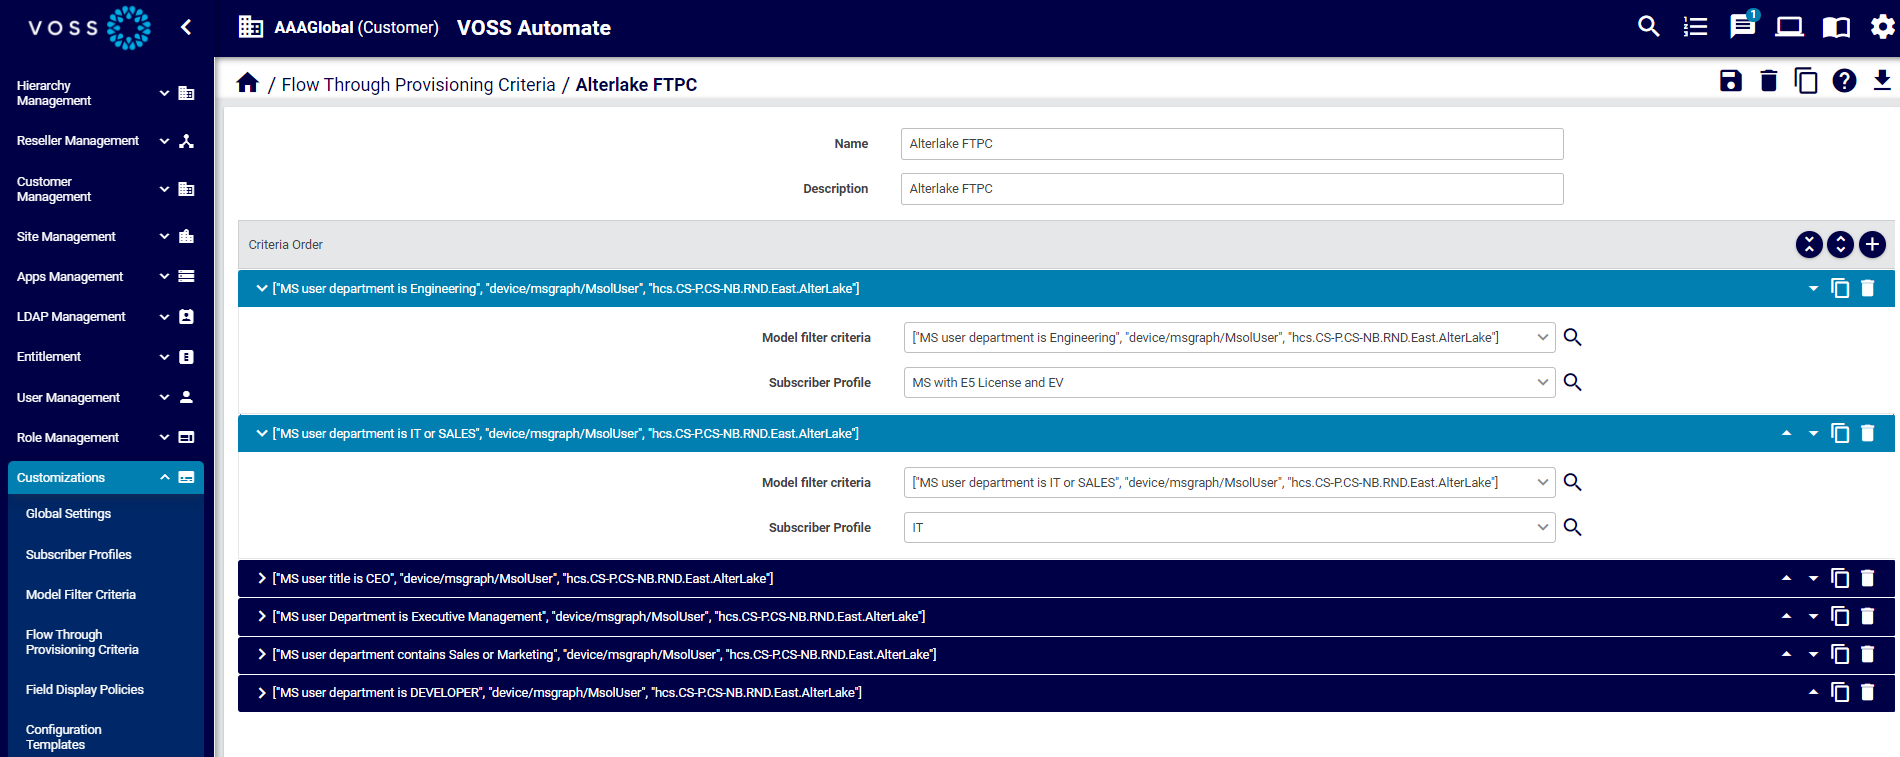
Flow through provisioning criteria is a type of model filter criteria used for provisioning. One named flow through provisioning criteria can be added at each Customer level.
Each flow through provisioning criteria is a collection of one or more pairs of model filter criteria and user profile combinations. The flow through provisioning criteria defines how users are matched to both sites and user profiles, allowing the tool to seamlessly move users to the sites (based on model filter criteria) and to create a user and assign services from the user profile.
Flow through provisioning uses the first match to execute the move and service assignment operation.
You can use a single flow through provisioning criteria to match any number of user profiles for this customer and its sites. For example, if you have ten different user profiles, you can add ten pairs of model filter criteria and user profile combinations.
Note
Flow through provisioning criteria is configured via the Flow Through Provisioning Criteria page.
Before setting up flow through provisioning criteria, configure the following:
Server sync source
Step 4: Choose move criteria#
To allow users to be moved in a flow through provisioning, you need to choose move filter criteria for the user type (Microsoft, LDAP, and/or CUCM). Move filter criteria defines how the system moves users to the correct site once they’re synced in; that is, it matches each user to the relevant site.
Note
The system uses the existence of the move filter criteria from the site defaults to determine if the user must be moved. Flow through provisioning will not work if a user is not moved to a site.
Prerequisites:
Server sync source
Model Filter Criteria (set Usage field to Move User)
Flow Through Provisioning Criteria
To choose move criteria …
Select the relevant site hierarchy.
Go to the Defaults page.
On the Move Filter Criteria tab, choose the criteria for the user types you’re importing (Microsoft, LDAP, and/or CUCM).
Save your changes.
Step 5: Enable flow through provisioning#
Enabling your system for flow through provisioning in the Global Settings allows Automate to perform a seamless sync in, to move users to the correct site (based on move filter criteria and model filter criteria), and to provision these users with appropriate services (based on the user profile).
Prerequisites:
Server sync source
Flow through provisioning criteria
Move criteria selected
To enable flow through provisioning …
Log in to the Admin Portal as Provider admin or higher.
Set the hierarchy to the level where the sync source device is installed. Typically, this is at the customer.
Go to Global Settings, then select the Flow Through Provisioning tab.
At Enable Move & Flow Through Provisioning, select Yes.
At Enable Move & Provisioning after Add Sync, select Yes.
At Flow Through Provisioning Criteria, choose the flow through provisioning criteria to use at the customer level (for all sites at the customer).
Save your changes.

Step 6: Sync with flow through provisioning#
This section describes the general workflow in a generic sync with flow through provisioning.
You can run the sync directly, or via a schedule.
Ensure you have the following set up before a sync:
Server sync source
Flow through provisioning criteria
Move criteria selected
Sync with flow through provisioning workflow steps
The flow through provisioning workflow is executed per user and runs in parallel:
Imports user.
Creates a corresponding LDAP user (for LDAP scenario), and a local VOSS user.
Moves users to the sites (based on model filter criteria). If no criteria in place, user remains at Customer level.
Updates the user’s role for the site.
Executes Add User from Profile to create the user, and checks the flow through provisioning criteria to match it to a user profile.
Provisions the users with appropriate services, from the user profile.
Sends a welcome email to users if the following applies:
The global setting to allow an email message to be sent to a user is enabled. See the Email Tab topic at Global settings.
An SNMP server has bee set up. See Add a SMTP Server.
The user has an email address.
See also Email HTML templates.
You can monitor the progress of the transaction via the Transaction Log. When complete, verify the user’s move and provisioning status:
Go to the Users list view and verify that synced in users are at the correct sites.
On the Users list view, check that users exist at the sites, with relevant services.