Single Number Reach#
Overview#
Single number reach (SNR) is the remote destination number configured for a subscriber.
Note
While you can add one or more Remote Destination Profiles (RDP) to a subscriber, only one RDP may be added to a subscriber’s SNR service.
View and Manage Single Number Reach#
This procedure displays, moves, exports, and updates existing single number reach (SNR) remote destination profiles (RDPs), and adds new RDPs for SNR. For example, you can configure ring schedules, choose a mobility profile and a single number reach voicemail policy, or set up answer too soon / answer too late timers.
Pre-requisites:
The subscriber must have been assigned a remote destination profile (RDP) and an entitlement profile that allows SNR.
To view, add, or update a subscriber’s SNR:
In the VOSS Automate Admin Portal, go to (default menu) Subscriber Management > Single Number Reach to open the Single Number Reach list view.
Note
You can also view a multi vendor subscriber’s SNR details (line and mobile number) via (default menus) User Management > User Services > Multi Vendor Subscribers, then click the Edit icon (wrench) to update their SNR settings, or click the Delete icon to remove their SNR. See Multi Vendor Subscribers.

View existing single number reach (SNR) profiles.
Choose an option:
Delete - to delete one or more single number reach (SNR) instances, select the relevant SNR instances, then click Delete.
Move - to move one or more single number reach (SNR) instances, select the relevant SNR instances, then click Move. Choose the target hierarchy.
Export - to export one or more single number reach (SNR) instances, select the relevant SNR instances, then click Export.
Edit - to edit a single number reach (SNR) instance, click on the relevant instance to open its configuration page. Update the instance, then click Save.
Add - to add a single number reach (SNR) instance, click the Plus icon (+) to add a new record, then fill out configuration details, and click Save.

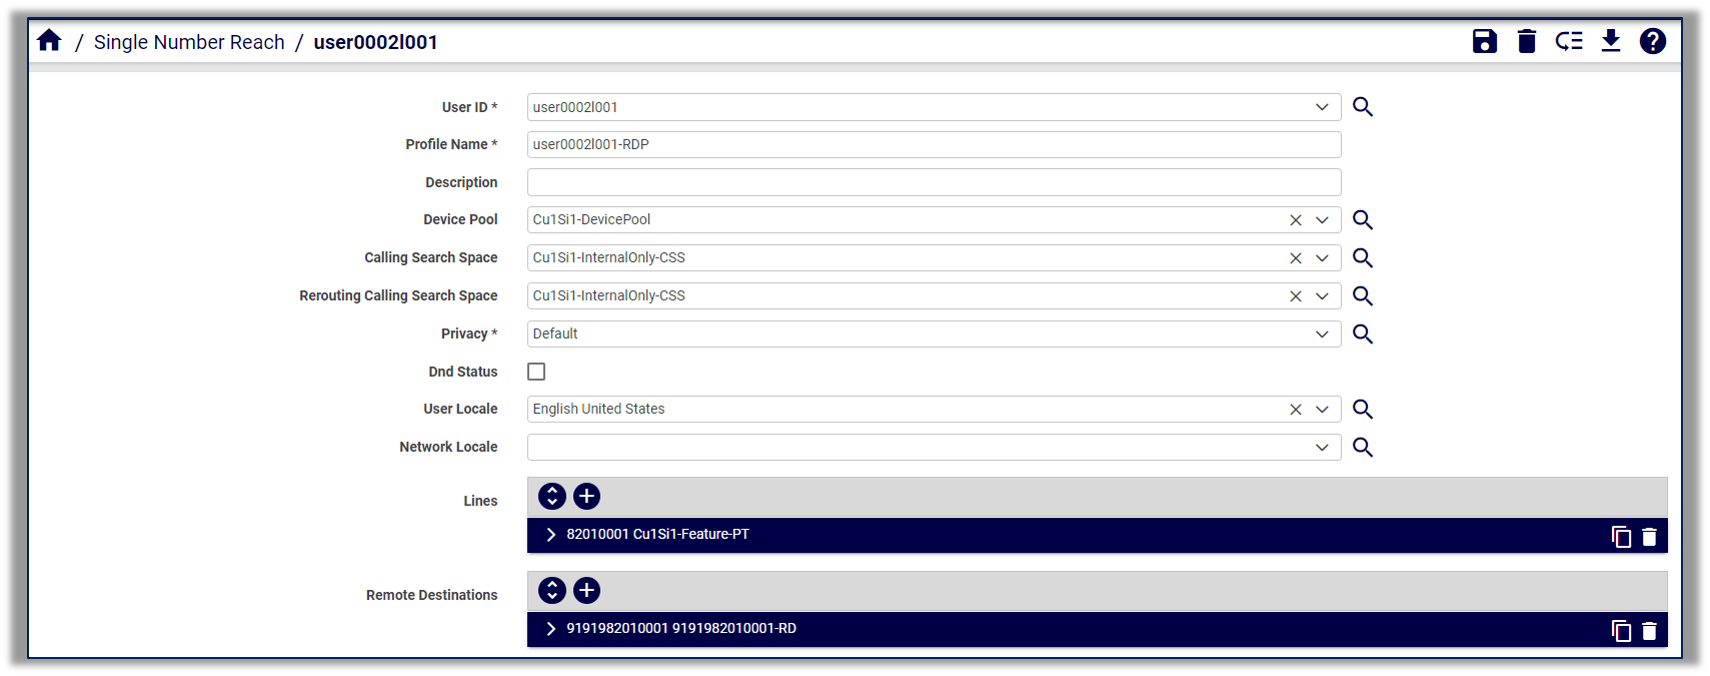
Mandatory. Choose a user ID where you want to assign the SNR profile.
Note
The subscriber must have Enable Mobility enabled. You can verify via, default menus, Subscriber Management > Subscribers, click on the subscriber, and select the User tab.
Mandatory. At Profile Name, fill out a remote destination profile (RDP) name, which must be their user name, followed by "-RDP". For example: jsmith-RDP.
Note
You can use a maximum of 50 characters in the RDP name. Valid characters include letters, numbers, dashes, dots (periods), spaces, and underscores.
Optional. Fill out a description for the RDP name.
Optional. Choose the relevant device pool.
Note
The device pool defines sets of common characteristics for devices, such as region, date/time group, softkey template, and MLPP information.
Optional, if relevant to your scenario. At Calling Search Space, choose the Calling Search Space (CSS) to be used for routing mobile voice access or enterprise feature access calls.
Note
Calling Search Space (CSS) is relevant here only when you’re routing calls from the remote destination, which specifies the outbound call leg to the dialed number for Mobile Voice Access and Enterprise Feature Access calls.
Optional, if relevant to your scenario. At Rerouting Calling Search Space, choose a calling search space to be used to route Cisco Unified Mobility calls.
Note
Ensure that the gateway configured for routing mobile calls is assigned to the partition that belongs to the Rerouting Calling Search Space.
Cisco Unified Communications Manager (CUCM) determines how to route calls based on the remote destination number and the Rerouting Calling Search Space.
The Rerouting Calling Search Space setting applies only when you are routing calls to the remote destination or mobility identity, which specifies the outbound call leg toward the remote destination or mobility identity when a call comes in to the user enterprise number. Cisco Unified Mobility calls do not get routed to the dual-mode mobility identity number that corresponds to the dual-mode mobile phone number if the device associates with the enterprise WLAN and registers with CUCM.
Cisco Unified Mobility calls get routed to the dual-mode mobility identity number only when the device is outside the enterprise.
Mandatory. At Privacy, select the relevant privacy option for the RDP. Options are Off, On, Default.
Note
When selecting Default (the default value), the setting matches the value of the Privacy Setting service parameter. If you change and save the value for Privacy, you must return to the Remote Destination Profile Configuration window for a remote destination profile that specifies Default and save your changes.
You can’t transfer a call from a cell phone to a desk phone if the value for Privacy is On, and “Enforce Privacy Setting on Held Calls” is True.
Select Dnd Status to enable Do not disturb on the phone, else, leave this checkbox clear.
At User Locale, choose the locale associated with the phone user interface.
Note
User locale defines phone details that supports users, such as language and font, on phone models that support localization. When selecting a locale other than English, ensure the locale installer is installed. Refer to the Cisco Unified Communications Manager documentation for locale installation.
At Network Locale, choose the location of the network.
At Lines, click the Plus icon (+) to add lines (one or more).

Note
Lines you add are listed by their unique ID.
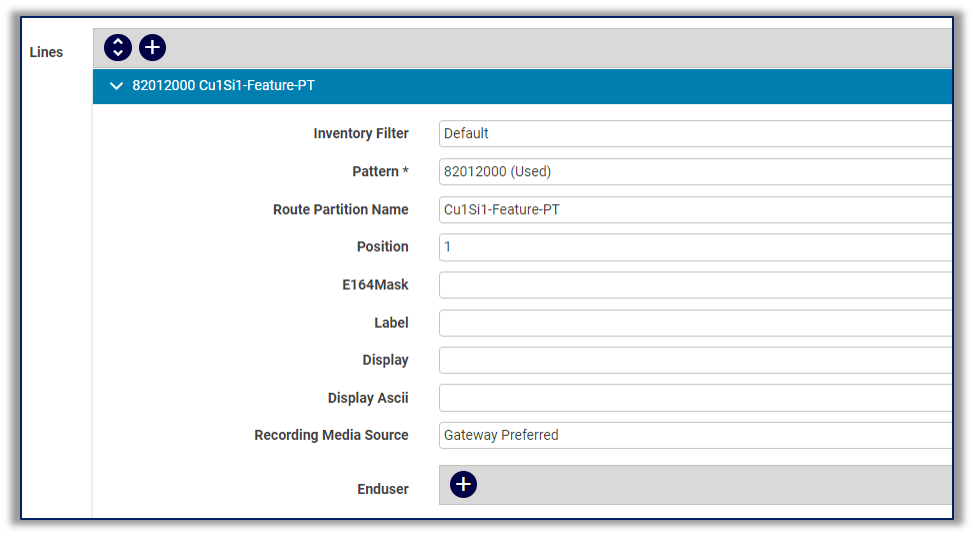
The table describes the line configuration settings:
Inventory filter
Options are:
Default (default)
Show Unused Numbers (Site Only)
Show Unused Numbers
Show Unused Numbers with Associated E164’s ((Site Only)
Show Unused Numbers with Associated E164’s
Show Used Numbers (Site Only)
Show Used Numbers
Show Numbers belonging to this Subscriber (See Reserve Numbers for a User)
Pattern
Mandatory.
Route partition name
Mandatory.
Position
Integer.
E164 Mask
String.
Label
String.
Display
String.
Display Ascii
String.
Recording media source
Options are:
Gateway Preferred (default)
Phone Preferre
Enduser
Add associated end users, one or more, and select their user ID.
At Remote Destinations, click the Plus icon (+) to add remote destinations (one or more) associated with the profile.

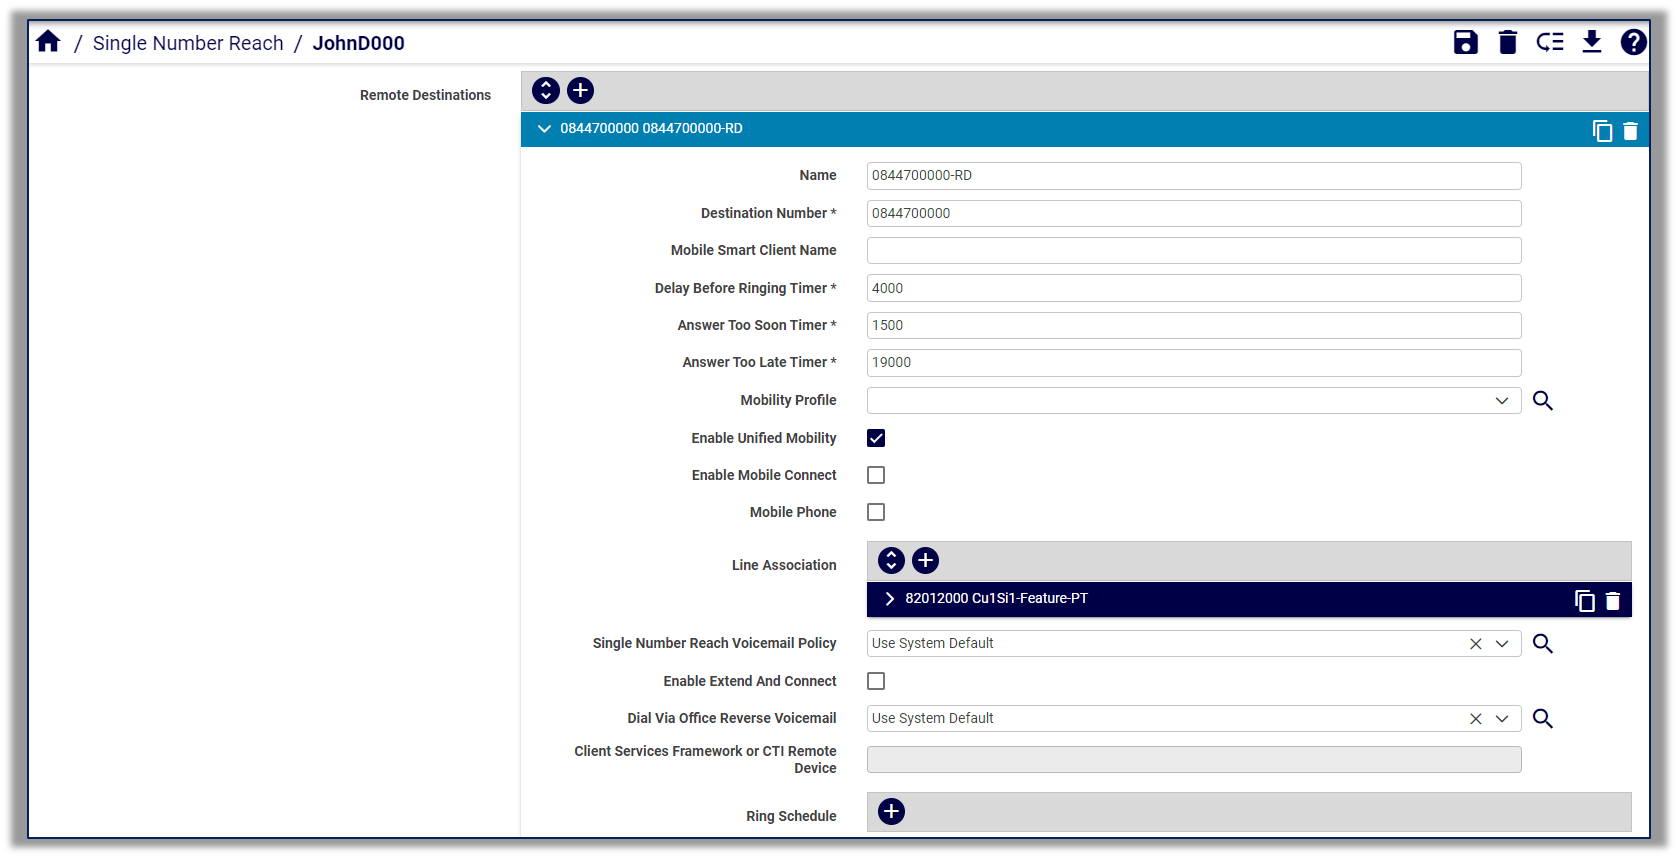
The table describes the remote destination settings:
Setting
Description
Name
Fill out a name to identify the remote destination or mobile identity.
Destination Number
Mandatory. The PSTN telephone number for the destination, including the area code.
Mobile Smart Client Name
Not relevant for dualmode phones.
Delay Before Ringing Timer
Mandatory. Default is 4,000 milliseconds.
Enter the time that elapses before the mobile phone rings when a call is extended to the remote destination.
Range: 0 - 30,000 milliseconds.
Note that when using a hunt group, lines ring only for a short period of time. You may need to manipulate the Delay Before Ringing Timer setting and make it zero to allow a remote destination call to be established, ring, and answer, before the hunt list timer expires and pulls the call back.
Answer Too Soon Timer
Mandatory. Default is 1,500 milliseconds.
Enter the minimum time, in milliseconds, that CUCM requires the mobile phone to ring before answering the call.
This setting accounts for situations where the mobile phone is switched off or is not reachable, in which case the network may immediately divert the call to the mobile phone voice mail. If the mobile phone is answered before this timer expires, Cisco Unified Communications Manager pulls the call back.
Range: 0 - 10,000 milliseconds Default: Default: 1500
Setting
Description
Answer Too Late Timer
Mandatory. Default is 19,000 milliseconds
Enter the maximum time, in milliseconds, that Cisco Unified Communications Manager allows for the mobile phone to answer.
Range: 0 and 10,000 - 300,000 milliseconds
If the value is set to zero, the timer is not started.
Mobility Profile
The mobility profile you want to use for this remote destination.
Enable Unified Mobility
Enable Mobile Connect
Defines whether to allow an incoming call to ring your desk phone and remote destination at the same time. Default is Tru
Mobile Phone
Defines whether to have calls that the desk phone answers to be sent to a mobile phone as the remote destination. Set to True to ensure that, if Send Call to Mobile Phone is specified (by using the Mobility softkey for remote destination pickup), the call is extended to this remote destination.
Not relevant for dual-mode phones that are running SIP nor to dual-mode phones that are running SCCP, such as the Nokia S
Line Association
The line association for this remote destination. The line to be associated must already be added to the remote destination profile. All directory numbers specified must already exist in the databa For each line you add, choose the Pattern (a directory number, which is already associated to RDP), Route Partition Name.
Single Number Reach Voicemail Policy
Choose a policy to define how mobile device users answer calls that terminate on a remote destination (RD). Users have a voice mail box for their mobility if the RD call reaches an external voice mail system. Options are:
Use System Default (default)
Timer Control
User Control Note
User Control works only when Enable Enterprise Feature Access is set to True.
Enable Extend and Connect
Disable if you wish to delete Extend and Connect
Dial Via Office Reverse Voicemail
Define how dual mode device users answer Dial-via-Office Reverse (DVO-R) calls that terminate on the Mobile Identity (MI). Allows users with a single voicemail box for their mobility, if the RD call reaches an external voice mail system. Options are:
Use System Default (default)
Timer Control
User Control
Client Services Framework or CTI Remote Device
ctiRemoteDeviceName tag will be used to associate either CTI Remote Device or a Cisco Spark Remote Device with a Remote Destination.
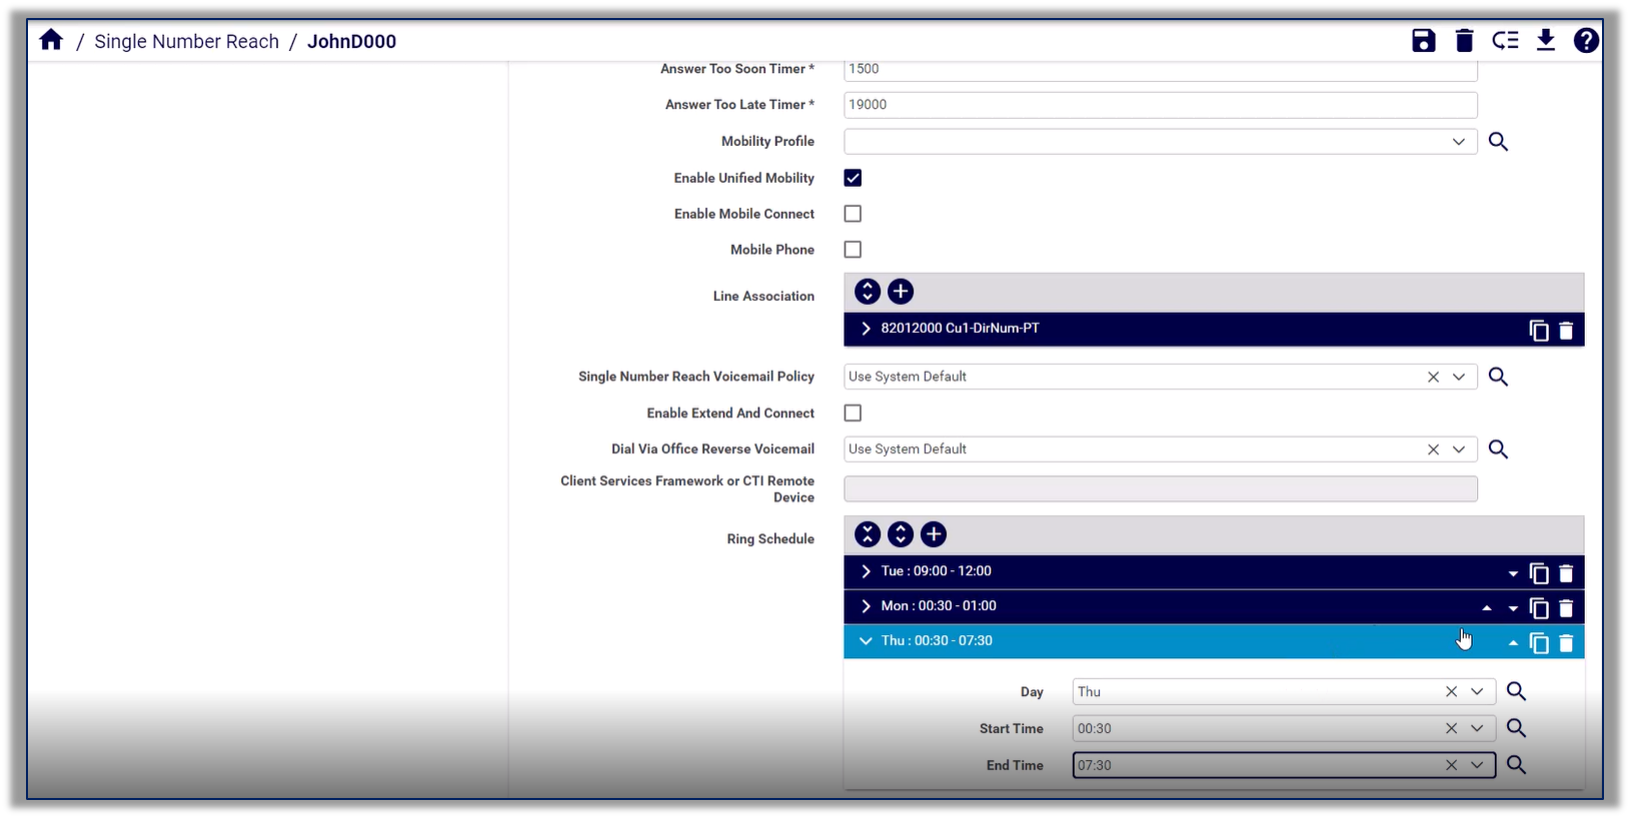
Ring Schedule
Manage ring schedules (maximum of 7 members in the schedule) for single number reach, to define working days and hours, for one or more days of the wee These fields display only when the CUCM server version is v11.5 and up Only ring schedules added via the Admin Portal can be managed in the Admin Portal. Ring schedules added via Self-service can only be managed in Self-service.

