Quick Offboard Subscriber#
Overview#
Quick offboard subscriber (QOS) offboards a Microsoft subscriber, and moves the subscriber from the site back to the tenant level in the hierarchy, typically, customer.
This feature provides a simple way to choose a user and to complete the offboard process.
Note
When offboarding and moving a user from the site back to the tenant level in the hierarchy (typically, customer), if that user had a Self-service role at the site, their Self-service role is retained when they move to the customer level and this Self-service role is retained if you later move that user to another site.
When running the Quick Offboard tool for Microsoft you can choose from a filtered list of Quick Add Groups (QAGs) flagged for offboarding. These designated QAGs contain configuration templates (CFTs) that define how the subscriber should be offboarded and de-provisioned. For example, via the CFTs in the QAG you can choose to:
Leave the usage location and licenses in place
Remove licenses (system default behavior)
Remove licenses via removal of groups
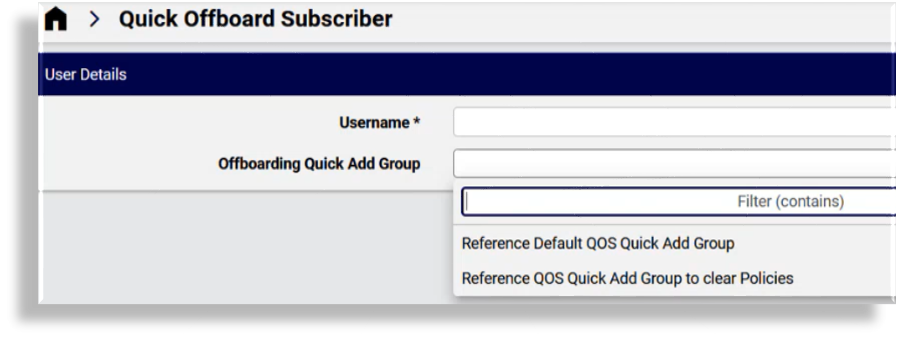
Automate ships with default offboard QAGs. You can use the defaults or clone and customize a QAG to use for offboarding via Quick Add (Subscriber) Groups. Quick Add Groups flagged for Microsoft offboarding display in the Offboarding Quick Add Group drop-down. For details around setting up offboard scenarios, see Offboarding.

Note
A MSOL configuration template (CFT) removes licenses. A CSOL CFT only removes voice services
(disables enterprise voice and removes the line). The CSOL CFT clears or changes values and
should contain fn.unset for any fields that need to be cleared, such as LineURI and
enterpriseVoiceEnabled. See the System Microsoft Teams Online User Template Un License User
CFT for an example of the minimum configuration required.
For customers using VOSS Automate for license management and assigning license directly to users, the default behavior for Quick Offboard Subscriber is to remove all licenses from the user.
If you want licenses to remain unchanged when running Quick Offboard,
the default ProviderAdmin` role (or any cloned role with similar access) will need to
clone the MicrosoftSubscriberMsolUser_Update CFT to the customer hierarchy, and without
making any changes to this CFT, just click Save.
Related Topics
Setting up a Configuration Template for MS Offboard Subscriber#
The configuration template (CFT) to be included in a Quick Add Group flagged to be used in offboarding may be customized via referenced variables to define how a subscriber should be offboarded and de-provisioned.
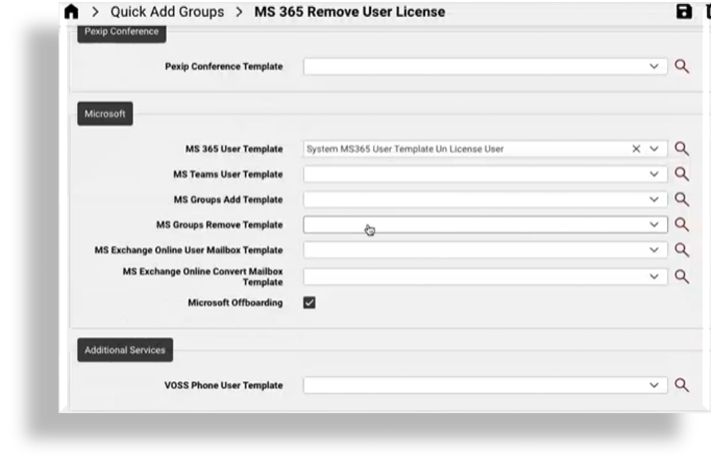
In the Quick Add Group, you choose the CFT to use and select the offboarding checkbox. The CFT is customized to run the offboarding workflow. When running Microsoft offboard you can choose a Quick Add Group flagged for offboarding, and the CFT referenced in this Quick Add Group runs the offboarding workflow.
If you don’t select an offboarding Quick Add Group, the system default offboarding behavior applies.
Offboard a Microsoft Subscriber#
This procedure is for Microsoft-only users.
Note
When choosing a hybrid user with Cisco-Microsoft services, you’ll need to work with this user via the Hybrid multi vendor actions. The Hybrid Status Message field displays the user’s hybrid status. See Hybrid Cisco-Microsoft Management
To offboard a Microsoft subscriber:
Log in to the Admin Portal.
Go to Quick Offboard Subscriber.
Choose the relevant site or customer.
At Username, select the subscriber you wish to offboard.
Optionally, at Offboarding Quick Add Group, select a predefined Quick Add Group that defines how the user is to be offboarded and de-provisioned, or leave the field blank to apply the system default behavior.
Note
Quick Add Groups used for offboarding display a checkbox called Microsoft Offboarding (by default, False). Quick Add Groups with the offboarding flag enabled (selected, and thus set to True) display in a filtered list in the Offboarding Quick Add Group drop-down on the Quick Offboard Subscriber form.

If you wish to customize how and whether licenses, and/or lines, and/or or services are removed when offboarding, you can set up this behavior in a custom configuration template (CFT), and associate it to a Quick Add Group used for offboarding to define how users are to be offboarded and de-provisioned.
If you don’t see the Offboarding Quick Add Group drop-down on this form, it’s hidden via the field display policy (FDP), which means that the system default behavior applies when offboarding users.
The system default for offboarding is to remove the user’s licenses and services.
Regardless of the options you set up to offboard a user, or whether you use the system default behavior, an offboarded user is always moved from the site back to the tenant level in the hierarchy (typically, customer level).
Click Save.
Verify that the user is de-provisioned and offboarded as defined via the configuration template in the Quick Add Group you chose, either a customized offboarding Quick Add Group, or the system default behavior.
For the system default behavior:
Note
The system default for offboarding is to remove the user’s licenses and services. An offboarded user is always moved from the site back to the tenant level in the hierarchy (typically, customer level).
Go to Subscribers, and confirm that the value in the Is Licensed column of the list view is false.
Click on the subscriber to open their management page, and verify that they have no services assigned (for example, their MS Teams user status should be User not provisioned for MS Teams).
Confirm that the user is now at the tenant level (typically, customer).
Note
When moving a user from the site to the customer level, if that user had a Self-service role at the site, their Self-service role is retained when they move to the customer level and this role is retained if you later move that user to another site.
Important
The offboard transaction requires a sync with the Microsoft Cloud and relies on waiting for incoming new data from Microsoft. For this reason, you may expect some delay (between 30 and 60 seconds), before the user’s new status (unlicensed and/or services removed) displays in Automate. For example, the user may still appear as licensed in Automate, and values such as PhoneSystem may still display as an assigned service in the Automate cache, even though the user is unlicensed and services are removed.
Custom Fields on Quick Offboard Subscriber#
The Quick Offboard Subscriber form allows for the exposure of up to ten custom string fields and up to 10 custom boolean fields to the field display policy you apply to the Quick Offboard Subscriber form (view/MicrosoftSubscriberQos).
Values are:
Custom String 1 (
customString1) to Custom String 10 (customString10)Custom Boolean 1 (
customBoolean1) to Custom Boolean 10 (customBoolean10)
This provides flexibility to add additional details for a subscriber, if required to set specific values that for can example trigger workflows during off-boarding.
Expose Custom Fields on Quick Offboard Subscriber#
This procedure exposes custom fields for view/MicrosoftSubscriberQos.
Log in to VOSS Automate as Provider admin or higher.
Create or update the Customers data model field display policy:
Use the Action Search to go to Field Display Policies, and locate the entry for target model type view/MicrosoftSubscriberQos.
Click on the default field display policy (FDP) for the model (the FDP named default).
Clone (copy) the default FDP for the model, and give the clone a new name.
Note
You can’t modify default FDPs that ship with the system. This allows you to refer to or revert to a system default at any time, if required.
Modify the new FDP (the clone).
Note
You can add a new group of fields containing only the new custom fields, or add fields to existing field groups.
Save your changes.
Update the dashboard (Automate Dashboards) or menu layout (Menu Layouts) to apply the field display policy, and save your changes.
Log out, then log in again as Provider admin.
Role-based access profile changes refresh so that you can view the updated menu layouts and field display policies you applied, including new custom fields.
