
DS9 Configuration
Overview
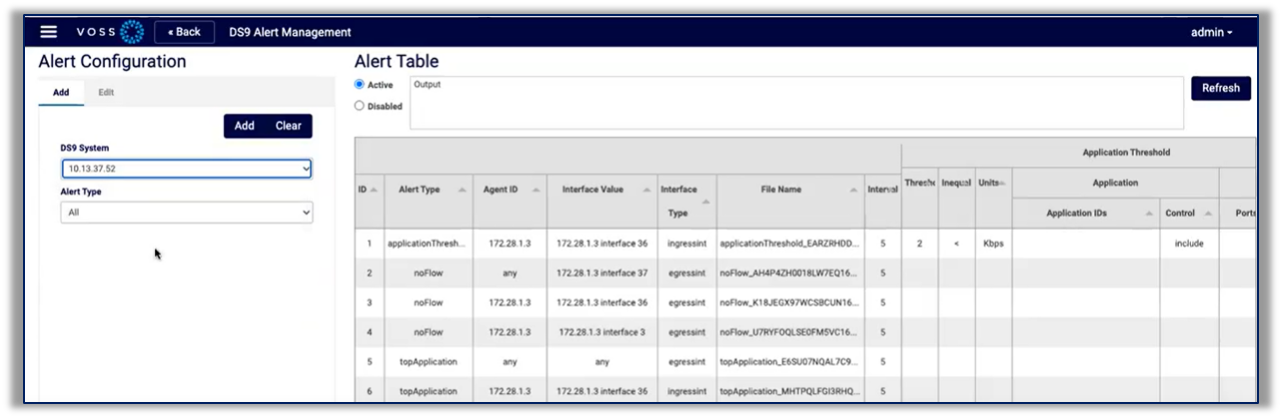
The DS9 Alert Management page allows you to view, edit, disable, or delete existing alerts for DS9, and to add new alerts for DS9.
Note
To access this page, log in to the dashboard as admin user, and from the admin menu, select DS9 Configuration.
Alert types
DS9 ships with three standard alert types:
Alert type |
Description |
|---|---|
Application Threshold |
This alert notifies you that a NetFlow-reporting node reports traffic for an application over or under a certain threshold. After you create an alert for the application and the threshold for a particular node, the alert is triggered when the traffic exceeds the threshold. The alert can be created across multiple applications. This means that the alert will be triggered when the combined threshold of all selected applications is reached. |
Top Application |
This alert notifies you whether an application is present in Top XX Applications lists. After you create an alert for a specific application for a node or interface, the alert is triggered when the application is missing in the Top XX Applications resources. |
No Flow |
The flow is no longer being received. This alert notifies you that a device (node or interface) is not sending data over a defined time period. |
View alerts
Log in to the Dashboard as admin user.
From the admin menu, select DS9 Configuration to open the DS9 Alert Management page.
On the DS9 Alert Management page, select a DS9 system to view alerts for this system in the table in the Alert Table panel.
Note
You can choose to view details for all alert types or choose one. In the Alert Table panel, you can choose to view active or disabled alerts. Click the Refresh button to update alert configuration details in the table.
Add an alert
This procedure creates a DS9 alert.
Log in to the Dashboard as admin user.
From the admin menu, select DS9 Configuration to open the DS9 Alert Management page.
On the DS9 Alert Management page, click Add.
At DS9 System, choose a DS9 system from the list.
Note
The list is populated based on DS9 data sources. Once you choose a DS9, the system runs a query and populates the table in the Alert Table panel, displaying the details of any active / disabled alerts already configured for the DS9 you choose (active or disabled, depending on whether you select the Active or Disabled radio button).
At Alert Type, choose the alert type you want to add. Options are: No Flow, Top Application, Application Threshold
Configure the alert:
Choose the agent ID (the address for the alert) (relevant for all alert types).
Note
The option you choose at Agents populates the Interfaces drop-down.
Choose interface type (relevant for all alert types).
Choose interfaces (relevant for all alert types).
Note
The list is dynamically populated based on the agent you select, via an API call to the DS9 data source or the local database.
Choose time interval (the number of minutes to query in the past) (relevant for all alert types).
Configure threshold (unit, compare symbol, and value) (relevant for alert type Application Threshold only)
Define whether to include applications, and if yes, specify application IDs (one or more, in a comma-separated list) (relevant for alert type Application Threshold only)
Define whether to include ports, and if yes, specify ports, one or more, in a comma-separated list (relevant for alert type Application Threshold only)
Choose severity (minor, major, or critical) (relevant for alert types No Flow and Top Application only).
Choose the condition at Exists, either true or false (relevant for alert types No Flow and Top Application only).
Mandatory. Define a numeric value as the limit (relevant for alert type Top Application only).
Click Add.
The system adds the new alert and progress displays in the display field adjacent to the Refresh button.
Wait a short while (approximately one minute) to allow the system to process the new alert and to run the query, then click the Refresh button to view the new alert in the table.

Note
The Clear button clears the interfaces data and the agent. If you don’t clear these fields before adding a new alert, the value for agent and interfaces is the same as the last alert you added.
Edit, disable, or delete an alert
This procedure edits, disables, or deletes a DS9 alert.
Log in to the Dashboard as admin user.
From the admin menu, select DS9 Configuration to open the DS9 Alert Management page.
On the DS9 Alert Management page, click Edit.
At DS9 System, choose a DS9 system from the list.
View active alerts for this system in the Alert Table panel.
Note
Select Disabled to view disabled alerts.
In the table, choose the alert you wish to edit. The alert’s details populate the configuration fields, including a file name.
Choose an option:
To modify the alert, update the data, then click Edit to update the alert.
To disable the alert, click Disable. The alert is removed from the table of active alerts, and is added to disabled alerts.
To delete the alert, click Delete. The alert is removed.