
Access Controls
Access Control Editor
The VOSS Insights Dashboard application provides an Access Control Editor, where you can configure role-based access to the dashboards, configure system permissions, add or configure users and customers, configure SAML settings, and configure the system password policy.
Note
Only the system super user (admin account) may view and edit the password policy.
In the Access Control Editor, you can set up multiple tenants to have their own view only access to dashboards and to receive their own reports.
Note
To open the Access Control Editor, click the Main Menu (hamburger icon) ![]() , then select the Access Controls menu.
, then select the Access Controls menu.
You can select the following tabs in the Access Control Editor:
Permissions Tab
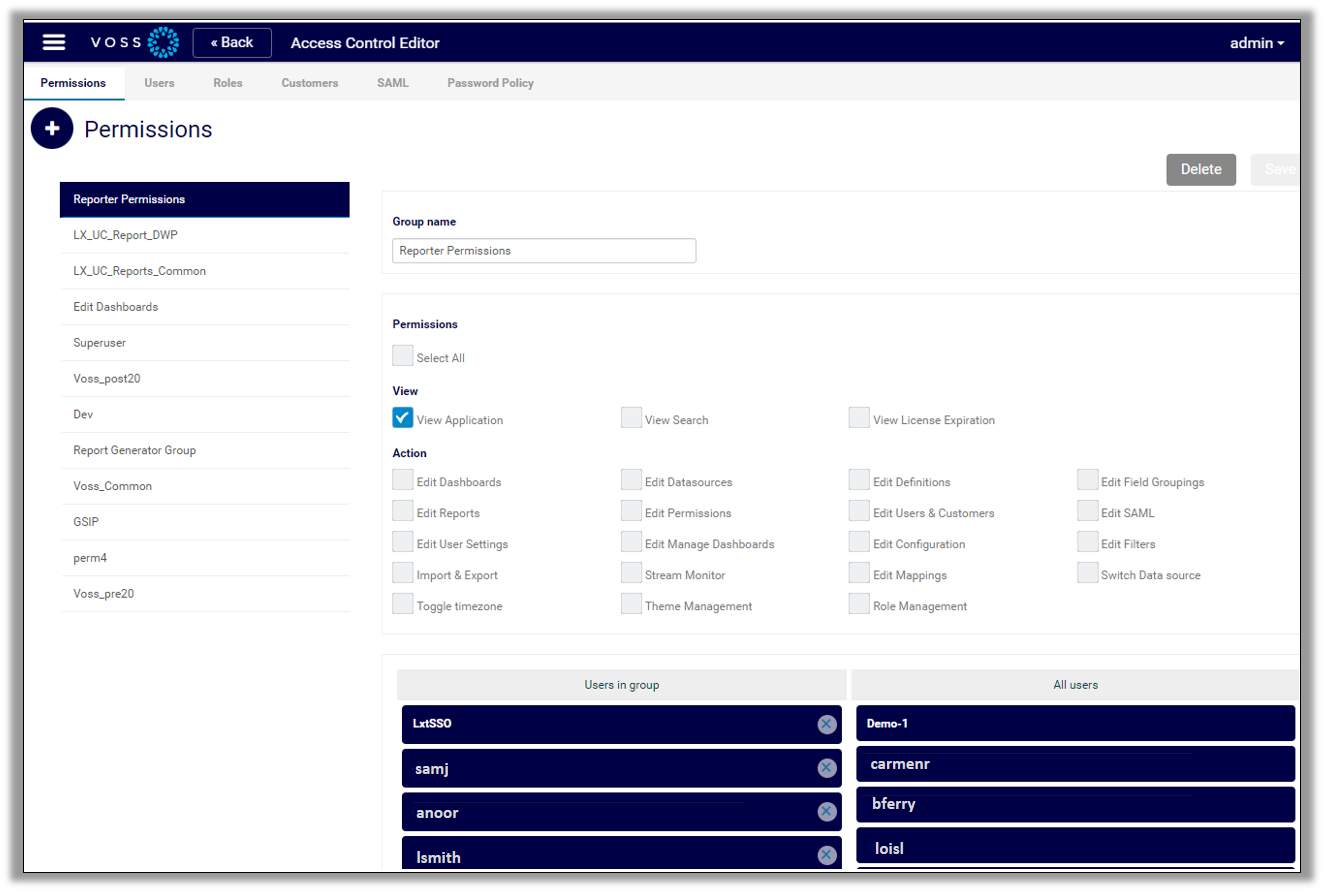
This tab adds and configures permission groups.
The Reporter Permissions group is a default permissions group, and is assigned by default to the Default role. All new users added to the system are automatically assigned to the Reporter Permissions permissions group, which provides View Application rights to the system.
You can add new permissions groups, and for each permission group, you can choose permissions, and add or remove users.
Note
A user can be in one or more permission groups, but only the most restrictive one is used.
The Users in group and All users fields display the names of users added to the system.
The View and Action checkboxes define the permissions that can be assigned to a selected permission group.
To create a new permission group, click the Plus (+) icon at Permissions, define a group name, choose permissions, add users to the group, and save your changes. Users in this group will have access to the system based on permissions configured for their permission group.
Note
All permission groups should have at least the View Application permission.
Related Topics
Users Tab
This tab adds, edits, and deletes users.
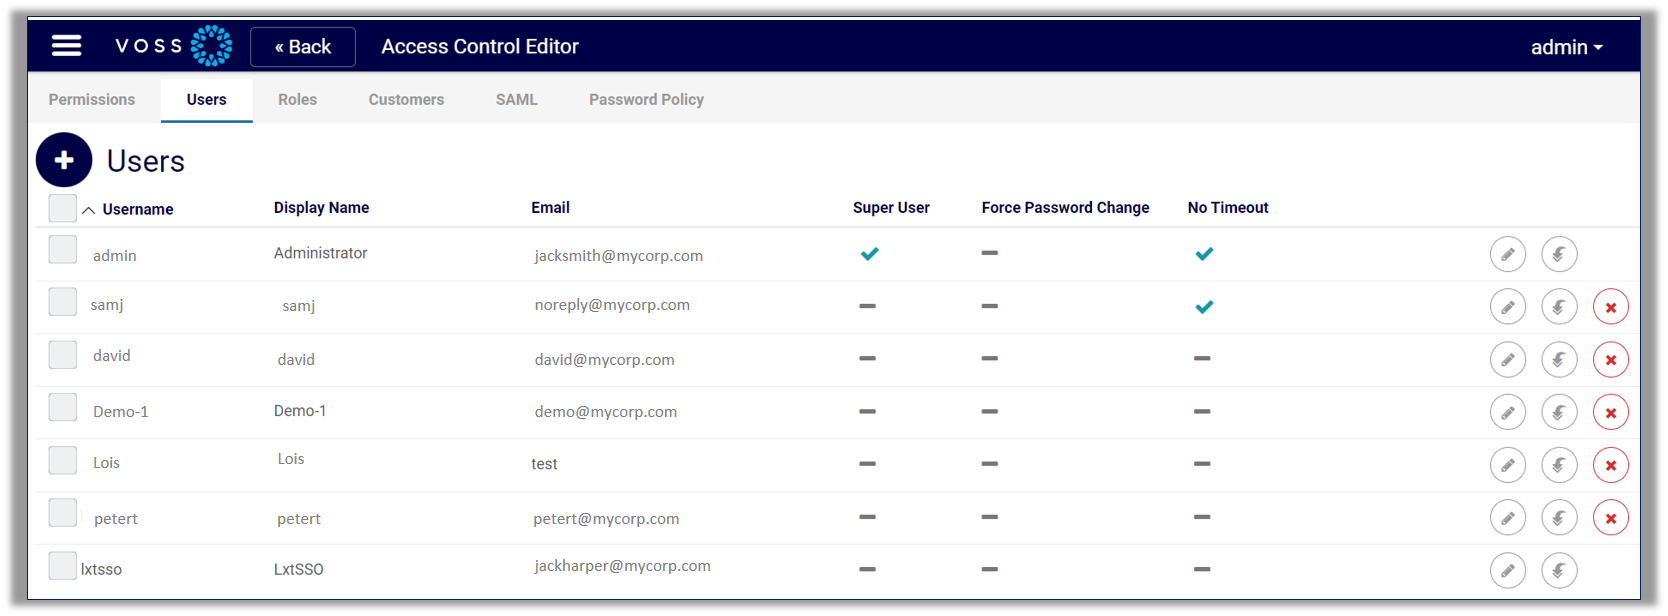
There are two default users upon installation:
admin |
This is the system superuser. The admin can perform all functions in the system. Set these credentials and only share them with your administrator. |
lxtsso |
This is a single sign-on credential and is only used when the system is integrated to another platform, such as an IT Operations platform. |
All new users are automatically created with a default role (called Default), and the Reporter Permissions permission group, which gives at least the View Application permission. Provided the default role is enabled and has dashboards associated to it, new users can log in to the system and will have access to the predefined collection of dashboards you associated to the default user role (typically dashboards you want all users to have access to). This simplifies the onboarding process.
Related Topics
Roles Tab
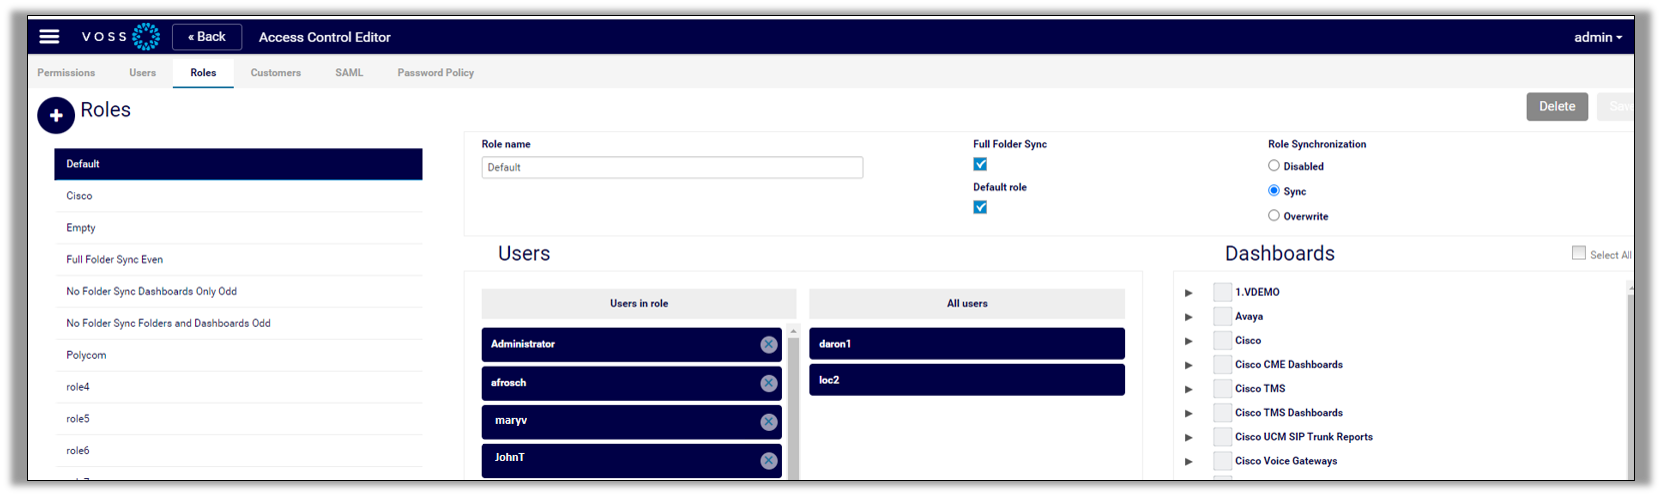
This tab adds and edits role-based access to the dashboards.
Note
You can assign dashboards to specific roles. Users can be part of one or many roles. If the role is enabled (see Role Synchronization settings), any user with that role will have all the dashboards assigned to that role. Roles tie together permission groups and dashboard collections.
The table describes the fields on the Roles tab in the Access Control Editor:
Field |
Description |
|---|---|
Roles |
Click the Plus icon (+) to add a new role. Select a role then add or remove users associated with the role. The system ships with a role called Default. All new users are automatically associated with the Default role. It is recommended that you assign a selection of dashboards to the Default role. These are dashboards that you want all new users to have access to as soon as they’re added to the system. You can create additional roles based on the requirements of your organization, then add or remove users as required, and choose the dashboards to assign to users based on their roles (users can have more than one role). |
Users |
Associate and remove users from a selected role. |
Dashboards |
Choose dashboards to be associated with a selected role. These dashboards will be available to users assigned to the role when saving your changes. |
Role name |
A customizable name for the role. The system ships with a default role (called Default). |
Full Folder Sync |
Defines that when syncing dashboards to user roles, the system syncs the entire folder where dashboards are selected for the role. If Full Folder Sync and Overwrite is selected, when an admin user adds another dashboard to the folder, that dashboard is available to the user the next time the user logs in. |
Default role |
Defines that the selected role is the default for the system. Any new users added to the system are assigned to this role, and will have access to any dashboards associated with this role. Additionally, new users are automatically assigned Reporter Permissions (permissions group), which gives them view access to the system. |
Role Synchronization |
Options for how a selected role is synced and dashboards made available or removed for users associated with the role:
|
Related Topics
Customers Tab
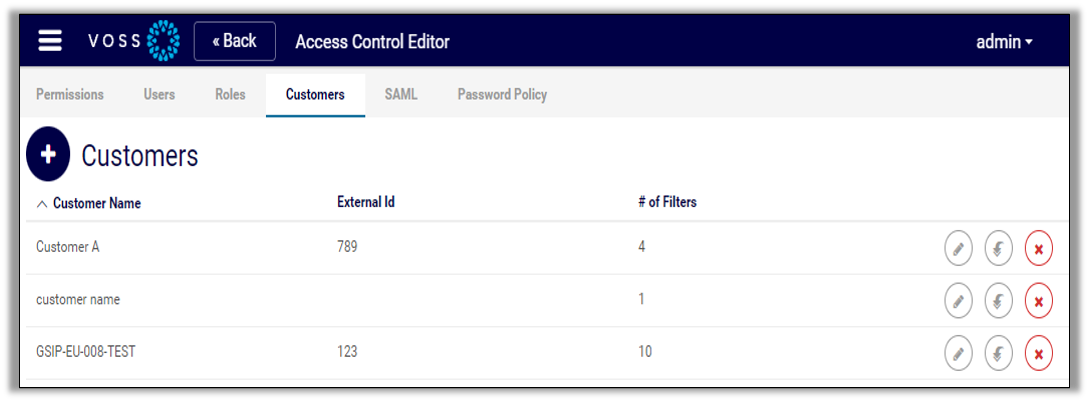
This tab adds, edits, clones, and deletes customers.
Customers can be actual companies (if you are an MSP), or they can be departments/individuals (if you are an enterprise).
Related Topics
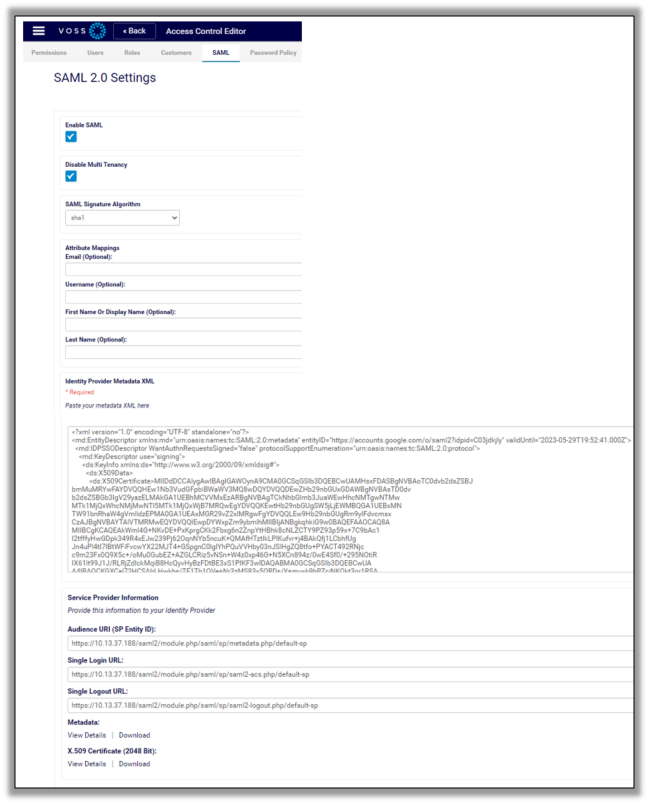
SAML Tab
This tab configures SAML settings, which are used to enable single sign-on across security domains.
You can choose to enable SAML along with the specific signature algorithm and various attributes. This function often requires close interaction between the customer and the VOSS engineer.
Note
Security Assertion Markup Language (SAML) is an open standard for exchanging authentication and authorization data between parties, in particular, between an identity provider and a service provider. As its name implies, SAML is an XML-based markup language for security assertions (statements that service providers use to make access-control decisions).
Password Policy Tab
This tab configures the system password policy, allowing the system administrator (super user with admin role) to enforce an application user password policy across all local users.
Related Topics
Add and configure roles
This procedure adds and configures a new user role.
Note
Roles are used to give users access to a collection of dashboards. The system ships with a default role called Default. This role must be enabled, and you will need to select the dashboards that all users should have access to by default. All new users are assigned the Default role, and will have immediate access to the dashboards associated with this role when they first log in. This simplifies the onboarding process for new users.
To add a new role:
Log in to the Dashboard application as admin user.
Click the Main Menu (hamburger icon)
 , then
select Access Control to open the Access Control Editor.
, then
select Access Control to open the Access Control Editor.Select the Roles tab.
Click the Plus icon (+) at Roles, then configure the new role:
At Role name, fill out a name for the role.
At Users, move relevant users from All users to Users in role.
Choose whether this is a default role.
Choose whether to enable full folder sync.
Choose role synchronization options.
Choose dashboards to associate with this role.
Click Save.
Provided the role is enabled and you have selected one or more dashboards for this role, any users with this role will have access to these dashboards the next time they log in.
Note
To edit a role, select the role on the Roles tab, update the role, and save.
To delete a role, select the role on the Roles tab, click Delete.
Related Topics
Add and configure permission groups
Permission groups are a way to give users specific permissions in the system.
Note
The system ships with a default permissions group called Reporter Permissions and a default user role called Default. New users are automatically assigned the Default role, and the Reporter Permissions permission group. Reporter Permissions automatically assigns the View Application permission to new users. A default collection of dashboards must be added to the Default role, and this role must be enabled (via the Roles tab in the Access Control Editor). These are dashboards that you want all new users to have access to as soon as they sign in to the system, and is a quick way of onboarding new users.
To add a permission group:
Log in to the Dashboard application as admin user.
Click the Main Menu (hamburger icon)
, then
select Access Control to open the Access Control Editor.Select the Permissions tab.
Click the Plus icon (+) at Permissions, then configure the new permission group:
Fill out a name for the permission group.
Choose permissions.
Note
All permission groups should have at least the View Application permission.
Add users to the permission group.
Click Save.
Users in this permission group will have access to the system based on permissions configured for their permission group.
Related Topics
Configure password policy
This procedure configures the password policy for local users.
Log in to the Dashboard application as admin user.
Note
Only a user with the admin role (super user) can view and configure the password policy.
Click the Main Menu (hamburger icon)
, then select Access Control to open the Access Control Editor.Select the Password Policy tab.
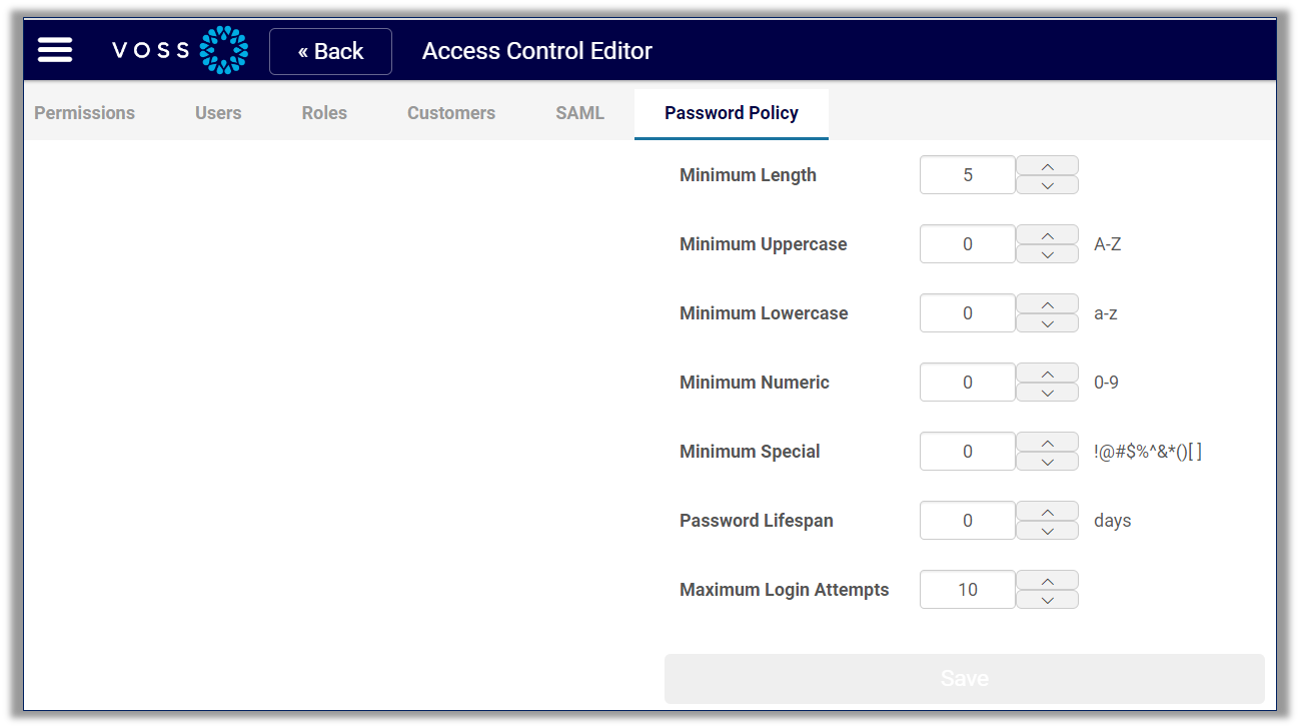
Configure the password policy settings, including:
minimum length of password
minimum uppercase letters to be included in the password
minimum lowercase letters to be included in the password
minimum numeric characters to be included in the password
minimum special characters to be included in the password
password lifespan (number of days before password will need to be changed)
maximum login attempts
Click Save.
Related Topics
Assign dashboards to users via their user role
This procedure automatically assigns a collection of dashboards to users via their user role.
Pre-requisites:
Add the user. See Add a new user with default role and dashboards
Add the role.
Associate dashboards and users to a role:
Log in to the Dashboard application.
Click the Main Menu (hamburger icon)
, then select Access Control to open the Access Control Editor.Select the Roles tab.
Select the role.
In the Users fields, move the relevant users from the All users field to the Users in role field, or remove users from the Users in role field to the All users field.
At Dashboards, select the relevant dashboards. Select an entire dashboard folder tree, or select a dashboard folder and select or deselect dashboards, as required.
Choose options for the sync:
Select Full Folder Sync if you want to refresh the users’s dashboard whenever changes are made to the selected dashboard folders.
Select Default role if you want this role (and the associated dashboards) to be assigned to any user with this role.
Choose a Role Synchronization option:
Select Disabled if you don’t want this role to sync dashboards to users with this role.
Select Sync to remove dashboards previously assigned to users with this role, and to replace manually assigned dashboards with dashboards associated to this role. When the user next logs in, they will have access to these dashboards.
Select Overwrite to replace existing instances of this dashboard with the dashboards associated with the role.
Note
If you have both Full Folder Sync and Overwrite selected, if the admin adds another dashboard to a dashboard folder, the user has access to the new dashboard the next time they log in.
Repeat this procedure to configure additional roles, if required.
Click Save.
The sync runs based on the settings you defined per role. The next time the user logs in, they will have access to the dashboards associated with their roles (one or more).
Add a new user with default role and dashboards
This procedure adds a new user so they have the dashboards they require for onboarding purposes.
Note
New users are automatically assigned the Default role, which should contain a default collection of dashboards that you want every user to have access to. This role is also assigned the Reporter Permissions permissions group, which provides at least View Application (read) access to the system. When a new user logs in the first time, they will have access to the default collection of dashboards. This makes it easier to onboard new users. The Default role must be enabled for your system, and you will need to associate the default collection of dashboards to the Default role (via the Roles tab in the Access Control Editor). The Default Role does not ship with dashboards already assigned to it.
To add a new user with the default role:
Log in to the Dashboard application as admin user.
Click the Main Menu (hamburger icon)
, then select Access Control to open the Access Control Editor.Select the Users tab.
Click the Plus icon (+) at Users to add a new user.
Fill out details for the new user:
Add a username, display name, and email address.
Note
The username is used to log in to the system. The display name is the name that displays at the top right on the GUI.
Define whether to force the user to change their password when they first log in.
Define whether the user’s session can continue without a timeout.
Choose the customer where this user will be assigned.
Optionally, select additional roles for this user.
Note
All new users are automatically assigned the Default role.
Optionally, select additional permission groups for the new user.
Note
All new users are automatically assigned to the Reporter Permissions group via the Default role. This permission group provides View Application (read) access to the system.
Optionally, select additional permissions for the user.
Fill out a password for the user.
Save your changes, then click out of the screen to refresh it.
View the new user listed on the Users tab. Use the icons to the right of the username to manage the user:
To edit a user account, click the Edit icon (pencil).
To clone (copy) a user account, click the Clone icon (down arrow).
To delete a user account, click the Delete icon (X).
Note
The user can now log in to the system with their username and Default role. On log in, the user has access to the dashboards associated with the Default role, plus any dashboards assigned via additional roles you may have configured for this user.
Related Topics
View a user’s roles, permissions, and dashboards
This procedure displays a user’s account, their permissions, roles, and the dashboards associated with their role.
Log in to the Dashboard.
Click the Main Menu (hamburger icon)
, then select Access Control to open the Access Control Editor.To view or update a user’s account:
Select the User tab.
Locate the relevant user, then click the Edit icon (pencil) for this user.
View the user’s settings, including their assigned roles, permission groups, and permission rights.
Note
The following settings are editable: username, display name, email, whether to force a password change, whether timeout applies for a user’s session, the customer, report logo, and password.

To view the dashboards this user has, select the Roles tab, then:
Select a role.
At Users in role, inspect whether the user is assigned to the role.
Once you locate a user in a role, inspect the dashboards selected in the Dashboards tree structure for that role. These are the dashboards the user has access to.
Note
All new users are assigned the Default role and the collection of dashboards associated with this role. A user can have one or more roles, and will have access to the dashboards selected for each role.
To view a user’s permissions, select the Permissions tab, then:
Select a permission group.
At Users in group, inspect whether the user is in the permission group.
Once you locate a user in a permission group, inspect the permissions selected for the group.
Note
All new users are assigned the Reporter Permissions permissions group in the Default role. All permission groups must have at least the View Application permission. A user can be in one or more permission groups.
Add and configure a customer
This procedure displays, edits, clones, and deletes an existing customer, and adds a new customer.
Log in to the Dashboard.
Click the Main Menu (hamburger icon)
, then select Access Control to open the Access Control Editor.Select the Customers tab. Existing customers are listed on the page.
Choose an option:
To add a customer, click the Plus (+) icon at Customers.
In Display Name field, fill out a name for the customer.
Click Edit Filters, then configure filters:
Note
Filters allow you to define the data (tenanted) that only this customer will see.
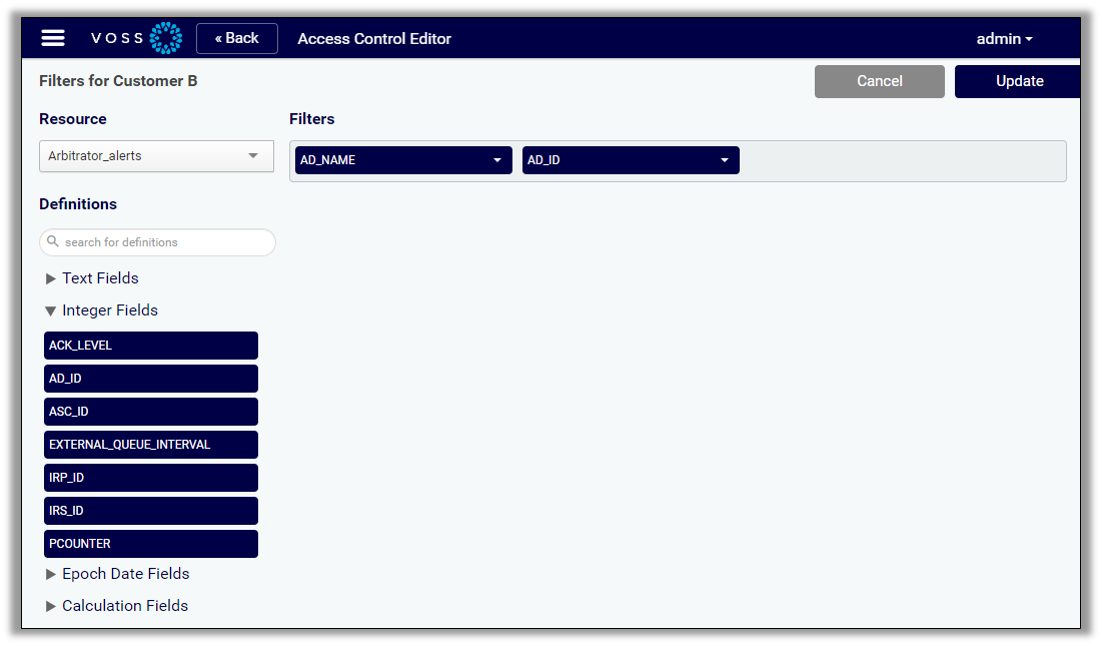
At Resource, select the resource that applies to the customer.
At Definitions, select the specific definition that is unique to that customer. Drag and drop that definition to the Filters field. You can select multiple filter definitions.
Click Update to return to the Customer tab in the Access Control Editor (or click Back to cancel).
Click Save to create the new customer.
To create a clone of a customer, select the Clone icon (down arrow) at the relevant customer (the one you want to clone).
You can create a clone (copy) of an existing customer, then modify the clone to create a new customer based on the settings in the clone. Save the new customer.
To edit a customer, click the Edit icon (pencil). Update the customer, then save.
To delete a customer, click the Delete icon (X) for that customer.
Change your password, display name, and report logo
This procedure allows a system user with minimum permissions to change their own password, their display name, email address, and the report logo.
Note
By default, all new system users are assigned the Default role, with Reporter Permissions. This role and permissions group allows the minimum View Application permission, but also allows non-admin users to change their own password, their display name, email address, and report logo, via the Access Controls menu (accessible via the Main Menu).
Admin users (superuser account) change their password via the Profile menu (click on the profile, then select Edit Account.)
To update your profile:
Log in to the Dashboard.
Click the Main Menu (hamburger icon)
, then select Access Control to open the Access Control Editor.On the Users tab, click the Edit icon (pencil).
Update your profile.
You can change your own password, your display name, your email address, and the report logo.
Click Save.
Related Topics