Set up the PowerShell Proxy Server#
Overview#
This procedure configures the PowerShell proxy server for Microsoft Teams and (optionally) for Microsoft Exchange Online.
Note
You can set up a new PowerShell proxy server, or use an existing one.
Task overview (as shown in the diagram):
Step 4: (Optional) Configure the PowerShell Proxy for Redundancy
Step 7: (Optional) Install the Microsoft ExchangeOnlineManagement Module
Note
You must have local Administrator privileges on the PowerShell Proxy server.
A single PowerShell server can be used by multiple tenants, with or without Microsoft Exchange.
Before you start
Related Topics
Step 1: Create a Server-local Service Account#
VOSS Automate must use a server-local service account for accessing the PowerShell Proxy server. It must not be a domain account (should the server be domain-joined).
This task is mandatory.
Create a local service account with the following properties:
Account Type
Local Computer Account (not a domain account)
Local Group Membership
Administrators
Remote Management Users
Sign out of the server, then sign back in using the credentials for the service account you just created. Perform the remainder of the tasks in this section using this account.
Step 2: Run a script on the PowerShell proxy#
VOSS provides a script that you will need to run on the PowerShell proxy server. This script allows Automate to deploy certificates to the Windows server.
Run the provided script on the Windows server to configure the PowerShell proxy so that Automate is able to deploy certificates to the Windows server.
Copy the script to c:\VOSS on the Windows server, and run it using a PowerShell prompt,
such as the following, where service_account_name must be replaced as needed:
PS C:\voss> .\conf_proxy_task.ps1 -service_account_name WSMan-svc
Note
A certificate must be installed on the PowerShell server, the public key must be uploaded to the app reregistration, and the thumbprint must be copied - you can use an existing generated certificate, if available.
You won’t need to copy the thumbprint if the certificate is only installed on the Windows PowerShell server and not on Automate.
Step 3: (Optional): Enable OpenSSH#
Although this is an optional step, it is highly recommended that you enable the OpenSSH feature of Windows 2019 or greater in order to improve file transfer performance from Automate to the Windows server.
Note
OpenSSH is manually enabled on the Windows server to allow VOSS Automate to copy Call Queue and Auto Attendant audio files using SCP. See: Call Queues and Auto Attendants.
Enabling OpenSSH speeds up the process of copying certificates, audio files, and other such content to the PowerShell proxy.
Step 4: (Optional) Configure the PowerShell Proxy for Redundancy#
This procedure adds a Fully Qualified Domain Name (FQDN) to the local hosts file on each PowerShell Proxy server you’re deploying. Each PowerShell Proxy server must be able to address itself with the FQDN corresponding to the load balancer’s virtual IP address.
Important
This task is only required if you’re deploying multiple PowerShell Proxy servers behind a load balancer. If you do not have any concerns around redundancy, you can skip this task.
On each of the PowerShell Proxy servers, open an elevated PowerShell window, and issue the following command:
PS C:\WINDOWS\system32> notepad C:\Windows\System32\drivers\etc\hosts
In the Notepad window, uncomment the
127.0.0.1line (delete the hash) and append the FQDN of the load balancer virtual IP:# Copyright (c) 1993-2009 Microsoft Corp. # # This is a sample HOSTS file used by Microsoft TCP/IP for Windows. # # This file contains the mappings of IP addresses to host names. Each # entry should be kept on an individual line. The IP address should # be placed in the first column followed by the corresponding host name. # The IP address and the host name should be separated by at least one # space. # # Additionally, comments (such as these) may be inserted on individual # lines or following the machine name denoted by a '#' symbol. # # For example: # # 102.54.94.97 rhino.acme.com # source server # 38.25.63.10 x.acme.com # x client host # localhost name resolution is handled within DNS itself. 127.0.0.1 localhost psproxy.domain.com # ::1 localhost
Step 5: (Optional) Configure the Outbound Internet Proxy#
This procedure configures a PowerShell Proxy server to use an outbound Internet proxy.
Important
This step is only required if your deployment is using an outbound Internet proxy to access the public Internet (including Microsoft tenants).
Prerequisites:
If the outbound Internet proxy requires authentication, you will need to obtain those credentials and configure them in VOSS Automate (as described in the Core Feature Guide). The credentials are not configured directly on the PowerShell Proxy server.
Perform these steps:
Sign into the PowerShell Proxy server using the local service account that VOSS Automate will use to connect to the proxy.
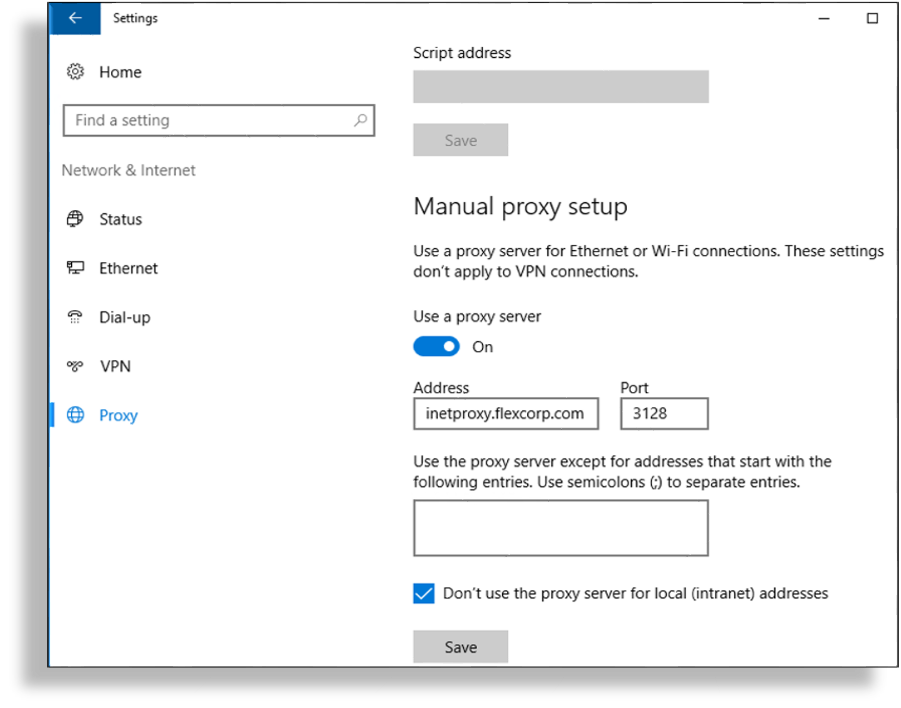
Open Windows Settings and go to Network & Internet > Proxy.
Under Manual proxy setup enable Use a proxy server.
In the Address field, fill out the IP address or FQDN of the outbound Internet proxy server.
In the Port field, fill out the port number required by the proxy.
Note
The port is typically 3128, but your organization may require a different port.
Select Don’t use the proxy server for local (intranet) addresses, then click Save.
Note
This is a per-user configuration, so ensure you sign in using the VOSS Automate service account.
To make this configuration the default setting for all HTTP clients, open an elevated PowerShell session, and issue the following command:
netsh winhttp import proxy source=ie
Step 6: Install Software Management Components#
This procedure installs software components on a PowerShell Proxy server:
Before you start
The Install-Module command used in Step 6.2: Install Microsoft Teams PowerShell Module downloads the specified PowerShell module
from the PowerShell Gallery (an online repository).
Since the
PowerShell Gallery has deprecated the use of TLS versions earlier than TLS 1.2, you will
need to force Windows PowerShell to use TLS 1.2, which will allow the Install-Module
command to work correctly. TLS 1.2 is the default in Windows Server 2019 and later.
If you’re using an earlier release of Windows Server, use the
following command to force PowerShell to use TLS 1.2:
[Net.ServicePointManager]::SecurityProtocol = [Net.SecurityProtocolType]::Tls12
The command is relevant only for the current PowerShell session (its effect persists only
until you close the PowerShell window and end the session).
Errors such as the following when using the Install-Module command are likely the
result of a TLS version mismatch: “Unable to resolve package source”, “No
match was found…”
Step 6.1: Install .NET Framework 4.8#
Browse to https://dotnet.microsoft.com.
Navigate to the download for .NET Framework 4.8 Runtime, or do an Internet search for “.NET Framework 4.8 download”.
Note
Ensure you only download from a URL ending in “microsoft.com”. The authenticity of software downloaded from third-party websites cannot be guaranteed.
Download and run the .NET Framework 4.8 Runtime installer.
Note
Once the installation completes, you may need to reboot the server.
Step 6.2: Install Microsoft Teams PowerShell Module#
There are two options for installing the MS Teams PowerShell module, depending on whether you’re upgrading PowerShell proxies that have already been deployed, or if you’re installing the MS Teams PowerShell module on a new PowerShell proxy:
Important
Starting with VOSS Automate version 21.4-PB3, the required MS Teams PowerShell module is v5.6.0. If you notice errors with this version, check with VOSS around using an alternative version.
Install the MS Teams PowerShell module. Choose an option:
UPGRADING?
If you’re upgrading any existing PowerShell proxy servers that have already been deployed, perform these steps (on each PowerShell proxy server) to use the supported version of the MS Teams module:
Exit any existing PowerShell and PowerShell ISE windows.
From an elevated (run as Administrator) PowerShell window:
Stop-Service WinRM
Uninstall-Module MicrosoftTeams
Install-Module MicrosoftTeams -RequiredVersion 5.6.0 -AllowClobber
Start-Service WinRM
Verify the version you’re using, (e.g. 5.6.0):
Get-Module -ListAvailable -Name MicrosoftTeams
NEW INSTALL?
If you’re installing the MS Teams PowerShell module on a new PowerShell proxy, run the following command from an elevated PowerShell session:
Install-Module MicrosoftTeams -RequiredVersion 5.6.0
Test the connection to the MS Teams PowerShell module:
Connect-MicrosoftTeams -Credential $cred
Get-CsOnlineUser -ResultSize 1 | Select DisplayName
Note
You’ll need to enter your MS Teams tenant admin credentials. The output confirms your connection to the model (CsOnlineUser), and performs a test query.
Step 7: (Optional) Install the Microsoft ExchangeOnlineManagement Module#
This procedure installs the MS Exchange Online module on the PowerShell proxy.
Note
This task is only required if you’re using Exchange Online. However, while Exchange is an optional setup on the PowerShell proxy server, it is recommended best practice to install the ExchangeOnlineManagement module.
From an elevated PowerShell session issue the following command:
Install-Module -Name ExchangeOnlineManagement -RequiredVersion 3.2.0
Note
Check with VOSS in case a newer version of the ExchangeOnlineManagement module is recommended.