Introduction to the Admin Portal User Interface
This topic describes the user interface for the VOSS-4-UC user interface.
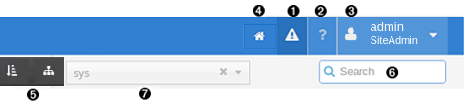
The Admin Portal Menu Bar
The table describes the information and controls available on the Admin Portal menu bar:
|
A notification indicator and menu for accessing the Transaction log and Alerts (if alerts are enabled). A pop-up notification displays when a transaction is done. You can click on the message to inspect transactions. Alert notifications display until all alerts are removed from the list. |
|
A Help button (Help or the icon ?) opens the help in a new browser tab. |
|
The logged in user’s username and role, with a drop-down menu for logging out or changing the password. Logout and password change is not available for SSO users. For details about logging out from an identity provider (IdP) initiated session, see the relevant user documentation for the relevant IdP. |
|
A customizable landing page and a Home navigation button to return to the Home page. See “Create a Landing Page” for details.
|
|
A hierarchy tree view and pop-up displays a tree or list of available nodes. See Navigating the Hierarchy |
|
A search field |
|
A hierarchy element displaying the highest hierarchy level. The associated child hierarchy element display in a similar field display box adjacent to the main hierarchy element. If there is more than one level or node at a specific hierarchy, you can search and navigate the hierarchy. See Navigating the Hierarchy. |
Forms and Lists
The Admin Portal displays information in forms and lists.
- Detail forms: during input, mandatory fields are highlighted in a red frame.
- List views of details. If the text in a column exceeds the defined column width, it is truncated with an ellipsis (…), except for any column showing the row entry hierarchy.
Slide out notifications
A Cached slide-out notification at the top right of the interface displays when the locally cached data of a resource is used.
This slide-out notification can be minimized to a narrow bar on the side of the screen.
Accessibility
To support accessibility, when using keyboard navigation, a black bar is enabled above the toolbar. When the cursor is in the URL box and the Tab key is pressed, this bar is displayed and has three menu items corresponding to three areas of the main user interface:
- Home screen - from any form on the interface, return to the main user interface. This is equivalent to the Home button on the menu bar and can for example be accessed by means of a screen reader shortcut.
- Skip to content - on the main user interface, move the focus to the landing page menu items. Press <Tab> to move the focus to the first landing page link.
- Skip to navigation - on the main user interface, move the focus to the menu bar. The first menu item receives focus.
Sessons and Authentication
Since VOSS-4-UC sessions are cookie based, it is possible to share the same session across different tabs or windows of the same browser. However, it is not possible to have different authentication sessions in different tabs. In other words, login as different users in different browser tabs is not supported.
Button Bar
For certain models, such as Roles or Credential Policy, the list view or detail view of the Admin Portal shows a button bar with a number of controls. The buttons displayed depend on the Access Profile of the user.
| Button | Description |
|---|---|
| Add | When viewing a list, the button opens an Add form to create a new item. |
| Save | On the Add form, the button is used to save a newly created item. On the detail view, the button is used to save changes made to the specific item. |
| Delete | From a list, remove an entry or the selected entries. |
| Cancel | Used to cancel triggered events such as transactions, bulk loads, and so on. |
| Back | On the detail view, the button returns to the original list page position. The browser’s back button also carries out this task. |
| Help | Open the on-line help page for the current model. |
| Move | For selected model instances, move them from the current hierarchy to another hierarchy. By default only device models have a Move button. This button is available on list and instance Admin Portal screens. When moving device models, checks are built in to disallow moving a device model instance to a hierarchy node with a different device. For Data Models, Move is allowed by editing the Data Model’s definition in the Operations section. |
The Action menu provides actions applicable to the specific view.
| List View Action | Description |
|---|---|
| Bulk Load File | Only used in Administration Tools > Bulk Load, when bulk loading a preselected file. |
| Bulk Modify | On the list view of certain items, the button displays a form to enter modifications to any selected list items and carries out a Bulk Modify. This is only available if your administrator has given you. the required permissions. |
| Configuration Template | For a form, create a Configuration Template for a model or carry out a task such as an advanced search. |
| List View Action | Description |
|---|---|
| Export | From search results or any list view in the system, it is possible to select the entities required and export them with all attributes. The selected data can be exported to:
|
| Export Bulk Load Template | Export a model structure to a MS Excel bulk load file format. The file can be used as a template to bulk load instances of the model. Refer to the Bulk Load topic help. |
| Field Display Policy | Add a Field Display policy to a selected model. The detail view of a Transaction displays this button to show sub-transactions. |
| Move | For selected model instances, move them from the current hierarchy to another hierarchy. By default only device models have a Move button, which is available on list and instance Admin Portal screens. When moving device models, checks are built in to disallow moving a device model instance to a hierarchy node with a different device. For Data Models, Move is allowed by editing the Data Model’s definition in the Operations section. |
| Clone | Make a copy of the current item. An option is available to rename the copied item. |
| Execute | For an executable model such as a Provisioning Workflow, Macro, Wizard or for a script, run the execution. |
| Import | For supported Network Devices, carry out an import of data from the device. |
| Export | Export a specific item with all its attributes. |
| Package | Create a package containing selected search results. |
| Refresh | Click this button on the Transaction list to refresh the list of transactions. This would for example update the Progress of the transaction. |
| Replay | Transactions that have failed can, under certain circumstances, be replayed. This means that the transaction is re-submitted with the original request parameters. |
| Edit and Replay | Available for completed transactions. Similar to the Replay button, but allows you to first make changes to the previously submitted form before the transaction is resubmitted. |
| Reset Phone | Reset a phone. |
| Return | Return - From the detail display of a selected instance of a model, select this button to return to the list display of the model instances. |
| Tag | For a selected model instance, add a tag to it. |
| Tag Version | For a selected model instance, add a version tag to it. |
| Test Connection | For instances of models representing connection parameters such as connections to devices, click the button to test the connection. |
| Visualize | Deprecated. |
On-line Help
Press the Help button on both the Main Menu button bar as well as the Button bar to open a new browser tab to show on-line help for your system. The new browser tab shows the following menu options:
- General Help: General help information for the application.
- Model Detail Help: Model (Item) specific help, for example data/GeneralHelp. This content may vary according to the Field Display Policy that is applied to the item.
- Model API Help: the API reference for the item.
When the Help button (?) is pressed on the Main Menu button bar, only the three menu options are shown. When the Help button is pressed on the Button bar, context sensitive help specific to the associated form is also shown.
If a Field on the context sensitive help for an item is marked with an asterisk next to the field name, it is mandatory and must be filled out in order for the subsequent transaction to be successful.
A user’s view of the available on-line help depends on hierarchy level, role-based access, and field display policies.
Main Page Controls
The following controls are available on the Admin Portal.
| Icon | Description |
|---|---|
 |
These icons are used to access the hierarchy. |
 |
This icon is used to return to the main application page. |
Form Controls
The following controls are available from a form.
| Icon | Description |
|---|---|
| Open another instance of the current form field or open a pop-up screen to add an item. | |
| Delete the current instance of a field from a form or open a pop-up screen to confirm. | |
| Move the selected instance on a form down in the order of field entries. In the case where a Position field is available, for example for Lines, the entered value determines the order in the object. | |
| Move the selected instance on a form up in the order of field entries. In the case where a Position field is available, for example for Lines, the entered value determines the order in the object. |
| Icon | Description |
|---|---|
| On multi-tabbed forms, navigate to the previous or next tab. | |
| A warning icon, for example if a mandatory field is not filled in. | |
| * | Next to an input control on a form, the asterisk indicates that the field is mandatory. |
| [Browse] | Next to an input control on a form, a button to open a file selection dialog. |
| [ V] | Drop-down input box. Typing into the box filters the drop-down list choices. |
Note
On some parts of the user interface, when adding or deleting items via pop-up screens, clicking the OK button typically completes the update; that is, you won’t need to also click Save on the main form.
About
The About menu provides a number of sub-menus:
Version
Release: Installed product release version.
The version naming convention is:
- new: <YY>.<num>, for example: 19.3 is the 3rd release of 2019.
- legacy: <major>.<minor>.<revision>, where major=YY,minor=num,revision=revision of num.
Patch Bundle: The installed Patch Bundle (PB) number, if any.
Build Number: Product build number.
Release Date: Date when this version was released.
Deployed Mode: Current deployment mode type, for example:
- Provider with HCMF
- Provider Decoupled
- Enterprise
Patches
If any patches have been installed on the system, these are listed under the Patches menu. Details of installed patches are also provided for reference and enquiries, for example:
- Version: in this context, the patch version (there can be multiple versions of the same patch).
- Defect IDs: VOSS-4-UC internal IDs for reference
- Models: any models and model Instances added or affected by the patch
Adaptations
If any adaptations are installed on the system, these are listed. Select an adaptation from the list to see more details, for example:
Adaptation Tag(s): the tags can be used to find all models that are a part of the adaptation, using a search query such as
(tag IS <tag1>) or (tag IS <tag2>)
where
<tag1>and<tag2>are the names of tags.Note
The search for models is carried out from the user hierarchy and down.
Upgrade Risk: an indication of the impact of an adaptation on an existing system:
- High: Core changes
- Medium: Standalone adaptation using core workflows
- Low: Standalone feature