VOSS-4-UC PowerShell Proxy Configuration
VOSS-4-UC utilizes the Web Services-Management protocol (WSMan) to create the PowerShell sessions used to manage Microsoft UC applications. On Windows computers, WSMan is implemented by the Windows Remote Management (WinRM) service.
This section defines how to configure WinRM on a PowerShell Proxy running on Windows Server 2016.
Local hosts File Configuration
If you are not deploying multiple PowerShell Proxy servers behind a load balancer, you may skip this step.
If you are deploying multiple PowerShell Proxy servers with a load balancer, each of the PowerShell Proxy servers must be able to address itself with the Fully Qualified Domain Name (FQDN) corresponding to the load balancer’s virtual IP address. You can accomplish this by adding that FQDN to the local ‘hosts’ file on each of the PowerShell Proxy servers. To do this, on each of the PowerShell Proxy servers open an elevated PowerShell window and issue the following command:
PS C:\WINDOWS\system32> notepad C:\Windows\System32\drivers\etc\hosts
In the notepad window uncomment (delete the hash) the 127.0.0.1 line and append the FQDN of the load balancer virtual IP:
# Copyright (c) 1993-2009 Microsoft Corp.
#
# This is a sample HOSTS file used by Microsoft TCP/IP for Windows.
#
# This file contains the mappings of IP addresses to host names. Each
# entry should be kept on an individual line. The IP address should
# be placed in the first column followed by the corresponding host name.
# The IP address and the host name should be separated by at least one
# space.
#
# Additionally, comments (such as these) may be inserted on individual
# lines or following the machine name denoted by a '#' symbol.
#
# For example:
#
#      102.54.94.97     rhino.acme.com          # source server
#       38.25.63.10     x.acme.com              # x client host

# localhost name resolution is handled within DNS itself.
  127.0.0.1       localhost psproxy.domain.com
# ::1             localhost
Outbound Internet Proxy Configuration
If your deployment does not require the use of an outbound Internet proxy to access the public Internet (including Microsoft tenants), skip this step.
To configure a PowerShell Proxy server to use an outbound Internet proxy, configure the proxy as described in this section.
Sign in to the PowerShell Proxy server using the local service account that VOSS-4-UC will use to connect to the proxy.
Note
The requirements for this account are described in the previous section.
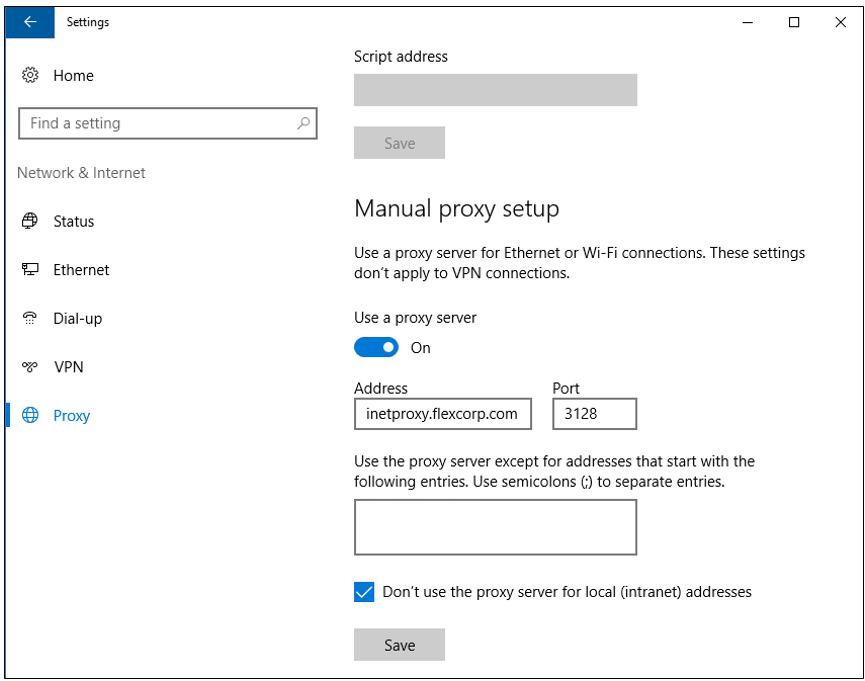
Open Windows Settings and select Network & Internet > Proxy from the navigation bar. Under Manual proxy setup flip the Use a proxy server switch to On. In the Address text box enter the IP address or FQDN of the outbound Internet proxy server. In the Port box enter the port number required by the proxy - typically 3128, but your organization may require a different port. Select the Don’t use the proxy server for local (intranet) addresses check box. Click Save.
Note
- This is a per-user configuration, so be sure to sign in using the VOSS-4-UC service account before performing this step.
- The outbound Internet proxy may require authentication. If it does, obtain those credentials and configure them in VOSS-4-UC as described in the Provider Core Feature Guide. You will not configure those credentials directly on the PowerShell Proxy server.
Outbound proxy setup
Make this the default setting for all HTTP clients by issuing the following command from an elevated PowerShell session:
netsh winhttp import proxy source=ie
WinRM Configuration
Configure WinRM with the appropriate settings for VOSS-4-UC by issuing the following commands from an elevated PowerShell session.
Note
When setting the TrustedHosts value below you will have to provide the identity of this server; that is, the server on which you are executing these commands. If this is a standalone PowerShell Proxy (not behind a load balancer), then provide the server’s IP address and FQDN, with a comma between them. If this PowerShell Proxy is behind a load balancer, then append the FQDN of the load balancer’s virtual interface. For example, assume the server’s FQDN is “psproxy01.domain.com” and its IP address is 10.1.1.10. If the server is not behind a load balancer, then the value to supply for TrustedHosts, including the quotes, will be: ‘10.1.1.10,psproxy01.domain.com’ If the server is behind a load balancer, and the FQDN of the load balancer’s virtual interface is “psproxy.domain.com”, then the value to supply for TrustedHosts, including the quotes, will be: ‘10.1.1.10,psproxy01.domain.com,psproxy.domain.com’
Enable-WSManCredSSP -Role Server -Force

Enable-WSManCredSSP -Role Client -DelegateComputer * -Force

Set-Item WSMan:\localhost\Service\AllowUnencrypted $true

Set-Item WSMan:\localhost\Service\Auth\Basic $true

Set-Item WSMan:\localhost\Client\AllowUnencrypted $true

Set-Item WSMan:\localhost\Client\Auth\Basic $true

Set-Item WSMan:\localhost\Client\TrustedHosts `{server identity}`
Firewall Settings
Any firewalls between VOSS-4-UC and the PowerShell Proxy, including Windows Firewall on the proxy, must permit the connections listed in the table below.
Note
These firewall exceptions are enabled by default in Windows Server 2016.
Table: WinRM Firewall Settings
| Service | Protocol | Port |
|---|---|---|
| WinRM 2.0 (HTTP) | TCP | 5985 |
| WinRM 2.0 (HTTPS) | TCP | 5986 |
Determining the Installed Management Software Version
To determine the installed version of each of the management software components, follow the steps below.
Online Services Sign-in Assistant
You will find the Microsoft Online Services Sign-in Assistant in the Programs and Features section of the Windows Control Panel. Right-click the Start icon and select Programs and Features. Look in the list of installed programs for ‘Microsoft Online Services Sign-in Assistant’. If the version displayed is 7.250.4556.0 or higher, then you have the required version and do not need to reinstall or upgrade it.
Azure Active Directory Module for Windows PowerShell
From any PowerShell session, issue the following command:
  Get-Module -ListAvailable | Select-String msonline

If If 'MSOnline' is returned then you have the correct module and do not need to reinstall or upgrade it.
.NET Framework 4.8
From any PowerShell session, issue the following command:
Get-ChildItem 'HKLM:\SOFTWARE\Microsoft\NET Framework Setup\NDP' -Recurse |
Get-ItemProperty -Name version -EA 0 | Where { $_.PSChildName -Match '^(?!S)\p{L}'} |
Select PSChildName, Version
There may be multiple versions of .NET installed. VOSS-4-UC requires version 4.8. Example output is shown below. Note that version 4.8 is among the installed versions, so in this example no additional installation would be required.
PS C:\> Get-ChildItem 'HKLM:\SOFTWARE\Microsoft\NET Framework Setup\NDP' -Recurse | Get-ItemProperty
-Name version -EA 0 | Where { $_.PSChildName -Match '^(?!S)\p{L}'} | Select PSChildName, Version

PSChildName                      Version
-----------                      -------
v2.0.50727                       2.0.50727.4927
v3.0                             3.0.30729.4926
Windows Communication Foundation 3.0.4506.4926
Windows Presentation Foundation  3.0.6920.4902
v3.5                             3.5.30729.4926
Client                           4.8.04161
Full                             4.8.04161
Client                           4.0.0.0
Microsoft Teams PowerShell Module From any PowerShell session issue the following command:
Get-Module -ListAvailable | Select-String MicrosoftTeams
If “MicrosoftTeams” is returned then you have the correct module and do not need to upgrade or reinstall anything.
Upgrading the Management Software on an Existing PowerShell Proxy
Refer to the previous section to determine what is already installed on your PowerShell Proxy server.
Online Services Sign-in Assistant If you have determined that you already have the Online Services Sign-in Assistant installed, then you do not need to reinstall or update it. If you do not have it installed, refer to the next section for instructions on how to obtain and install this module.
Azure Active Directory Module for Windows PowerShell If you have determined that you already have this PowerShell module installed, then you do not need to reinstall or update it. If you do not have this module installed, refer to the next section for instructions on how to obtain and install the module.
.NET Framework 4.8 If you have determined that you already have .NET Framework 4.8 (any sub-version) installed, then you do not need to reinstall or update it. If you do not have .NET Framework 4.8 installed, refer to the next section for instructions on how to obtain and install it.
Note
It is not unusual to have multiple versions of .NET Framework installed on a single server. Regardless of any other versions that may be installed on the server, if you do not have version 4.8 installed then you must follow the instructions in the next section to install version 4.8.
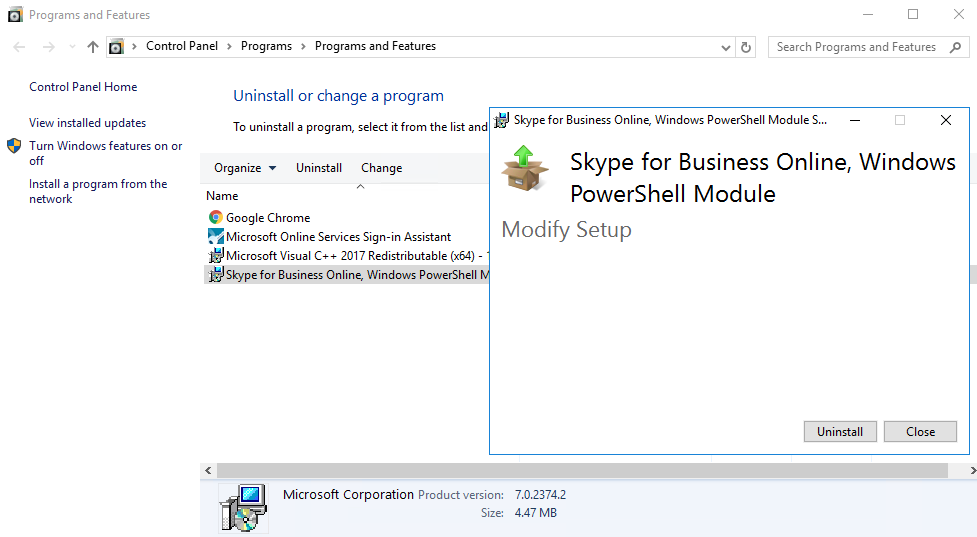
Microsoft Teams PowerShell Module If you have determined that you already have the Microsoft Teams PowerShell module installed, then you do not need to reinstall or update it. If you do not have this module installed, then you probably have the now-deprecated Skype for Business Online PowerShell module instead. You can remove that module by performing the following procedure:
Right-click the Start icon and select Programs and Features.
Look in the list of installed programs for Skype for Business Online, Windows PowerShell Module.
Uninstall the module if it is there, then refer to the next section to install the Microsoft Teams PowerShell Module.
Uninstalling Skype for Business Online PowerShell Module
Installing the Management Software on a New PowerShell Proxy
The following software components must be installed on the PowerShell Proxy server. Install these components in the order listed.
Note
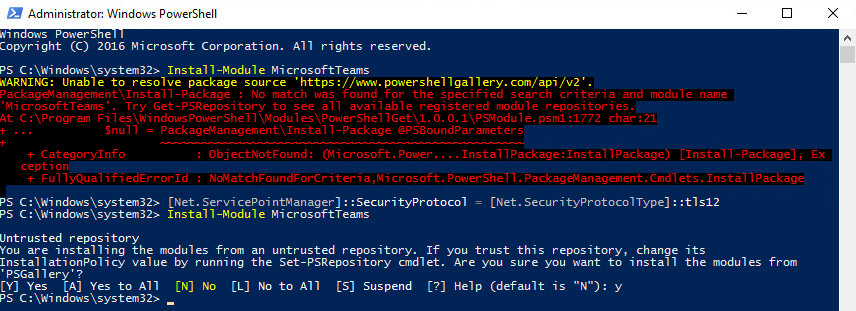
You will use the Install-Module command in the steps below to install the Azure AD and Microsoft Teams PowerShell modules. The Install-Module command downloads the specified PowerShell module from an online repository called the PowerShell Gallery. The PowerShell Gallery has deprecated the use of TLS versions earlier than TLS 1.2, so for Install-Module to work correctly you must force PowerShell to use TLS 1.2. You do this by issuing the command below. The command affects only the current PowerShell session, and its effect persists until the session ends (i.e., you close the PowerShell window).
If you see the “Unable to resolve package source” warning or the “No match was found” error shown below when using Install-Module, the likely cause is this TLS version mismatch.
TLS Version Mismatch Error and Resolution
[Net.ServicePointManager]::SecurityProtocol = [Net.SecurityProtocolType]::tls12
Online Services Sign-in Assistant Download and install
msoidcli_64.msifrom the VOSS customer portal.Azure Active Directory Module for Windows PowerShell From an elevated PowerShell session issue the following command:
Install-Module msonline
.NET Framework 4.8 Browse to https://dotnet.microsoft.com and navigate to .NET Framework 4.8 Runtime or do an Internet search for “.NET Framework 4.8 download”. Download and run the .NET Framework 4.8 Runtime installer. Following installation, a reboot of the server will likely be required.
Important
Be sure to download only from a URL ending in “microsoft.com”. Do not download software from any third-party web site as the authenticity of that software cannot be guaranteed.
Microsoft Teams PowerShell Module From an elevated PowerShell session issue the following command:
Install-Module MicrosoftTeams -RequiredVersion 2.0.0