Administrator User Interface
Note
The Business Administration Portal (BAP) interface menus and functionality is defined as an interface type in VOSS-4-UC, along with the required role based access.
A default interface type is provided, but menus, features and functionality described here may not be available if your administrator has created a Business Admin Portal Custom Interface for you.
Refer to the Core Feature Guide for details.
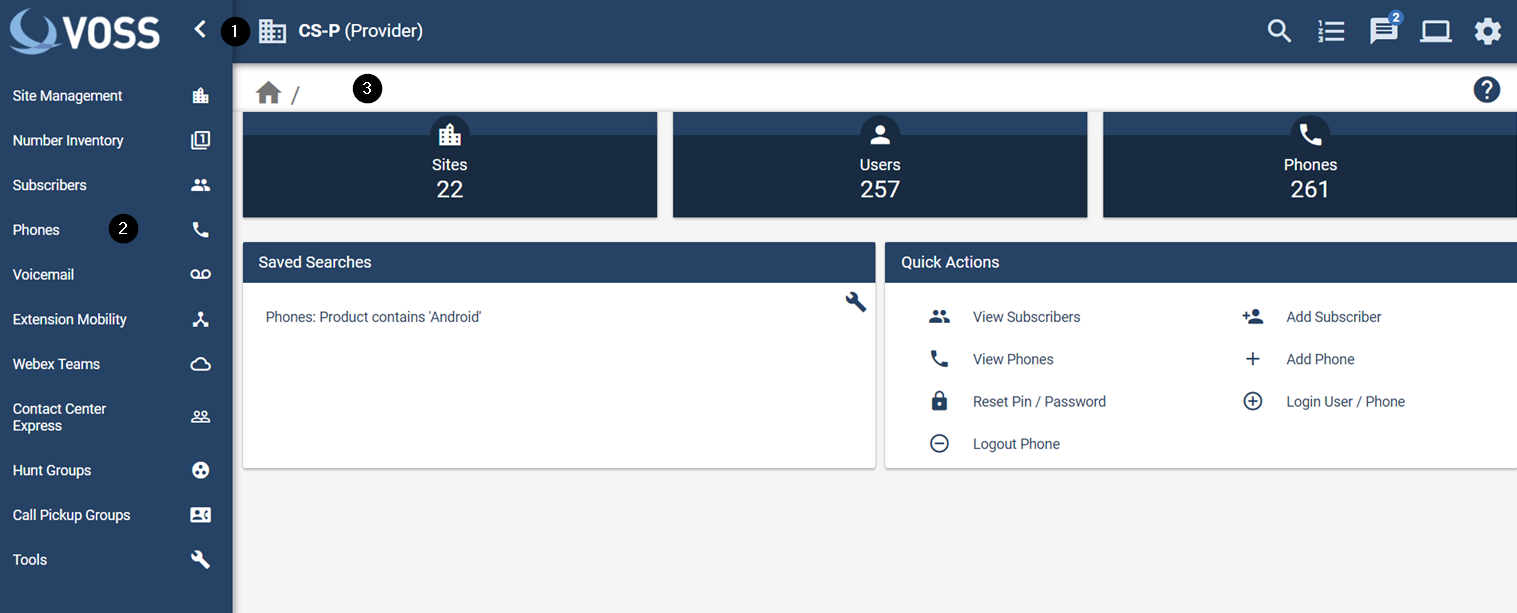
The interface is divided into three main functional areas:
Top Menu Bar containing:
Company Brand and Menu Labels Toggle. Displays your company brand as well as a Toggle switch that either exposes or hides the side menu labels. When set to ‘<’, the labels are always visible, when set to ‘>’, the labels are ‘hidden’.
Organization Selection icon. Opens a pop up that allows you to navigate to a specific level in the organization. See: Organization Navigation. If site level is selected, the associated Customer is displayed next to the Site to provide context.
Search icon. Allows you to search for a specific item in the system. See: Carry Out a Search.
Transaction Log. Link to the Transaction page, which lists the most recent transactions in your system. See: Transactions List View.
Messages. Link to the Messages slide out page, which lists the most recent notification messages and transactions, for example:
“There have been no failed login attempts since your last successful login on August 10, 2020 at 3:00:25 PM Central Standard Time”.
It also provides links to clear the list and to “See all transactions”.
Application Mode. Opens a dialog box, which allows you to select either Administration or Business Administration mode (only if you have access to both modes).
Settings. A drop-down menu showing:
- The logged in User, which links to:
- an Account Settings card showing user details such as Username, Email Address, Last Login, etc.
- a Quick Actions card allowing you to, for example, Change Password or Sign Out
- a Preferences card allowing you to change the default application mode to either Administration or Business Administration (only if you have access to both modes).
- An About menu with release and version details.
- A Sign out option
- The logged in User, which links to:
Side Menu Bar. Provides menus according to your custom interface setting. Selecting a menu directs you to the relevant menu default dashboard.
The Home Page is the first page that is displayed when you access the Business Admin Portal. It provides you with a summary view of your entire system.
Home. Upper bar icon that redirects you to the home page for your organization level from anywhere within the interface.
A navigation path is shown next to this icon that can be used to for example navigate from an instance view to the list of instances - see Organization Level and Controls under List View.
Dashboard Widgets and Help icons.
Counters. Displays the total number of Sites, Users (Subscribers) and Phones at the selected organization level. Each counter also serves as an active hyperlink, which redirects you to the associated menu landing page.
Quick Actions. Provides hyperlinks to common tasks such as, View Subscribers, Add Subscriber, View Phones, Add Phone, Reset Pin/Password, Login User/Phone, and Logout Phone.
Saved Searches. Provides hyperlinks to a user configurable list of previously saved common searches.
MACDs Per Day. Provides a graph indicating the number of move, add and delete transactions performed at the specified organization level over the past week. Note that graphs are only displayed if there is available data.
Notifications are also displayed on the interface:
A session expiry notification will display if the Idle Session Timeout (minutes) value in the credential policy associated with the user role has been reached. The notification has the format:
“Your session will expire in <n> seconds.”
Use the stay Logged In button to remain logged in. For details on the topics of credential policies and session timeouts, refer to the Core Feature Guide.
If a form is submitted with missing required fields, a message “Please check that all fields are filled in:” is shown, followed by the list of missing fields.
Refer to User Interface Controls in Appendix A for a description of the controls and indicators used in the User Interface.