Business Admin Portal Custom Interface
The Business Admin Portal Custom Interface that is associated with a user role can be managed from the Business Admin Portal Profiles menu by adding instances or cloning and modifying existing instances down to a required hierarchy.
Default Business Admin Portal Profiles
Upon installation, the Business Admin Portal Interface Type provides three profile instances:
defaultThis instance is used when creating a role. The name “default” at the user’s hierarchy level or first level upwards is applied.
The default profile has the following properties:
- The Enable Business Admin checkbox is checked.
- No access the Business Admin Portal Menus: site management, tools.
- Only view access to data from other Business Admin Portal Menus, including example model counts and charts.
The system level administrator can clone the instance down the hierarchy and modify it to create custom default instances of the interface type.
Read OnlyThis instance:
- The Enable Business Admin checkbox is checked.
- has the same properties as the
defaultinstance - is applied to all Operator administrator user roles by default
Full AccessThis instance is a profile with full access to all Business Admin Portal Menus menus and features.
Manage Business Admin Portal Profiles
Log in as a system level administrator (above provider level).
Choose Role Management > Business Admin Portal Profiles.
To add a Business Admin Portal Interface Type, click Add. The default custom interface can also be cloned to a required hierarchy and modified.
Enter or select the following settings:
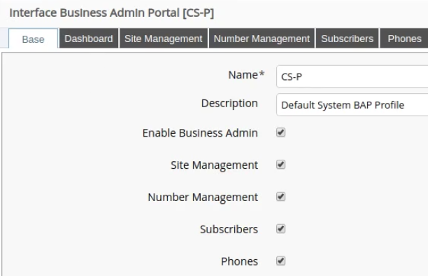
On the Base tab: provide a name and description and select the available menus.
On the Base tab: check / uncheck the Enable Business Admin checkbox to enable or disable the Dashboard tab and feature tabs.
On the Base tab: if custom features are needed to be added to the Quick Actions card for a Feature Area, use the Custom Features list:
- Choose an Icon title. For a list icons corresponding to the titles, see Business Admin Portal Interface Custom Icon Names Reference.
- Enter a title and choose the Feature Area.
- Similar to Menu Layout configuration options, choose a model type and set up any further configuration associated with the model type. Note that the model type needs to be exposed in a user’s Access Profile if the custom interface is associated with a user. Refer to the Custom Feature example image.
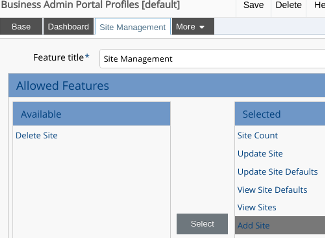
On the Dashboard tab, move features from the Available transfer box to the Selected box to enable them on the menu landing page.
On each feature tab, move features from the Available transfer box to the Selected box to enable them on the feature dashboard.
If no features are selected, the menu item will show, but no features will be available.
On the Miscellaneous tab, functionality and display options can be configured for the Business Admin Portal GUI:
- Display About Information: the Settings > About menu can be shown or hidden.
- Allow Data Export: if enabled or disabled, the Export action is either available or not on list and form pages.
- Transaction Log Actions: for transaction instances and its list view, options are available to enable or disable actions on these; such as Replay and Cancel.
- Transaction Log Display Fields: when viewing a transaction instance, options are available to show or hide selected information on the transaction, such as its logs and sub-transactions.
Click Save to save the named instance.
The created instance can be selected as a Name of the InterfaceBusinessAdminPortal Interface Type by a provider level admin when creating or modifying a user role. See: Role Management and Create a Business Admin Portal Role.
Base tab example:
Custom Feature example:

Feature Transfer boxes example: